Download PDF
Download page Setting Up Backup or Delegate Approvers.
Setting Up Backup or Delegate Approvers
Backup or delegate approvers enable you to delegate approval request tasks and ensure that approval processes are not delayed waiting for someone to make a decision. You can add up to three delegate approvers for a single user. You can also add a custom link to the user layout so you can assign a backup or delegate approver for a user from the page layout itself.
Flow rules must be added to the system for the feature to work as expected, with selected backup or delegate approvers receiving delegated approval requests.
To create a Set in Effect on Effective Date rule
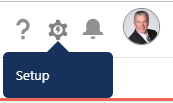
- Click the gray gear icon in the top right corner to enter Setup.
- In the left navigation bar, go to Platform Tools, open Process Automation, and click Flows.
- Click the New Flow button, which raises the New Flow panel.
- Select Record-Triggered Flow and click Create to raise the Configure Start screen.
- From the Configure Start screen:
- In the Object fields, enter
backto select Backup/Delegate Approver (Apttus_Approval__Backup_Approver__c) from the pull-down menu. - In the Configure Trigger section, for "Trigger the Flow When:" select the A record is created or updated radio button.
- In the Set Entry Conditions section, select All Conditions are Met (AND) for the Condition Requirements.
Use the + Add Condition button to add and enter the following rule criteria:
Field
Operator
Value
Effective Date (Apttus_Approval__Effective_Date__c)
Is Null
False
Is Active (Apttus_Approval__IsActive__c)
Equals
True
Is Delegate (Apttus_Approval__IsDelegate__c)
Equals
False
- Click the radio button to set the "When to Run the Flow for Updated Records" value to Only when a record is updated to meet the condition requirements.
- From "Optimize the Flow for:" select Actions and Related Records.
- In the Object fields, enter
- Click Save. The "Save the flow" screen requests that you label the flow. The name you enter in the Flow Label field auto-populates the Flow API Name field with an acceptable API name (spaces and special characters are replaced with underscores). You can enter another API name, but you must use appropriate characters. You may also enter a brief description of the flow you are saving.
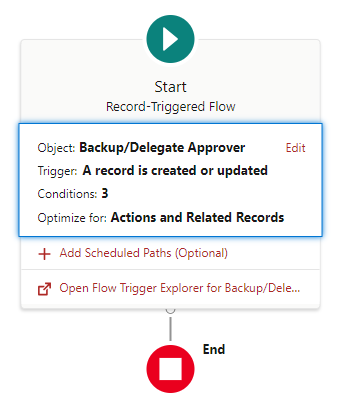
- On success, your screen will look like:
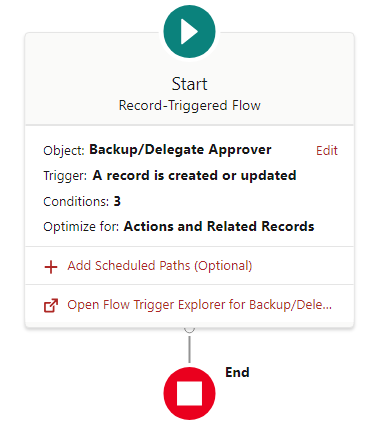
If you don't see the flow details, click the Start icon.
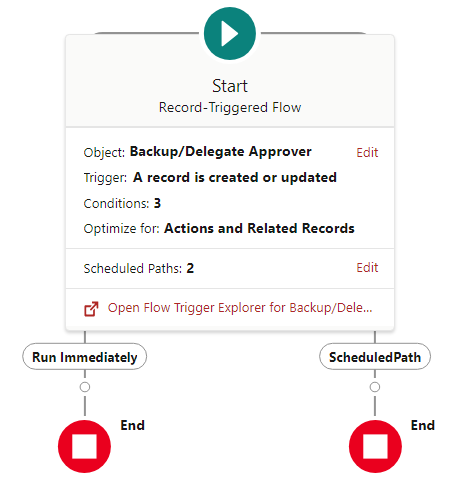
With the Backup/Delegate flow thus established, you must add and configure scheduled path details.
To add and configure scheduled path details
- Click Add Scheduled Path (Optional), raising the Scheduled Paths window.
In the scheduled path details section, enter these values:
In Path Label, enter
ScheduledPath. The API Name field auto-populates with the ScheduledPath name.In Time Source, select Apttus_Approval__Backup_Approver__c: Effective Date from the pull-down menu.
In Offset Number, enter the unit: in the present example, this is
2; however, you can also enter0for the scheduled path to activate on the same day as the event.In Offset Options, select Days After.
- Click the Save button. The successful exit state looks like:
To add update records to update Salesforce records
You can now add an element to the flow.
- On the right (ScheduledPath) fork of the Flow map, hover over the disk under ScheduledPath until it changes into a plus sign.
- Click the plus-sign button to raise the Add Element pop-up.
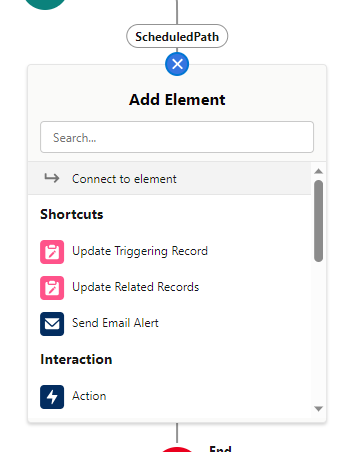
- Scroll down and select Update Records, raising the New Update Records window.
- In the New Update Records window:
- Enter a label in the Label field. The API Name field auto-populates with a snake-case representation of the label. This field names the element's GUI icon.
- Enter a descriptor in the Description field. This field defines the hover text for the element's GUI representation.
- In the "How to Find Records to Update and Set Their Values" section, select the Use the backup/delegate approver record that triggered the flow radio button.
- In the "Set Filter Conditions" section, select None—Always Update Record.
In the "Set Field Values for the Approval Request Record" section, use the + Add Field button to add entries, then select and enter the following values:
Field
Value
Cancellation Date
(Apttus_Approval__Cancellation_Date__c)Blank
Effective Date
(Apttus_Approval__Effective_Date__c)Blank
In Effect
(Apttus_Approval__InEffect__c)True
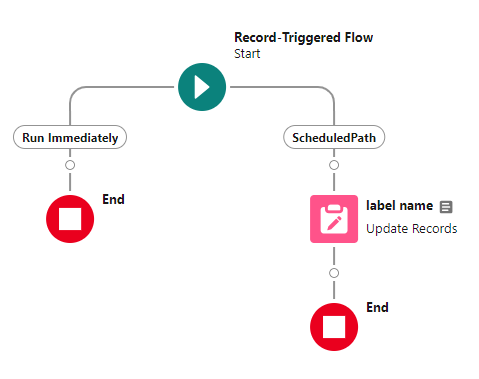
- Click Done. A successful exit state resembles:
- Click the Save button.
To create Cancel Backup/Delegate User on Expiration Date
- From the Setup Home screen, click Create and select Flow from the pull-down menu to raise the New Flow screen.
- From the New Flow screen, select Record-Triggered Flow and click Create to raise the Configure Start screen.
- In the Configure Start screen:
- For Select Object: Select Apttus_Approval__Backup_Approver__c
- For Configure Trigger: For Trigger the Flow When:, select the A record is created or updated radio button.
For Set Entry Conditions: Select All Conditions are Met (AND) for the Condition Requirements field, and enter the following rule criteria:
Field
Operator
Value
Apttus_Approval__Expiration_Date__c
Is Null
False
Apttus_Approval__InEffect__c
Equals
True
Apttus_Approval__IsDelegate__c
Equals
False
- In the When to Run the Flow for Updated Records field, select the Only when a record is updated to meet the condition requirements radio button.
- In Optimize the Flow for: select Actions and Related Records.
- Click Done. A successful exit from the Create step looks like:
- Click Add Scheduled Paths (Optional) to raise the Configure Scheduled Paths window.
- Enter the following values in the Configure Scheduled Paths window:
- Path Label: ScheduledPath. The API Name field is automatically populated.
- Time Source: Select Apttus_Approval__Backup_Approver__c: Expiration Date.
- Offset Number: Enter
0(numeral zero) - Offset Options. Hours after
- Click Done, raising the following view on success:

- Click the navigation bar button at top left (
 ) to raise the nav bar.
 - Click the New Resource button in the left nav bar.
- Select the Formula Resource Type.
- In the API Name field, enter
Set_Cancellation_Date_to_NOW. - In the Data Type field, select Date/Time.
- In the "Insert a function..." field, select NOW().
- You can click Check Syntax to validate your entries.
- Click Done. Set_Cancellation_Date_to_NOW appears in the left navbar.
- Hover your mouse over the ring immediately below Scheduled Path:

Click the plus-sign icon, raising the Add Elemnent drop-down menu. - Select Update Records to raise the New Update Records window.
- Label the update record.
- Set the "How to Find Records to Update and Set Their Values" field to Use the backup/delegate approver record that triggered the flow.
- For the Set Filter Conditions field, set the condition requirements to update the record to: None—Always Update Record.
In the Set Field Values for the Backup/Delegate Approver Record section, set the following values:
Field
Value
Apttus_Approval__Cancellation_Date__c
{!Set_Cancellation_Date_to_NOW}
Apttus_Approval__Effective_Date__c
Blank
Apttus_Approval__Expiration_Date__c
Blank
Apttus_Approval__InEffect__c
False
Apttus_Approval__IsActive__c
False
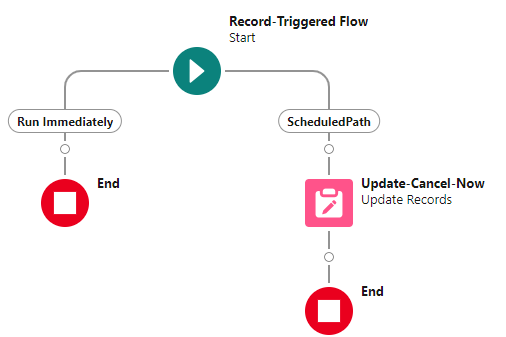
- Click Done. On success, the flow will resemble:
Associating a Backup Approver or Delegate Approver to a User
There are two ways you would want to associate a backup or delegate approver to a user.
Backup approvers can be set via the Backup/Delegate Approver tab or from a User profile. Once past the initial entry point, the process of associating a backup or delegate approver to a user is the same.
Once you have set the backup or delegate approver for a user, you must always click Deactivate before you begin making changes and must click Activate again for the saved modifications to take effect.
If a single user is the backup approver for multiple users and you have set it up to simultaneously reassign approvals to those original users, the system may not be able to complete that action.
To add the backup and delegate approver custom link for a User
- Click Edit for User Layout.
- Create a new Section.
- From the Custom Links list, drag and drop Set Backup/Delegate Approver to the Custom Links section of the page.
- Click Save.
To add multiple delegate approvers for a User
Build > Customize > Backup/Delegate Approver > Page Layouts
Click Edit Layout.
From the Visualforce Pages list, drag and drop Delegate Approver to the new section of the page.
Click Save.
The Set Delegate approver VF page is now available in the Custom section.
You can now select a user you want to delegate approval requests for and complete the Associate backup approver to a user task.
Before associating a backup or delegate approver, remove the Backup/Delegate User field from the Backup Approver layout.
To associate a backup approver
- Select the Backup/Delegate Approvers tab or click and select Backup/Delegate Approvers. If the custom link has been added, you can also complete this task from Administration Setup > Manage Users > Users. Select the user that you will assign a backup approver to, go to the Custom Links section, and click Set Backup Approver or Set Delegate Approver and go to step 4.
- Click New to raise the Backup Approver Edit page. By default, Transfer in-flight and Is Active are selected, while In Effect is cleared.
- If you are setting a backup user, clear the Is Delegate checkbox.
- Click the lookup icon for Current User to select the user you will assign a backup approver to.
- Click the lookup icon for Backup User to select a user for the backup approver.
- Select Transfer in-flight for approval processes already underway to be transferred to the backup approver; otherwise, clear the option and only new approval processes can be routed to the backup approver. When you select the Transfer in-flight checkbox for a backup approver, the approval request is available only to the backup user.
- Enter the Effective Date and Expiration Date for the period that the current user's approvals will be transferred to the backup approver. Cancellation Date has no effect and is only used to flag when someone manually ended the effective period before the expiration date. Do not specify an effective date and expiration date for a delegate approver.
- Click Save.
The user's page is displayed and approval requests will now be delegated to the backup approver when the effective date is reached. The Activate action occurs automatically on that date. When the expiration date is reached, the Deactivate action occurs automatically.
You can create multiple entries for backup/delegate records. Only one record is active at a time. You can create multiple entries for backup/delegate records for different date ranges, as long as the date ranges do not overlap. All approval requests are routed to the designated backups or delegates during the activated period(s).
Use Case 1: Multiple entries for Backup/Delegate record for different date ranges
| Record | Primary User | Backup Approver | Effective Date | Expiration Date | Is Active |
|---|---|---|---|---|---|
| 1 | Sam | Jack | 09/01/2019 | 09/30/2019 | True |
| 2 | Sam | Bob | 11/01/2019 | 11/30/2019 | True |
Neither record is activated and both are future-dated. If you activate the second record now (i.e., current date) the following message dialog appears:
Primary user Sam already has a Backup/Delegate that is scheduled. This will activate the new record immediately as well as any ones currently scheduled. Are you sure you want to continue?
Click Yes to activate the second record (Sam as the primary user and Bob as the Backup Approver) immediately. The Effective Date is set to the current date with no expiration date. On 09/01/2019, the second record is deactivated and the first record (Sam as the primary user and Jack as the Backup Approver) is activated. On 11/01/2019, the second record (Sam as the primary user and Bob as the Backup Approver) is activated and the first record is deactivated. On 11/30/2019, the second record is also deactivated.
Use Case 2: Multiple entries for Backup/Delegate record
Sam is a primary user and Jack is a backup approver. This record is activated. Now, when you create and activate a new record where Sam is the primary user and Bob is the backup approver, the following message appears:
Primary user Sam already has a Backup/Delegate that is in effect. This will deactivate the existing record and set the new one in effect. Are you sure you want to continue?
Click Yes to activate the new record (Sam as the primary user and Bob as the backup approver). The previous record (Sam as the primary user and Jack as the backup approver) is deactivated at the same time.
To Create Delegate Approvers
- Select the Backup/ Delegate Approvers tab or click and select Backup/Delegate Approvers. If the custom link has been added, you can also complete this task from Administration Setup > Manage Users > Users. Select the user you will assign a delegate approver to, go to the Custom Links section, click Set Delegate Approver and go to step 4.
- Click New to display the Backup/Delegate Approver Edit page. By default, Transfer in-flight and Is Active are selected, while In Effect is cleared.
- To set a delegate user, select the Is Delegate checkbox, which raises the Suppress Delegate Notification checkbox. Selecting this checkbox enables you to restrict notifications to the delegate user for every approval request assigned to the primary approver.
- Click the lookup icon for the current user to select the user to assign a backup approver.
- Click the lookup icon for Delegate Approver 1, Delegate Approver 2, Delegate Approver 3 to select the user to act as a delegated approver. Approval requests are routed to the primary approver as well as all the delegate approvers. Delegate approvers can perform the same actions as the primary user.
- Select Transfer in-flight for approval processes already underway to be transferred to the delegate approver; otherwise clear the option so that only new approval processes are routed to the approver. The Transfer in-flight checkbox is always selected for a delegate approver, making the approval request available to both the primary user and the delegate approver.
- Enter the effective date and the expiration date for the period that the current user's approvals will be transferred to the backup approver. Cancellation Date has no effect and is only used to flag when someone manually ended the effective period before the expiration date. Do not specify an effective date and an expiration date for a delegate approver.
- Click Save.
- Click Edit Layout and remove the Backup/Delegate user field.
When required, you can return to the User Detail page to edit or deactivate the backup or delegate approver. If you want to edit the backup or delegate approver, you must deactivate the backup or delegate approver first, make your changes, and then activate it again. This is required because the Backup or Delegate Action (Activate/Deactivate) initiates workflows and logic required for the Current User/Backup User relationship.
We recommend that you do not select the In-Active, In-Effect, Is Delegate, or Suppress Notification checkboxes from the All Records view.
Backup Approver Search Page Configuration
The Backup Approver Search page provided as part of the Approvals package is a custom Visualforce page that must be linked to selecting a backup user. This enhancement directs you to the correct backup approver page from the user detail record, as well as when you create new backup approvers or edit existing backup approvers from the Backup Approvals tab.
Clicking the Backup User link (![]() ) in the Backup Approver Details page raises a Backup User Search page.
) in the Backup Approver Details page raises a Backup User Search page.
To configure backup approver search pages
Select the Backup Approvers tab or click All tabs and select Backup/Delegate Approvers.
Note
If the backup approvers custom link has been added, you can also complete this task from Administration Setup > Manage Users > Users and select the user you want to assign a backup approver to.
- Click New to display the Backup Approver Edit page or click Edit for an existing backup approver to display the same page.
- Make sure the Current User field is populated and click the Backup User link (
 ) .
) .
A new Backup User Search page is displayed from where you can search by name and then select a valid backup user. Previously, a Lookup pop-up window would be displayed.
To configure actions for Backup Approver Search page
Build > Create > Objects > Backup Approver
- Go to Standard Buttons and Links and click Edit beside New.
- Select Visualforce Page and then BackupApprover [Apttus_Approval__BackupApprover].
- Click Save.
- Repeat Steps 1 to 3 for the Edit action.
The Backup User link (![]() ) now takes you to the custom Visualforce page (Backup User Search). For existing records, remove the Backup/Delegate User field from the Backup Approver layout.
) now takes you to the custom Visualforce page (Backup User Search). For existing records, remove the Backup/Delegate User field from the Backup Approver layout.