Download PDF
Download page Creating Steps from the Wizard Designer.
Creating Steps from the Wizard Designer
Steps are used to designate the actions that occur when end-users use the Wizard. Steps use common elements, like actions and rules, to define the flow of your Wizard. Each step represents a screen in the wizard runtime.
If the step you want to use in a Wizard design does not exist in the Steps Library, you can create one and use it with your Wizard from the Wizard Designer. Steps created in this way can be saved for use in the current Wizard design only.
To create a new Step from a Wizard design
- From the Wizard Designer, click on New Step. (Note: Your Wizard design must have a Design name before you can create a new step.)
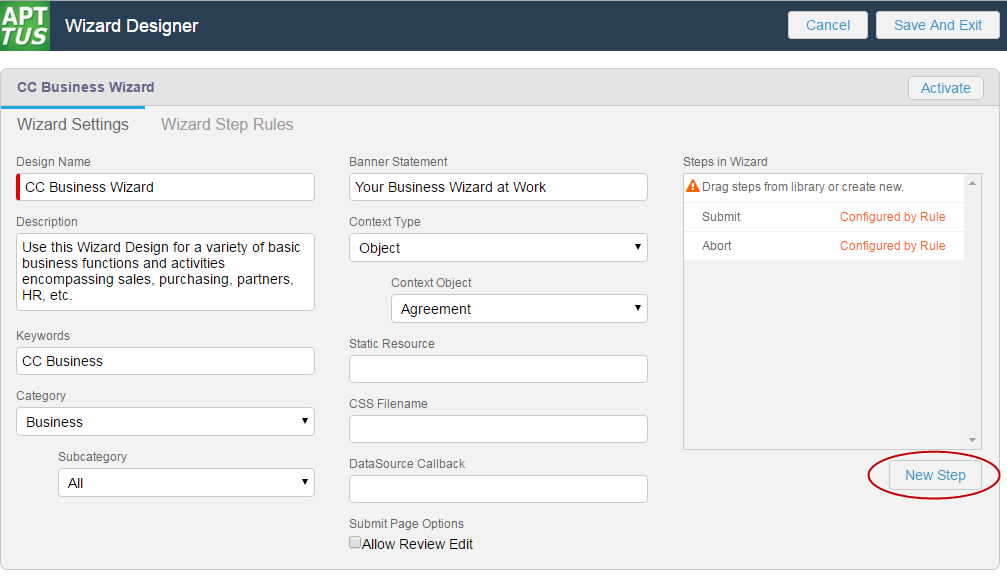
The Step Settings form is displayed.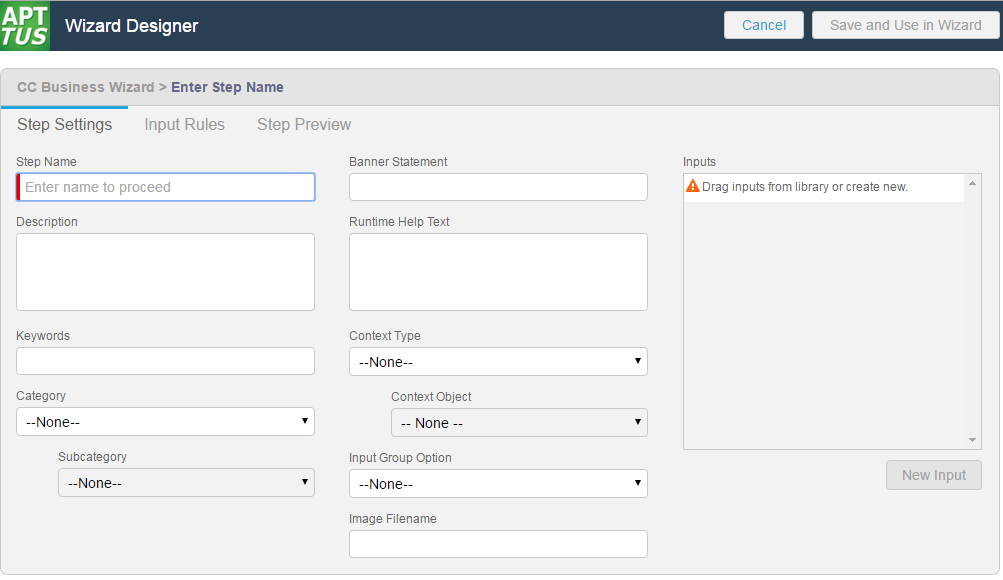
Enter the following properties into the form:
Step Setting Description Step Name Enter a name for your Step. This name can be internal but is used in the runtime banner when the user is interacting with the Wizard if Banner Statement (below) is not defined. Note: You cannot add any inputs to your step until you choose a Step Name Banner Statement Enter a Banner Statement to display at Wizard runtime when the user is interacting with the Wizard. If left blank, the Step Name will be used instead. Description Enter a description for your step which describes its intended use (for example, "Define business details in this step.") Keywords Enter a list of keywords which can be used to search for this step. Category Choose an option from a drop-down list of pre-defined Step Categories (define picklist values on the Wizard Step object). Sub Category Choose an option from a drop-down list of pre-defined Step Sub Categories (define picklist values on the Wizard Step object). Runtime Help Text Enter text to display when the user clicks the help icon at the top of the Step page. Context Type Define whether your Step will apply to All objects or a specific Object. Context Object Choose the specific context Object for your Step. This option is only available if you specified "Object" for Context Type. (e.g., "Agreement") Input Group Option Select an option from the drop-down list to choose how Inputs will be displayed in the Step (as groups):
None – Select this option to display all Inputs for the step in the sequence listed in the Inputs pane.
Repeatable – Select this option to allow the end-user to add multiple records for selected Inputs in list format. User can click the Add Item button to add additional values for the same group of Inputs (e.g., multiple Addresses).
Table Layout – Select this option to allow the end-user to add multiple records for selected inputs in tabular format. User can click the Add Item button to add additional values for the same group of Inputs (e.g. Agreement Line Item Products, Quantity, List Price, etc.)
Two Column Layout – Select this option to display selected inputs to the end-user in two columns.

The Two Column Layout is only available in the Salesforce Lightning mode. You need to configure the Two Column Layout option. For more information, see Configuring Two Column Layout.
Image Filename Filename of the image located in the Static Resource (defined in Wizard Settings) to display in this step to the right of the input controls. For information on setting up the Static Resource, refer to Configuring Wizard Settings.
Note: You can only add images to steps created within a specific Wizard design. You cannot add images to steps created from the Component Library.
Drag-and-drop an Input from the Inputs Library to the Inputs pane. If you do not see your Input listed, use the type-ahead feature in the Search box to locate the Input you want to use.
You cannot add inputs to a step unless the Step Name has been entered.You can take the following actions on Inputs you have added:
Add more inputs from the Inputs Library in the sequence you want them to appear in the step.- Hover over an Input in the list and click Edit to edit the input settings for this step only.
- Hover over an Input in the list and click Delete to remove an Input from the step.
Click and drag Inputs in the Inputs pane to reorder them.
- If you do not find the correct input in the library and need to create a new one to use in your step, see Creating Inputs from the Wizard Designer.
- To create rules which govern inputs for the current step, click on Input Rules (see Configuring Step Input Rules from the Wizard Designer).
- Click Save And Use in Wizard to save your changes or click Cancel to discard changes and return to the Wizard Design form.