Download PDF
Download page Approval Rules.
Approval Rules
Approval rules encapsulate logical, causal decision points to develop your approval flows. Rather than the one-step, one-reviewer rule for standard flow steps, approval rules enable you to adopt decision points requiring multi-party decisions, which you can define as Unanimous, Majority, Percent, and Quorum. Rules are also reusable: Once you have configured a rule, you can adopt it in other approval flows.
Rules apply a logical condition to a business object, then drive an action when that condition is satisfied. These correspond to rules (the base conditional criteria for applying the rule), and "rule entries" (the actions that occur when the rule is triggered).
Access approval rules by clicking the Approvals icon (![]() ) and then clicking the Approval Rules tab in the left navigation panel.
) and then clicking the Approval Rules tab in the left navigation panel.
Reapproval Logic
Use reapproval logic to streamline reapprovals. For example, a contract for more than $100,000 but less than $1 million may require the CEO for initial approval but may only require a director to reapprove. Likewise, a contract may require an attorney to approve on submission, but not for a renewal under its own terms. In such circumstances, the CEO or the attorney can be assumed to have approved without requiring their explicit reapproval. The Approvals administrative user can configure reapproval flows to eliminate such unnecessary reapprovals.
Reapproval behaves comparably to auto-approval but must meet special criteria, which can affect the whole entry rather than a specific assignee. For example:
- Entry 1
- Assignee 1
- Assignee 2
- Entry 2
- Assignee 3
- Assignee 4
If reapproval criteria are not met, all assignee approval flags are set to false, with each assignee and entry dependent on the approval before it.
On submittal, this presents a simple linear flow. Assignee 1 is tasked with the first approval, followed by Assignee 2, and so forth:
- Entry 1
- Assignee 1 (assigned)
- Assignee 2 (not submitted)
- Entry 2
- Assignee 3 (not submitted)
- Assignee 4 (not submitted)
If Entry 1 meets reapproval conditions, the submission looks like:
- Entry 1
- Assignee 1 (approved)
- Assignee 2 (approved)
- Entry 2
- Assignee 3 (assigned)
- Assignee 4 (not submitted)
To create a new rule
Rules apply a logical condition to a business object (test), then drive approval actions when that condition is satisfied. These correspond to two sections in the rule setup titled "WHEN to Apply" and "Rule Entries" or "Then the following users will approve" in the rule entry itself.
- Click the Create New button at top right to raise the New Approval Rule window.
- Enter a name for the rule in the Rule Name field.
- Select a business object type (Opportunity, Contract, Proposal, Product Configuration, Line Item, Contract Clause, or Contract Line Item) from the Business Object pull-down menu.
- Select a rule type from the Rule Type pull-down menu. Options are Condition (a logical state) or Dimension (a critical value).
- Select an order for the rule's occurrence by picking an integer from the stepper in the Sequence field.
- Pick an approval policy from the Approval Policy drop-down. Available policies are:
- Unanimous: All reviewers must approve. One dissent is a veto.
- Majority: More than half of the reviewers must approve. It is best to establish an odd number of reviewers to prevent tie votes. For an even number of reviewers, tie votes result in rejection.
- Percent: A specific percentage of approvers is necessary to approve. If you select a percent that must approve, use the Approval Percent stepper to select the required approval percentage.
- Quorum: A specific number of approvers is necessary to approve. If you select a quorum that must approve, use the Approval Count stepper to select the required number of approvers.
- Click Create.
- Add rule criteria in the Rule Criteria section. Select a field name from the Field Name pull-down, assign it a logical operator from the Operator pull-down, and provide an appropriate value to create a testable rule. For example, you can pull down the Total Contract Value field type, assign a "greater than or equal to" logical operator, and a numeric value to qualify a rule.
- Click the plus icon (+) to create additional rule criteria. You must add Boolean logic between multiple rules. For example, "Contract value is greater than or equal to 1000000 dollars AND Location is Chicago." XOR, NAND, XNOR and NOR operations are not supported: use the rule criteria logic to support these logical operations (for example, for a NOR relation: Contract value is less than 1000000 dollars AND Location is not Chicago).
- Click Save. You are returned to the Approval Rules screen. You must create rule entries before you can activate the new rule.
To edit an existing rule
- Find the rule name in the Approval Rules table.
- Click the rule name or select the adjacent More icon (
 ) and then select Edit from the resulting pull-down menu.
 - Click the Details tab if necessary and modify the approval rule values as described in To create a new rule.
To create or edit rule entries
For each rule, you must add rule entries defining the conditions under which the rule shall be enforced.
- From the Approval Rules window, click the rule name link in the Rule Name column to access the rule details.
- Open the Rule entries tab. This raises an active diagram interface showing the order of steps.
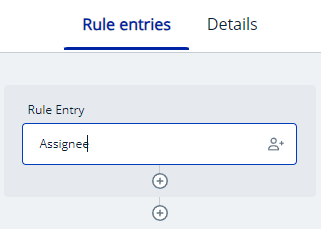
For each rule entry, you can edit the entry itself (by clicking in the main box), add a sub-step (i.e., an added test) within the rule entry by clicking the upper plus-sign icon, or add a new rule entry by clicking the lower plus-sign icon. Each choice provides the same Rule Entry panel options. - Clicking in the Rule Entry box opens the Rule Entry panel at right:
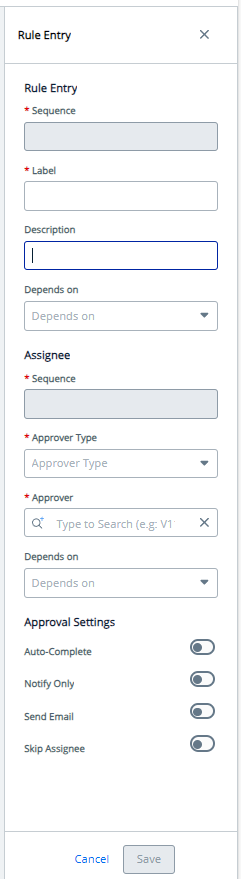
- Label and describe the rule entry in the fields provided. For a first rule entry, sequence and dependency information will not be available, but as you add entries, you will have to choose the order in which rules are run (Sequence) and, if necessary, the rules that must have been run to implement the current rule (Dependencies).
- Select an assignee for the rule. As with the entry itself, the "Sequence" and "Depends on" fields are blank for the first rule entry. Select an approver type (User, Custom User, Related User, or Queue that must approve), and the appropriate approver or object (this could be a particular user, a custom or related user, or a queue).The available options for this sequence field are constrained to actions within the same step.
- Set Approval Settings toggles (Auto-Complete, Notify Only, Send Email, Skip Assignee) as required.
- Select one of Add Condition, Auto Reapproval, Reminder Setup, Escalation Setup, or Delete.
- Add Condition: Use this to add conditional logic to apply the rule. You can define the logical relationship of a field to a value. Use additional logical operators to define these conditions in relationship to each other.
- Auto Reapproval: Use this to add conditional logic to reapprove the step that uses this rule. Use additional logical operators to define these reapproval conditions in relationship to each other.
- Reminder Setup: Use this to define the frequency with which reminders are issued. Select Days or Hours from Duration and a number from Frequency.
- Escalation Setup: Use this to establish the rule for escalation. Select the number of days or hours the rule requires for completion, the assignee type, and the assignee if possible, and then toggle Auto Escalation on.
- Delete: Click this to delete the rule. You will be prompted to confirm the deletion.
- When you have modified the rule conditions as desired, click Save to preserve your changes.
To add a related user to a rule entry
Adding related users enables you to configure flows to send items for approval to users or properties identified dynamically, rather than by preconfiguration.
- Follow the steps in To create or edit rule entries to open the Rule entries tab.
- Click a rule entry or one of the plus-sign icons to edit a step, add to an existing step, or add a new step.
- Label, sequence, and describe the rule entry step as needed.
- Select Related User in the Approver Type field. This raises the Add Approver hyperlink below the Approver field.
- Click the Add Approver hypertext to raise an attribute selector. This selector reflects the business object type (Opportunity, Contract, Proposal, Product Configuration, Line Item, Contract Clause, Contract Line Item) chosen in the Approval Rules window for this approval rule.
- Select the parameters that result in the related-user identity you want the rule to identify. For example, to select an account owner by ID to approve a contract type, select Account, Owner, and Id:
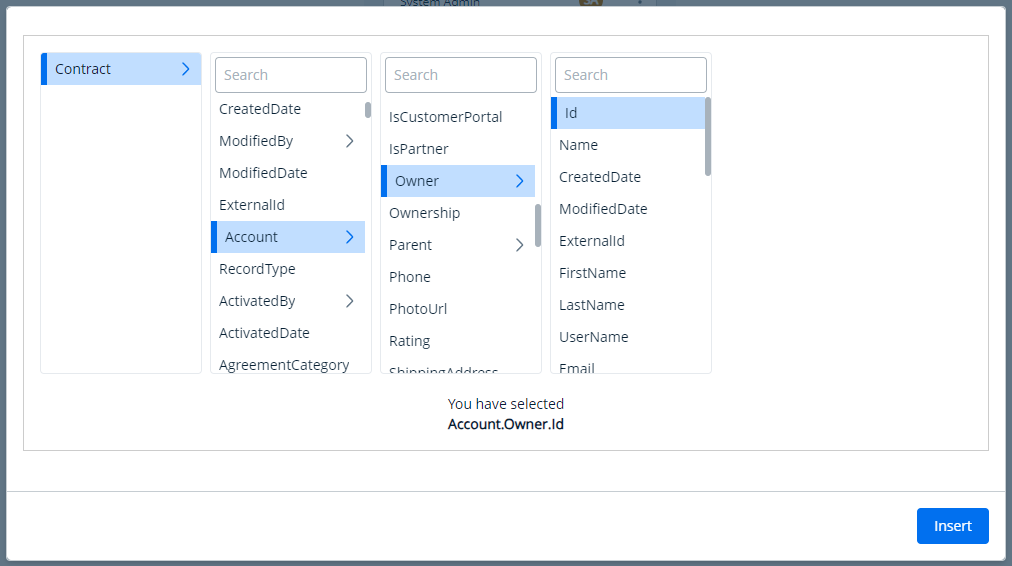
This selection is reflected in the bottom legend: "You have selected Account.Owner.Id". - Click Insert. The string entry is added as a related user.
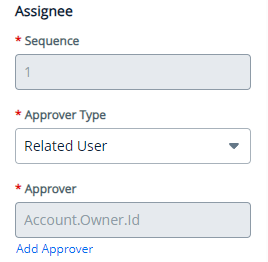
This string is added to requests to the CLM backend to identify documents' account owners dynamically and to route them for approval without laborious fixed definitions. - Complete the rule entry definition as described in To create or edit rule entries.
To delete a rule
- Find the rule in the Approval Rules table.
- Select the adjacent pull-down menu and pick Delete.
- A confirmation popup appears. Click Delete to confirm.