Download PDF
Download page Auto-Escalating Approval Requests.
Auto-Escalating Approval Requests
When an approval request is not approved, rejected, or reassigned within the allotted time, it can be automatically reassigned to a new approver so the approval process can continue.
Auto-escalation is enabled for sub-process approval rules only. Do not set up auto-escalation on child process approval rules. For example, if an approval rule set up on a child record object (such as a line item or an agreement line item) is used as a child process, then entries in that approval rule are not auto-escalated.
Once an approval request is created, the system uses the expected time-to-complete value (days and hours) to determine when to auto-escalate the approval request. A background service periodically checks the status of approval requests and when one is flagged for exceeding that time, it triggers auto-escalation. Auto-escalation is triggered at the approval step level. If you do not want to wait for auto-escalation, you can manually escalate approval requests from the approvals related list for the object under approval. Auto-escalations can take one of two paths, single-step or multi-step, depending on the auto-escalation assignee type.
| Single-step | After an approval is auto-escalated to the next user, if that user does not act on the approval in the designated time, the approval request is auto-escalated to the backup admin user. For example, if the auto-escalation assignee type is Role, and you have a "territory manager" role with three users assigned to it, the auto-escalation is assigned to the first active user assigned to that role. If that user does not decide on the request in time, the request is sent to the backup admin user. Single-step assignee types are: backup admin user, queue, related user, role, rule, and user. When the assignee type is queue or backup admin user, there is no delegate user. Note If you select rule as an assignee type, the approval request is sent only to the first user that satisfies the filter criteria in the approval rule. If you have multiple approvers in a sequence, only the first approver is selected and assigned. |
| Multi-step | An auto-escalated request can move among multiple users for that assignee type before being sent to the backup admin user. For example, if the auto-escalation assignee type is "user delegated approver", the initial auto-escalation sends the approval request to that user's delegated approver, configured in their user account. If the request is not decided in time, the request is auto-escalated to the delegated approver of the user who received the auto-escalated request. This continues until that assignee type is exhausted, then it is sent to the backup admin user. Multi-step assignee types are: user approval matrix next approver, user delegated approver, and user manager. |
Configuring Auto-Escalation
You must configure the following for this feature.
| Flow rules | Flow rules supersede the deprecated Workflow Rules. These rules contain time triggers that cannot be included in a managed package and must be manually configured to provide this feature's time-based framework. |
| Auto-escalation reminders | Reminder emails can be sent to approvers to let them know that approval requests not approved, rejected, or reassigned will be automatically escalated. |
| Approvals system property | The Enable Approval Request Auto-Escalation flag indicates to the system to use auto-escalation per the configured settings. |
| User approver settings | Configure these settings to auto-escalate to the user-delegated approver or user-manager assignee types. |
| Email templates | These templates are used to generate the email notifications that are sent to the auto-escalation approvers. The system comes with escalation templates for opportunities, and term exceptions. For other objects that use approvals you must create custom templates. Attention You must create custom email templates to use attachments with your emails. Default templates do not support attachments. |
| Global escalation options | These options must be configured so that if no escalation options are configured for an approval process step, the escalation process can fall back to determine when escalation begins, involving whom. |
By completing this configuration, you can use auto-escalations and they will work according to the configuration; however, you will be able to override some of the options later when creating approval processes.
Setting Up Auto-Escalation Flows
To set up the auto-escalation flow:
- Click the gray gear icon in the top right corner to enter Setup.
- In the left navigation bar, go to Platform Tools, open Process Automation, and click Flows.
- Click the New Flow button, which raises the New Flow panel.
- Select Record-Triggered Flow and click Create to raise the Configure Start screen.
- Select the Approval Request object.
- From the Configure Trigger screen, select A record is created or updated.
- Set entry conditions:
- In Condition Requirements, select Custom Condition Logic is Met.
- In Condition Logic, enter:
1 AND 2 AND 3 AND 4 AND 5 AND 6 AND (7 OR 8). Add and enter the following rule criteria:
S.No.
Field
Operator
Value
1
Active (Apttus_Approval__Active__c)
Equals
True ($GlobalConstant.True)
2
Auto Escalate (Apttus_Approval__AutoEscalate__c)
Equals
True
3
Can Escalate (Apttus_Approval__CanEscalate__c)
Equals
True
4
In Escalation (Apttus_Approval__InEscalation__c)
Does Not Equal
True
5
Escalated To Highest Level (Apttus_Approval__EscalatedToHighestLevel__c)
Equals
False
6
Date Escalated (Apttus_Approval__DateEscalated__c)
Is Null
False
($GlobalConstant.False)7
Approval Status (Apttus_Approval__Approval_Status__c)
Equals
Reassigned
(text)8
Approval Status (Apttus_Approval__Approval_Status__c)
Equals
Assigned
- In the "When to Run the Flow for Updated Records" section, select the Only when a record is updated to meet the condition requirements radio button.
- In the "Optimize the Flow for" section, select Actions and Related Records.
- Click Done. The successful exit state looks like:
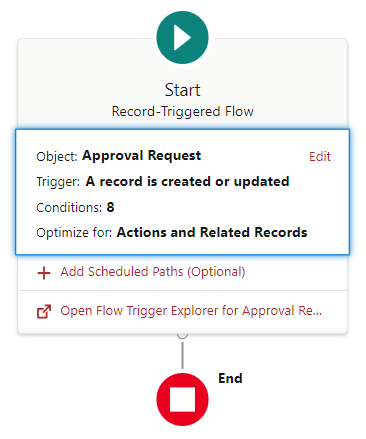
With the auto-escalation flow thus established, you must add and configure scheduled path details. Add a scheduled path to the flow map as follows:
- Click the Add Scheduled Path (Optional) button, raising the Configure Scheduled Paths window.
In the scheduled path details section, enter these values:
In Path Label, enter
Time Trigger. The API Name field auto-populates with the Time_Trigger name.In Time Source, select Apttus_Approval__Approval_Request__c: Date Escalated from the pull-down menu.
In Offset Number, enter
0(numeral zero).In Offset Options, select Minutes After.
- Do not expand the Advanced entry. Click Done. The successful exit state looks like:
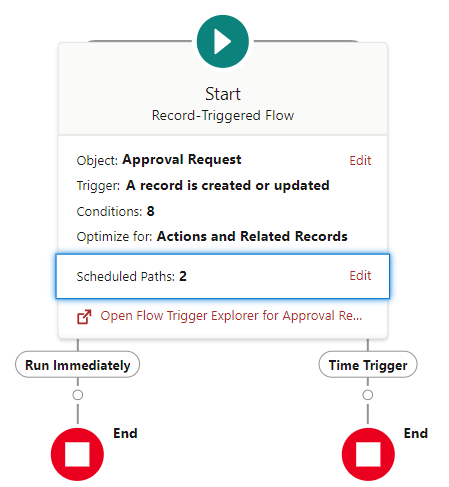
You can now add an element to the time-trigger flow.
- On the right (Time Trigger) fork of the Flow map, hover over the disk under Time Trigger until it changes into a plus sign:
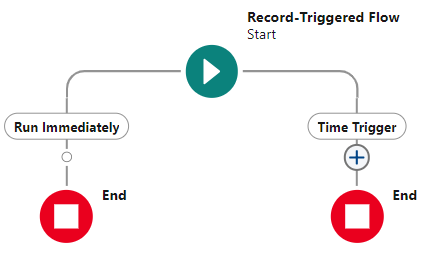
- Click the plus-sign button to raise the Add Element pop-up.
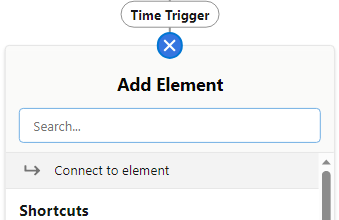
- Scroll down and select Update Records, raising the New Update Records window.
- In the New Update Records window:
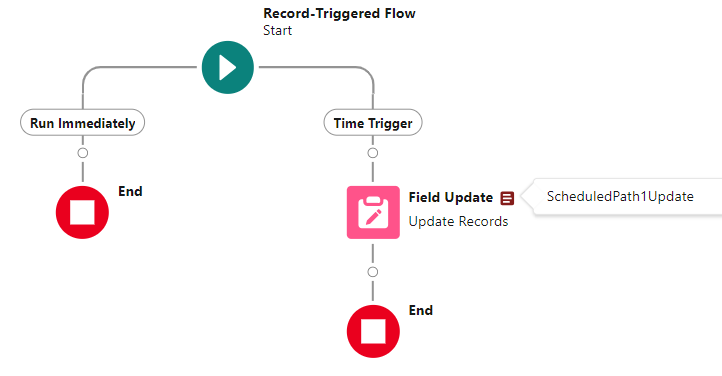
- Enter a label in the Label field. In the present example, this is
Field Update. The API Name field auto-populates with "Field_Update". This field names the element's GUI icon. - Enter a descriptor in the Description field. This field defines the hover text for the element's GUI representation. In the illustration below, this is "ScheduledPath1Update".
- In the "How to Find Records to Update and Set Their Values" section, select the Use the approval request record that triggered the flow radio button.
- In the "Set Filter Conditions" section, select None—Always Update Record from the pull-down menu.
In the "Set Field Values for the Approval Request Record" section, use the + Add Field button to add entries, then select and enter the following values:
Field Value Apttus_Approval__CanEscalate__c False
($GlobalConstant.False)Apttus_Approval__DateEscalated__c blank
Apttus_Approval__InEscalation__c True
($GlobalConstant.True)
- Enter a label in the Label field. In the present example, this is
- Click Done. A successful exit state resembles:
- Click the Save button.
To enable the approval systems property
- Go to Build > Develop > Approvals System Properties and click Manage.
- Beside System Properties, click Edit.
- Select Enable Approval Request Auto-Escalation and click Save.
This enables auto-escalation. Set up the required email templates and global escalation options.
To select Approver Settings
- Go to Administration Setup > Manage Users > Users and select Edit for the appropriate user.
Scroll to the Approver Settings section and complete the following:
Option Description Delegated Approver This can be any user, but be sure they can access the same objects as the user for whom they may receive delegated approval requests. Manager The user's manager. Receive Approval Request Emails If you select Never, the user will not receive email notifications that an auto-escalated approval request has been sent to them. They will receive notifications with any other option. - Click Save.
You can now select User Delegated Approver and User Manager as auto-escalation assignee types for this user.
Repeat this task for other users, as no batch update action is available for these settings.
Email Templates for Auto-Escalation
By default, the Conga Approvals Management package contains escalation templates for Opportunities, Agreements, and Term Exceptions.
These templates can be used as-is out of the box; however, you can also configure bespoke templates for your organization. See Setting Up Email Templates and Alerts and the Appendices for more details.
Auto-Escalation Behavior
This section outlines the behavior for auto-escalation in approval rules.
| Scenarios | Behavior |
|---|---|
| An approval request is escalated to the "User" assignee if the original assignee does not act within 1 or X hours of the approval request's generation. If the escalated User assignee does not take action in 1 or X hours, the request is escalated to the backup admin. This behavior applies to all other assignee types. |
| An approval request is escalated to the Conga delegate approver assignee if the original assignee does not act in 1 or X hours of the approval request's generation. If the escalated assignee does not take action in 1 or X hours, the request is escalated to the backup admin. The approval request remains with the escalated assignee for the remaining life of the request. |
| An approval request is escalated to the first assignee in the approval matrix if the original assignee does not act in 1 or X hours of the approval request's generation.
The request ascends the approval matrix at the interval defined in the auto-escalation setup. For example, after every one hour that no action is taken on the approval request, the request is escalated to the next assignee. |
| An approval request is escalated to the assignee "User" if the original assignee does not act in 1 or X days of the approval request's generation. If the escalated assignee does not take action in 1 or X hours, the request is escalated to the backup admin. This behavior applies to all other assignee types. |
| An approval request is escalated to the Conga delegate approver assignee if the original assignee does not act in 1 or X days of the approval request's generation. If the escalated assignee does not take any action in 1 or X hours, the request is escalated to the backup admin. |
| An approval request is escalated to the first assignee in the approval matrix if the original assignee does not act in 1 or X days of the approval request's generation.
The request ascends the approval matrix at the interval defined in the auto-escalation setup. For example, after every one day that no action is taken on the approval request, the request is escalated to the next assignee. |
Auto-Escalation Limitations
- There are limits on the number of time-based rules per hour. The limits are as follows:
- Enterprise Edition = 500
- Developer Edition = 50
- Unlimited Edition = 1,000
- Auto-escalation cannot be defined for rules used as child processes.
- For an assigned request, if the expected completion time is greater than the current time, the request is auto-escalated.
- If an assignee in a standard step is a rule, the assignees in the rule cannot have auto-escalation values.
Best Practices
- Escalation time should be no less than one day.
- Whenever escalation is set up for a specific user, role, or queue, follow the same format at every step.
If we configure a rule entry where Jim is an assignee, Mark is the escalation assignee, and the escalation time is set to one day, if Jim does not respond to a request in a day, it is escalated to Mark.
If there is any other step (standard or subprocess step) that also has Jim as an assignee, that step should also have Mark as the escalation assignee and an escalation time of 1 day.
This is also a system limitation. If a user has auto-escalation in one step, no auto-escalation in another step, and enables consolidated approvals, then escalation cannot work. In this scenario, an escalation request goes on hold.
Consolidation and Auto-Escalation Behavior
If consolidation is enabled (approvals or notifications), consolidation always takes precedence over escalation. For example, the escalation timer does not start until all requests are available (if a user has multiple requests, at least one must be in the assigned status).
Reassign and Auto-Escalation Behavior
Take, for example, an approval request that has Jim as a primary assignee, Mark as the auto-escalation assignee, and the request scheduled to escalate one day after assignment. After some time, the request is reassigned to Karl. This does not impact the escalation time. If Karl takes no action, the request escalates as expected (that is, it escalates one day after it was assigned to Jim.)
Ad Hoc Approver and Auto-Escalation Behavior
If an ad hoc approver is added, the end user does not have an option to add escalation value to the ad hoc assignee.
Auto-Approve/Auto-Complete and Auto-Escalation Behavior
Do not set up escalation on auto-approved steps.