Download PDF
Download page Sending a Contract for Microsoft 365 Review.
Sending a Contract for Microsoft 365 Review
You can send the contract documents to Microsoft 365 for collaborative review by sharing links to the contract documents. You can also send documents from contracts related to the current contract if the administrator has enabled the Show Related Documents setting. For more information see General Settings.
In Microsoft 365, you can collaboratively review a contract document with all the team members and view live changes. When you send a contract document in DOCX format for Microsoft 365 review, a review cycle is created and a redline document is generated. All documents reviewed in Microsoft 365 have change tracking turned on. You can send contract documents for review to stakeholders in and out of your organization.
Prerequisites
- You have a Microsoft 365 subscription.
- You have configured Microsoft 365 settings to send a contract document for review. For more information, see Configuring Microsoft 365 Connections.
- A contract document in DOCX format is available in the contract.
To send a contract document for review
- On the Contract Detail page, click Send for Review.
- Choose Share as links on the popup.
If you are not logged in to your Microsoft account or if the token is expired, a pop-up window prompts you to enter your Microsoft email address.

If two-factor authenticator is enabled in the system, enter the code displayed in the authenticator app on your phone.
In the Available Documents section, click the thumbnail (
 ) icon or the list (
 ) icon to toggle between the views. Select the documents to send for review. Documents with an In Progress review status cannot be selected.
- You must select one and only one Contract Document-type document.
- Only the latest versions of the documents are displayed.
- You can select additional documents of size up to 20 MB for attaching to the email along with the contract document link.
- Click the Related tab if it is displayed. Select documents from the contracts related to the current contract. To search specific related contracts, click the Parent, Child, or Sibling tabs.
- Click Next.
Enter recipients in the To field. Once you start entering user details like first name, last name, or email address, autocomplete suggestions appear below the search box if the user or contact exists in CLM. The user's role is displayed under each user's name in the list.
Select an email template from the Email Template dropdown.
Preview the email and update its email subject and body if required.
- Click Add Attachments to add supporting documents. Upload or drag and drop documents from your system and click Upload.
- Click Send.
The reviewer receives the document for review as a link to the document, with supporting documents sent as email attachments. The contract status category and status are set, respectively, to "In Authoring" and "Other Party Review".
You must cancel the Microsoft 365 review in progress to initiate a new Microsoft 365 review. The review cycle count increments until a redline document is generated. The review cycle restarts after redline document generation. The number of days a review cycle is "In progress" increments until the review is canceled. The right panel displays the document's review cycle details.
To send a contract document for review from the Documents link
- On the Contract Detail page, go to the Documents link and select the documents to send for review.
- Click Send for Review.
A pop-up window prompting you to enter your Microsoft email address appears if you are not logged in to your Microsoft account or if the token is expired. Specify your Microsoft email address and password.
If two-factor authenticator is enabled in the system, enter the code displayed in the authenticator app on your phone.
- Enter recipients in the To field and an email body if required. The list displays the user's role under each user's name. The list displays the user's role under each user's name.
- (Optional) Click Add Attachments to add supporting documents. Upload or drag and drop documents from your system and click Upload.
- Click Send.
The reviewer receives the document for review as a link to the document, with supporting documents sent as email attachments. The contract status category and status are set, respectively, to "In Authoring" and "Other Party Review".
To review a document
- Open your email and click the document link.
Log in to your Microsoft account. The document opens with change tracking turned on.
- Make the required changes and close the document.
To view a document's review cycle
- Go to the Contract detail page.
- Click the Review Cycle icon (
 ) in the right panel. You can view whether the review cycle is In Progress, Canceled, or Completed.
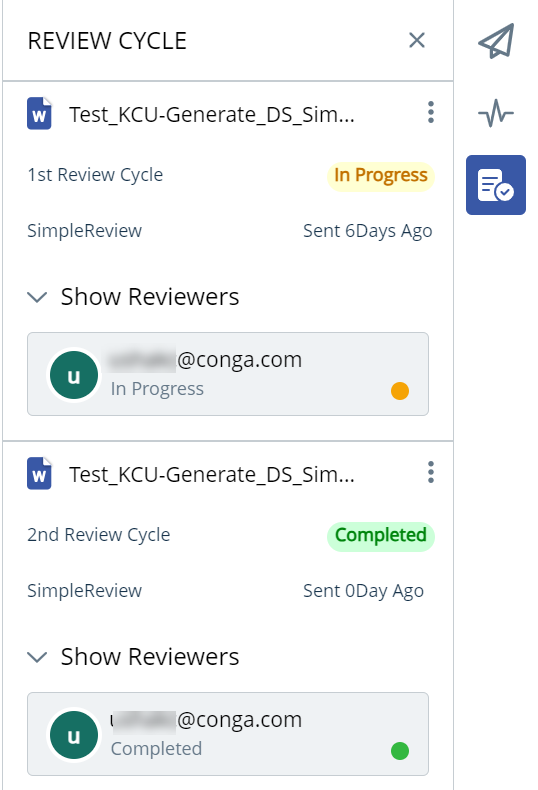
To add reviewers to the review cycle
- Click the Review Cycle icon () in the right panel.
- Click the More icon (
 ) beside the document name and click Add Reviewer. Alternatively, you can click the More Details (
 ) icon in the Show Reviewers row and click Add Reviewer in the Manage Review Cycle page.
 - A pop-up window prompting you to enter your Microsoft email address appears if you are not logged in to your Microsoft account or if the token is expired. Specify your Microsoft email address and password.
- Enter the recipient's email address and click Done.
You can add multiple email addresses to the list.
The newly added reviewer receives the review email notification. The system sets the review status to "In Progress.
To cancel a review for a reviewer
- Click the Review Cycle () icon in the right panel.
- Click the More Details () icon in the Show Reviewers row to raise the Manage Review Cycle page.
- Click the More icon ( ) beside the reviewer to finish the review.
- If you are not logged in to your Microsoft account or if the token is expired, a pop-up window prompts you to enter your Microsoft email address and password. Specify your Microsoft email address and password.
- Click Cancel Review.
The reviewer receives an email notification that the document review is canceled. The review status for the reviewer changes from In Progress to Canceled.
To cancel a review
- Click the Review Cycle icon () in the right panel.
- Click the More icon ( ) beside the document name.
- A pop-up window prompting you to enter your Microsoft email address appears if you are not logged in to your Microsoft Account or if the token is expired. Specify your Microsoft email address and password.
- Click Cancel Review. Click Yes to confirm.
All reviewers receive an email notification that the document review is canceled. When you end the review, the review cycle status changes from In Progress to Canceled.
To finish the review for a reviewer
- Click the Review Cycle icon () in the right panel.
- Click the More Details icon () in the Show Reviewers row to raise the Manage Review Cycle page.
- Click the More icon ( ) beside the reviewer to finish the review.
- A pop-up window prompting you to enter your Microsoft email address appears if you are not logged in to your Microsoft Account or if the token is expired. Specify your Microsoft email address and password.
- Click Finish Review.
A message confirming review process completion on this document for the reviewer appears. The reviewer receives an email notification that the document review is completed. The review status for the reviewer changes from In Progress to Completed.
To finish review
- Click the Review Cycle icon () in the right panel.
- Click the More icon ( ) beside the document name.
- A pop-up window prompting you to enter your Microsoft email address appears if you are not logged in to your Microsoft Account or if the token is expired. Specify your Microsoft email address and password.
- Click Finish Review. Click Yes to confirm.
A message confirming review process completion for the document appears. When you end the review, the review cycle status changes from In Progress to Completed. The document is archived and you cannot edit it. The reviewer receive an email notification that the document review is complete.
A new version of the contract document is and available in the Documents tabs on the left panel.
CLM assigns the document a name formatted per the Document Naming Convention setting.