Download PDF
Download page Customizing CLM using Custom Actions.
Customizing CLM using Custom Actions
Conga CLM enables you to introduce custom actions in the application to fulfill business requirements otherwise not achieved through out-of-the-box actions. You can add a custom action button in the contract details page header to perform either of the following functions:
| Action Function | Purpose |
|---|---|
| Navigate | To navigate the user to the URL specified in the Params field when the user clicks the custom action button. For example,
|
| Execute Workflow | To execute a workflow configured in the Conga Platform, when the user clicks the custom action button. |
| Execute Custom Code | To execute a code written in Custom Code in the Conga Platform, the user clicks the custom action button. |
You can also set visibility or validation rules for page header actions, page tabs, sections within a detail page, and fields. You can configure rules such as:
- If a user enters a currency value, they must select a currency type, or the system displays an error message.
- For contracts of type MSA, display the "Additional Information" section.
- If the contract number is not provided, display an error message in the contract number field.
- Display or hide custom actions on the UI based on defined rule criteria such as user role.
You can add custom action buttons in the Contract Details page (in the page header only) and the Clause List page (in the grid only).
Pre-requisites
- You have configured the required workflow or custom code in the Conga Platform. For more information see, Managing Workflows or Managing Custom Code.
To add a custom action button in Contract Details page
- Navigate to My Contracts and open a contract.
- Click Edit Page. The page layout for the contract type that is edited is displayed in Cx Studio.

- Click on the page header in the layout. The Properties popup appears with two tabs: Details and Rules.
- Go to the Details tab to manage actions and click Add Action button. The New Actions window appears.
Field
Description
Action Name Enter the name of the action as per your business needs. Action Function Select the name of the action function where you want to redirect the user when the action button is clicked.
- Navigate: Redirects the user to a different screen.
- Execute Workflow: Performs operations as defined in the workflow.
- Execute Custom Code: Executes operations as defined in custom code.
Params Enter the parameter relevant to the selected action functions. Use the syntax as shown in the example below:
Navigation URLFormat to navigate to the external page: url:https://<page URL>/Sample: url:https://documentation.conga.com/
Format to navigate within the application: url:/<path after the domain name>Sample: url:/workflow
Workflow IDFormat to execute workflow: id:{workflowid}Sample: id:6c803fb3-29b0-48d9-9873-90964d65430a
Custom API URLFormat: method:<method name>, resourceName:<Custom Code project name>,url: responseSample: method:post,resourceName:codeExecution,url:response - Use Rules tab to set visibility or validation rules for the action button. To learn more about applying rule, see Adding Rules to a Custom Action Button.
- Click Publish to apply changes.
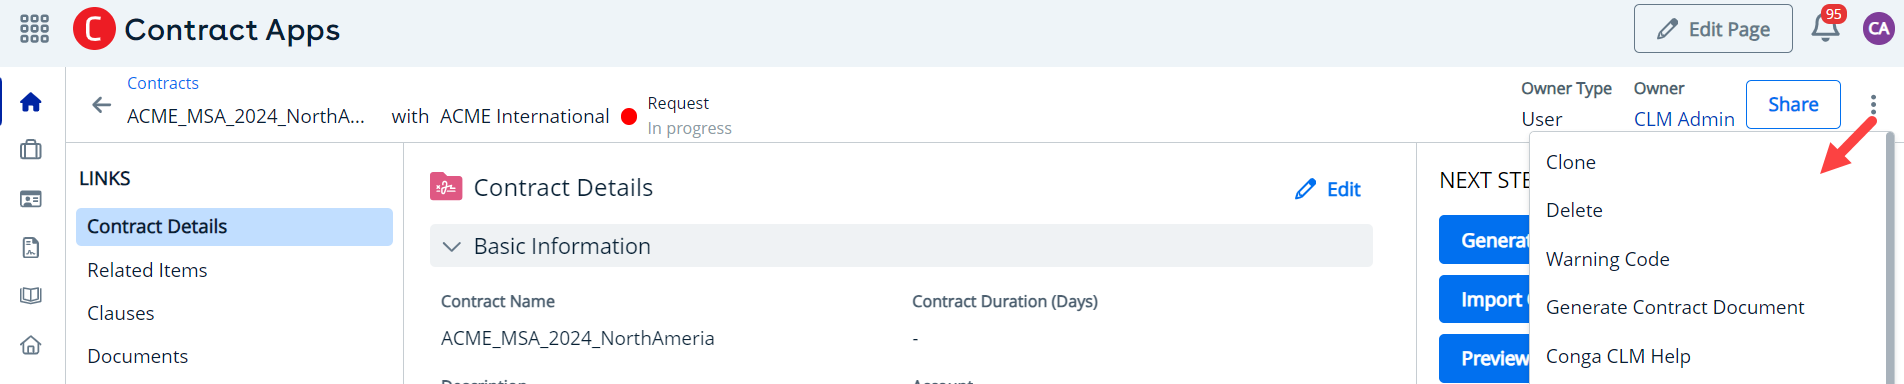
The custom action button added to the page header will be displayed in the kebab menu. The custom action buttons are displayed for a contract depend on its type depending on the contract type and the page layout configured for it.
To add a rule
- Log in to the Conga Platform as an admin user.
- Click the App Launcher (
 ) icon from the top-left corner > Apps > CX Studio.
 - The properties popup appears with two tabs: Details and Rules.
- To add a rule to an action, click the PageHeader pane.
- To add a rule to a section or field of the record detail page, click on the Record Detail View pane. If there are multiple tabs on the detail page, select the tab you want to work with, and then make your selection.
- Go to Properties window and click Rules tab.
- You can access add rules in the following ways. Click a link to view steps:
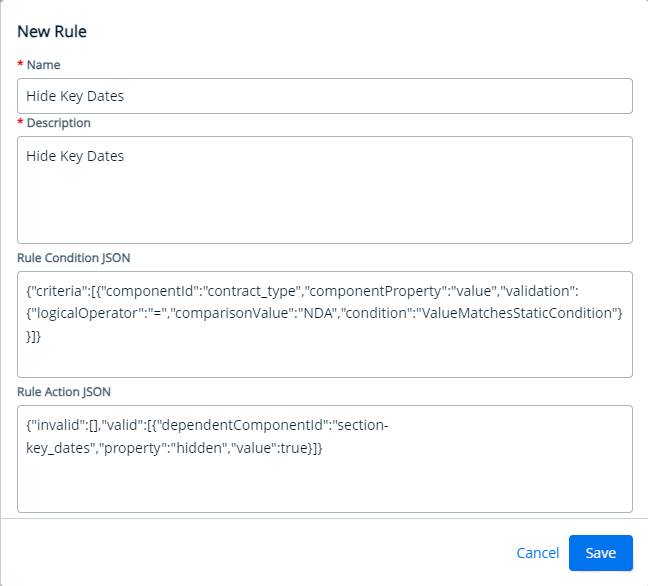
- Click Add Rule. The New Rule window lets you define rule conditions and actions using JSON format.
You can either define the rule's conditions and actions in JSON or leave these fields blank, save the rule, and then define the criteria using the Advanced Rule Editor UI.
Field Description Name Enter the rule's name. Description Enter a description for the rule you want to define. Rule Condition JSON and Rule Action JSON Insert the rule condition criteria in JSON format.
Rule Condition JSON
Rule Action JSON
Example: Adding a Rule to the Action button in the page header
To restrict access to the "customcode" action button for users with the admin role, add the following rule condition and action criteria in JSON format:
{"criteria": [{"componentId":"cos-page-header","validation": {"condition":"CustomCondition","validationFunc":"function (payload) {\n const userRole = payload.userInfo?.Role;\n return (userRole?.Name ?? '') === 'Admin';\n}"}}],"logicalExpression":""}{"valid": [{"ruleFunc":"function (payload) {\nconst props = {};\nprops.items = payload.element.actionBar.actions.map(\n(item) => {\nif (item.key === 'customcode') {\n item.hidden = true;\n}\n return item;\n}\n);\nreturn props;\n}"}],"invalid": [{"ruleFunc":"function (payload) {\nconst props = {};\nprops.items = payload.element.actionBar.actions.map(\n(item) => {\nif (item.key === 'testaction_1') {\n item.hidden = true;\n}\nreturn item;\n }\n );\n return props;\n}"}]}Example: Show or hide section on the record details page.
Hide the "Key Dates" section on the record details page only for NDA or MSA agreement record types. Display this section for all other agreement record types.
{"criteria": [{"componentId":"RecordType","componentProperty":"value","validation": {"logicalOperator":"=","comparisonValue":"NDA","condition":"ValueMatchesStaticCondition"}},{"componentId":"RecordType","componentProperty":"value","validation": {"logicalOperator":"=","comparisonValue":"MSA","condition":"ValueMatchesStaticCondition"}}],"logicalExpression":"1 OR 2"}{"valid": [{"dependentComponentId":"section-key_dates","property":"hidden","value":true}],"invalid": [{"dependentComponentId":"section-key_dates","property":"hidden","value":false}]}Example: Show or Hide tab in the multi tab detail page.To implement the same rule using the Advanced Rule Editor UI, see Controlling Tab Visibility using Rule Editor UI.
Consider a layout with two tabs: "Main Details" and "Terms & Renewals." Define the rule criteria as follows:- If the contract name in the "Main Details" tab is "Conga," the "Terms & Renewals" tab will be hidden.
- If the contract name is anything other than "Conga," the "Terms & Renewals" tab will be visible.
{
"criteria": [
{
"componentId": "Name",
"componentProperty": "value",
"validation": {
"logicalOperator": "=",
"comparisonValue": "Conga",
"condition": "ValueMatchesStaticCondition"
},
"type": "Field",
"id": "ui-rule-criteria-1724651467104363089216487876"
}
],
"logicalExpression": "( 1 )"
}{
"valid": [
{
"dependentComponentId": "tab-2",
"property": "hidden",
"value": true,
"dependentParentId": "agreement_tabs"
}
],
"invalid": [
{
"dependentComponentId": "tab-2",
"property": "hidden",
"value": false,
"dependentParentId": "agreement_tabs"
}
]
} - Click Save.
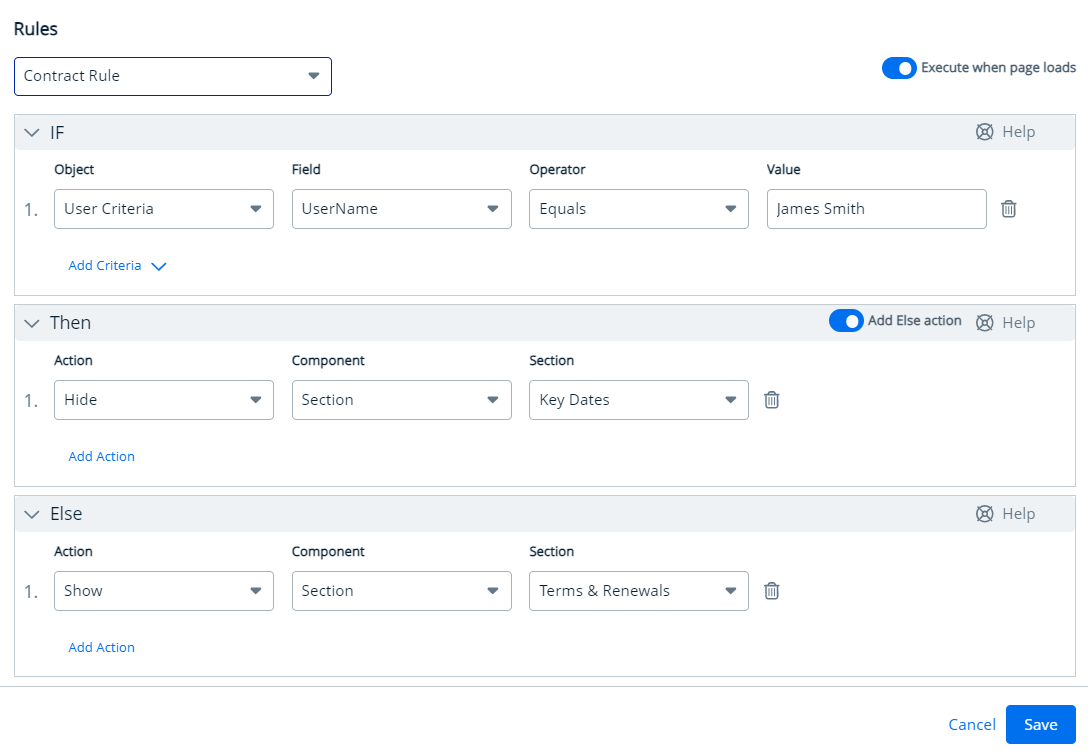
- To define rule criteria from the UI, click Advanced Rule Edit. The Rules window appears as below if you have an already configured rule, either through JSON format or Advanced Rule Edit.
If you are configuring a rule for the first time, the Rule list and Execute when page loads toggle is not displayed. - All defined rules are listed in Rule dropdown. Select the rule you wish to work on.
Execute when page loads Enable this toggle to apply the defined rule criteria at the time of page loading. IF - Click Add Criteria and then select Field Criteria option to create or manage a condition criteria for fields or select User Criteria to define criteria involving logged-in user info.
- Field - Field dropdown options are populated based on the selected object. Select the field you want to set as the condition criterion.
- Operator - You must select the logical operator from the picklist. This forms the relationship between the field and its value.
- Value - The value field changes based on the selected operator options. Enter or select the value for the specified field.
Example: Multiple Criteria{"criteria": [{"componentId":"Name","componentProperty":"value","validation": {"logicalOperator":"!=","comparisonValue":"Test","condition":"ValueMatchesStaticCondition"}},{"componentId":"StatusCategory","componentProperty":"value","validation": {"logicalOperator":"=","comparisonValue":"Request","condition":"ValueMatchesStaticCondition"}},{"componentId":"RecordType","componentProperty":"value","validation": {"logicalOperator":"=","comparisonValue":"Corporate","condition":"ValueMatchesStaticCondition"}},{"componentId":"AgreementNumber","componentProperty":"value","validation": {"logicalOperator":"=","comparisonValue":"123","condition":"ValueMatchesStaticCondition"}}],- Filter Expression: By default, the application uses AND logic for all criteria. However, you can modify this to fit your needs and create nested logical expressions if desired.
For example, 1 AND 2 AND (3 OR 4).
Then Click Add Action to create or manage an action that executes when the condition criteria are met.
Else Click Add Action to create or manage an action that executes when the condition criteria are not met.
Add Else action Enable this toggle to set up an Else action that follows the Then action. The Else panel will become available once you enable this option.
Delete (
 )
)Removes expression. - Click Add Criteria and then select Field Criteria option to create or manage a condition criteria for fields or select User Criteria to define criteria involving logged-in user info.
- Find the new rule under the Rules tab. Toggle the switch at the end of the rule name to activate it.
- To edit, delete or clone the rule, click the more (
 ) icon at the end of the rule and select an appropriate option.
 - Click Publish to apply the rule to the page.
The rule is applied when the contract matches the criteria specified in the rule.
To add a custom action button in Clause List page
- Click the App Launcher () icon from the top-left corner > Apps > CX Studio.
- Click Object Layouts (
 ) icon and click the more () icon in the row with Application Name, Entity Type and Page Type is CLM, agreement-clause, and clauselist, respectively.
 - Click Edit Metadata.
- This opens JSON Editor. Add custom actions by editing the JavaScript.
- Click Save.
The custom action button added though the JavaScript will be displayed in the Clause List page. Once add a custom button, you can add action function (Navigate, Execute Workflow, Execute Custom Code) to the button through CX Studio by editing the Clause List page.
Use Cases To Add Custom Action Buttons
Let's take a few examples to understand how custom action can be added to achieve different use cases:
| Use Case | High-level Activities To Be Performed |
|---|---|
| On clicking Help button, redirect the user to Conga Documentation Portal. | Edit Contract Details page layout and add an action with the following details: Action Name: Help Action Function: Navigate Params: < |
| On clicking Apply Discount button, check if the total contract value greater than $50000. If yes, apply 5% discount on the total contract value. But, if the Account Name is ACME International, then hide the Apply Discount button. | Create a custom button as below:
Action Name: Apply Discount Action Function: Custom Code Params: < Add a rule in the custom button as below: Rule Condition |
| On clicking Query Contract Documents |
Action Name: Query Contract Documents Action Function: Custom Code Params: < > |