Download PDF
Download page Configuring APTS_ComplyConfig.
Configuring APTS_ComplyConfig
The APTS_ComplyConfig admin entry allows you to set up Clone Specification and Sort Specification.
- Clone Specification: Allows you to configure the specifications for cloning, amending, or renewing an agreement record.
- Sort Specification: Allows you to configure the specifications to arrange records in a specified order when generating an agreement document.
To configure clone specification
The <CloneSpec> element in APTS_ComplyConfig XML code allows you to specify the custom objects that should be included as part of the agreement while cloning, renewing, and amending an agreement. You can also configure different specifications for each operation by creating separate admin entries with the following names:
- Clone: APTS_ComplyConfig_Clone
- Amend: APTS_ComplyConfig_Amend
- Renew: APTS_ComplyConfig_Renew
If you have configured operation-specific APTS_ComplyConfig admin entries, they take precedence over the default APTS_ComplyConfig admin entry. If none of the admin entries are configured, all the field values are included in the new agreement when you clone, amend, or renew an agreement.
To configure clone specification, you need to insert the <CloneSpec> element between <ComplyConfig><AgreementSpec> and </AgreementSpec></ComplyConfig> elements in the XML code of the admin entry. Within this element, you can insert the following elements:
- <Includes> element includes one or more <ChildObject> elements. Each <ChildObject> element represents an object to be inserted in the new agreement generated after cloning, renewing, and amending an agreement, identified by <Name> element
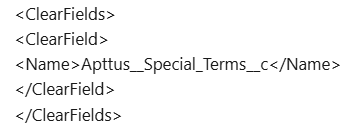
- <ClearFields> element to specify the fields to be cleared from the new agreement generated after cloning, renewing, and amending an agreement
You can add Document Version Detail, Document Version, Note, and Attachment in the clone specification to copy documents to the cloned, amended, or renewed agreement (new agreement). The following table lists the various scenarios and their outcome when you use clone spec to clone, amend, or renew an agreement.
| Document Version | Document Version Detail | Note | Attachment/Files | Documents copied to the cloned, amended, and renewed agreement (new agreement) |
|---|---|---|---|---|
| True | True | True/False | True/False | All the document details and documents from the document version are copied from Document Version and Document Version Detail to the new agreement. By default, Note and Attachment/Files are copied to the new agreement. If excluded, documents are not copied to the new agreement. Conga recommends using this configuration. |
| False | False | True/False | True/False | No documents are copied from Document Version and Document Version Detail to the new agreement. By default, Note and Attachment/Files are copied to the new agreement. If excluded, documents are not copied to the new agreement. |
| True | False | True/False | True/False | Only the document details from the document version (the first level of the document version) are copied to the new agreement. By default, Note and Attachment/Files are copied to the new agreement. If excluded, documents are not copied to the new agreement. Conga does not recommend this configuration. |
- Click the App Launcher icon (
 ).
). - Search and select Admin. This displays the Admin tab with a list of all out-of-the-box Admin entries.
- Search and open the APTS_ComplyConfig admin entry and click Edit. If the admin entry is not available, click New.
- Enter the Name.
Sample value: APTS_ComplyConfig_Renew - Specify XML in the Value field.
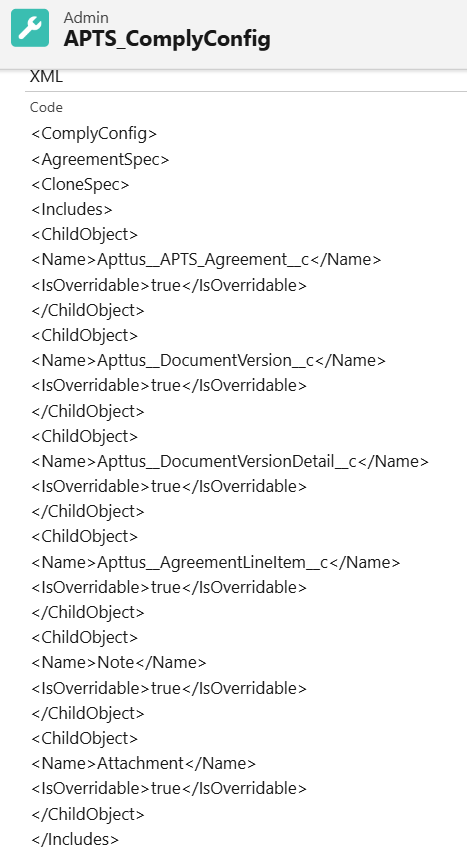
- Enter the clone specification in the Code field.


The below code snippet is a sample of clone specifications:<ClearFields> <ComplyConfig> <AgreementSpec> <CloneSpec> <Includes> <ChildObject> <Name>Apttus__APTS_Agreement__c</Name> <IsOverridable>true</IsOverridable> </ChildObject> <ChildObject> <Name>Apttus__DocumentVersion__c</Name> <IsOverridable>true</IsOverridable> </ChildObject> <ChildObject> <Name>Apttus__DocumentVersionDetail__c</Name> <IsOverridable>true</IsOverridable> </ChildObject> <ChildObject> <Name>Apttus__AgreementLineItem__c</Name> <IsOverridable>true</IsOverridable> </ChildObject> <ChildObject> <Name>Note</Name> <IsOverridable>true</IsOverridable> </ChildObject> <ChildObject> <Name>Attachment</Name> <IsOverridable>true</IsOverridable> </ChildObject> </Includes> <ClearFields> <ClearField> <Name>Apttus__Special_Terms__c</Name> </ClearField> </ClearFields> </CloneSpec> </AgreementSpec> </ComplyConfig>CODE - Click Save.
To configure sort specification
The <SortSpec> element in APTS_ComplyConfig XML code allows you to configure the specifications to arrange records in a specified order while generating an agreement document.
To configure sort specification, you need to insert the <SortSpec> element between <ComplyConfig><AgreementSpec> and </AgreementSpec></ComplyConfig> elements in the XML code of the admin entry. Within this element, you can insert the following elements:
- <SortObjects> element with one or more <SortObject> elements
- <SortObject> element to specify the object to be sorted, identified by the <Name> element. For example, APTS_Agreement_Appendix_C
- <SortFields> element with one or more <SortField> elements
- <SortField> element to specify fields for sorting, identified by the <Name> element. For example, Name.
- <SortOrder> element to specify the sorting order. For example, ascending or descending
The code snippet below shows how to insert tags to sort the agreement line item based on the Name field of the APTS_Agreement_Appendix__c object when the users clone, renew, or amend an agreement.
<ComplyConfig>
<AgreementSpec>
<ChildObject>
<Name>Apttus__AgreementLineItem__c</Name>
</ChildObject>
<SortSpec>
    <SortObjects>
      <SortObject>
        <Name>APTS_Agreement_Appendix__c</Name>
        <SortFields>
          <SortField>
           <Name>Name</Name>
          </SortField>
        </SortFields>
      </SortObject>
    </SortObjects>
    </SortSpec>
    </AgreementSpec>
</ComplyConfig>- Navigate to Admin Home page. This displays the Admin tab with a list of all out-of-the-box Admin entries.
- Search and open the APTS_ComplyConfig admin entry and click Edit. If the admin entry is not available, click New and enter the Name as APTS_ComplyConfig.
- Specify XML in the Value.
- Enter the sort specification in the Code field.
- Click Save.
To configure clone specifications based on record types
You can configure separate clone specifications for each record type.
To configure clone specifications based on record types:
- Navigate to Admin Home page.
- Click New. This displays Admin Edit page.
- Enter the following details:
- Name: APTS_ComplyConfig_<Action>_<RecordType>
Sample value: APTS_ComplyConfig_Renew_MSA
Ensure that you create a single clone specification for each record type. - Value: XML
- Code: Enter clone specification
- Name: APTS_ComplyConfig_<Action>_<RecordType>
- Click Save.