Download PDF
Download page Configuring Wizard Settings.
Configuring Wizard Settings
The first step in designing a Wizard is to define the basic settings for your Wizard, including the name, description and other search properties, as well as the Context (for one Object or All Objects) and the Start Step.
In this step you also define the Static Resource location and CSS file for any branding and/or banner logo you want to add to your Wizard (see the table below). For information on how to add static resources to your Salesforce org, refer to Salesforce documentation on Using Static Resources. Any Static Resource used with the Contract Wizard must contain all files in an application/zip format.
Hint: Click an image on this page to enlarge the view.
To configure Wizard Settings
- From the Salesforce application menu, choose Apttus Contract Wizard. The application displays the Home tab and three tabs unique to the Contract Wizard: Wizards, Wizard Designs and Wizard Component Library.
- Navigate to the Wizard Designs tab (click + and add the tab if it does not already exist).
- Click New Wizard Design to open a new Wizard Design form displaying fields for Wizard Settings.
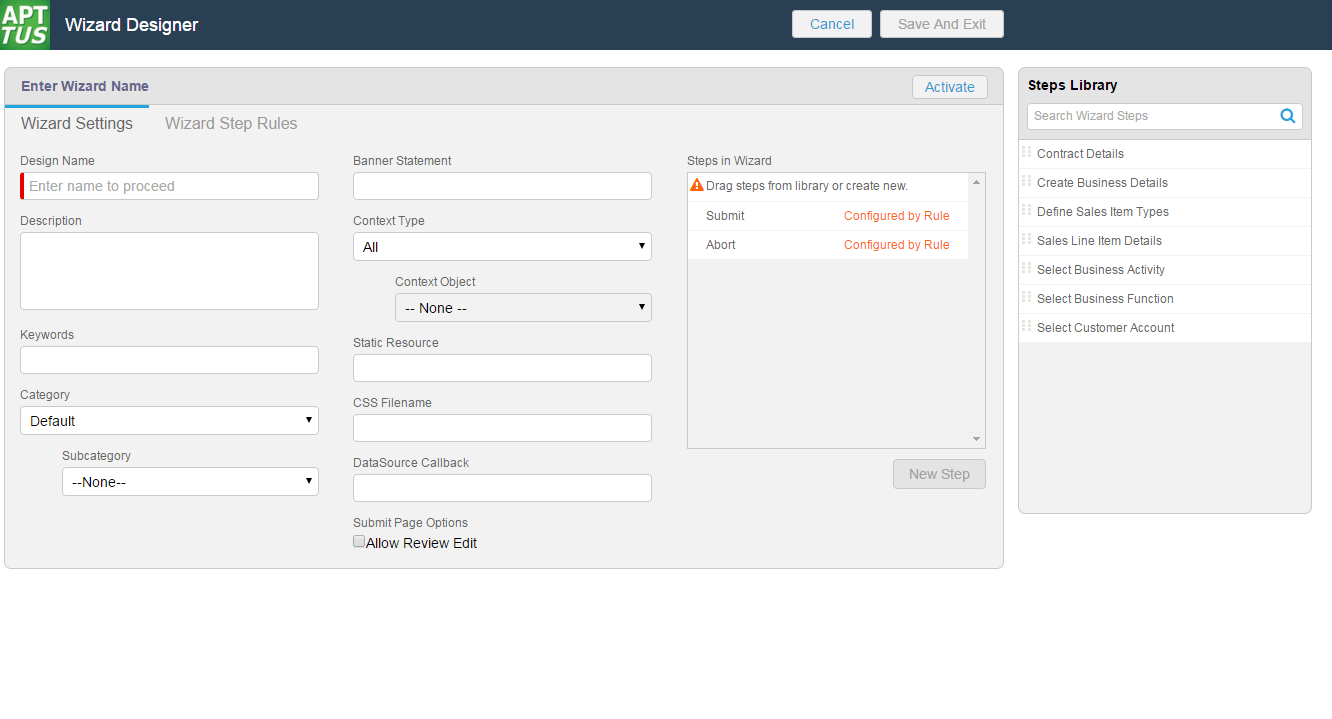
Enter the following search properties into the form:
Setting Description Design Name Enter a name for your Wizard Design. This name can be internal but is used in the runtime banner for the Wizard steps when the user is interacting with the Wizard if Banner Statement (below) is not defined. Note: You cannot add any steps to your Wizard Design until you choose a Design Name. Banner Statement Enter a Banner Statement to display at Wizard runtime when the user is interacting with the Wizard. If left blank, the Wizard Design Name will be used instead. Description Enter a description for your Wizard Design which describes its intended use (for example, "Use this Wizard to create MSA Agreements for Acme.") Keywords Enter a list of keywords which can be used to search for this Wizard Design. Category Choose an option from a drop-down list of pre-defined Wizard Categories (define picklist values on the Wizard Design object). Sub Category Choose an option from a drop-down list of pre-defined Wizard Sub Categories (define picklist values on the Wizard Design object). Context Type Define whether your Wizard Design context will apply to All objects or a specific Object. Context Object Choose the specific context Object for your Wizard. This option is only available if you specified "Object" for Context Type. (e.g., "Agreement") Static Resource Name Enter the static resource name where your banner logo (must be named "logo.png"), foreground images (for branding of any steps) and your CSS file reside. Banner height is 50 pixels. The CSS file you provide can override any style present in the runtime wizard–the margin-left of the Title/Breadcrumbs in the banner can be modified to allow for more breathing room from where the logo is placed. How to create your static resource:
1) Place all images and .css files inside a single folder and compress them into a ZIP.
2) Go to Salesforce Setup and enter "Static Resources" into the Quick Search box.
3) Create a new Public Static Resource and upload the ZIP file.CSS File Name The name of the CSS file located in the static resource (e.g., "style.css"). DataSource Callback Enter the name of the Callback Resource that will store values to pre-populate runtime input responses when this design is used to create a new Wizard. This resource holds the implementation class name for the callback interface. The interface contains a getData() method and returns a JSON string to pre-populate fields in the Wizard. Allow Review EditSelect this checkbox to enable the Wizard runtime user to edit steps during the Wizard review prior to submission. 
When you determine a specific Context Object for a Wizard Design, the available steps listed in the Steps Library to the right of the form will be refreshed. Only Steps which match the Object type you selected will be displayed for use.
Drag-and-drop a step from the Steps Library to the Steps in Wizard pane. If you do not see your Step listed, use the type-ahead feature in the Search box to locate the step you want to use.
You cannot add steps to a Wizard unless the Design Name has been entered.
You can take the following actions on steps you have added:
- Hover over a step in the list and click Edit to edit the step settings and inputs for this wizard design only.
- Hover over a step in the list and click Delete to remove a step from the Wizard.
Click and drag steps in the Steps in Wizard pane to reorder them. If you have a more complex flow to your wizard, click on Wizard Step Rules to configure condition-based rules for your steps (see Configuring Wizard Step Rules).
 The Submit and Abort steps system-provided and are always included in every Wizard design and cannot be modified, removed or reordered. Condition expressions can be defined to go to either step as part of a rule.
Add more steps from the Step Library as described in the general sequence you want them to appear in the Wizard.
- If you do not find the correct step in the library and need to create a new one for your wizard, see Creating Steps from the Wizard Designer.
Click Save And Exit to save your changes or click Cancel to discard the Wizard and return to the Wizard Designs tab.