Download PDF
Download page Configuring Wizard Step Rules.
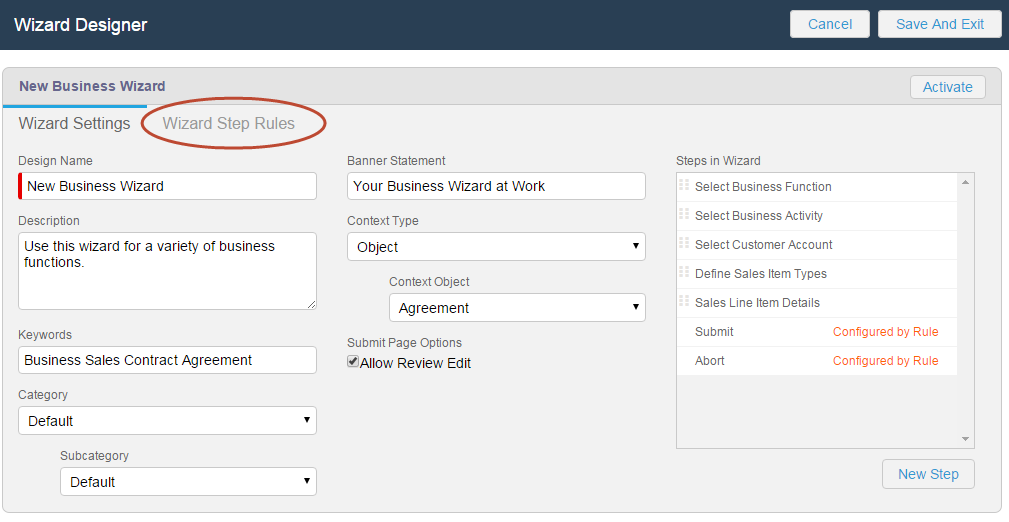
Configuring Wizard Step Rules
Wizard Step Rules control the flow of Wizard steps at runtime. You can create "Go to" rules for your steps which determine step order in the Wizard based on runtime user responses. The rules you create can be assigned as default for individual steps and can be made conditional based on expressions you create for each rule, using values from Inputs to determine whether or not rules are fired for any given step.
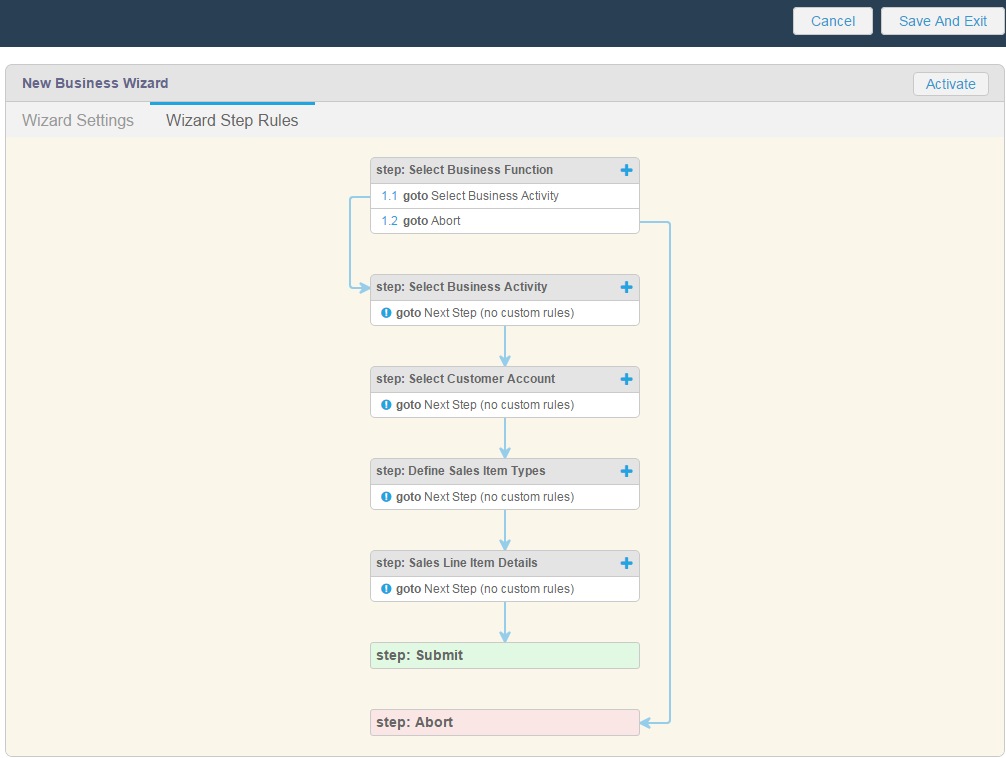
Much like Step Input Rules, Wizard Step Rules for any given Wizard are displayed as a graphical representation of the Wizard flow. As you add steps to your Wizard and configure Go to rules, the flow of the Wizard changes and is visually represented to give you an accurate snapshot of Wizard flow.
To configure Wizard Step Rules, you must have already added steps to the Wizard Design.
To configure Wizard Step Rules
- From the Wizard Designer Settings page, click on the Wizard Step Rules tab.
The Wizard Step Rules tab displays a graphical representation of your current Wizard, with all steps and any current rules shown as a flow from the first step to the Submit step.
By default, steps flow in the Wizard based on their listed sequence in Wizard Settings, with the Go to rule defined as "Next Step (no custom rules)." - Click on the
 icon next to the step name or hover over the list of rules and click New. A dialog is displayed for defining the step rule.
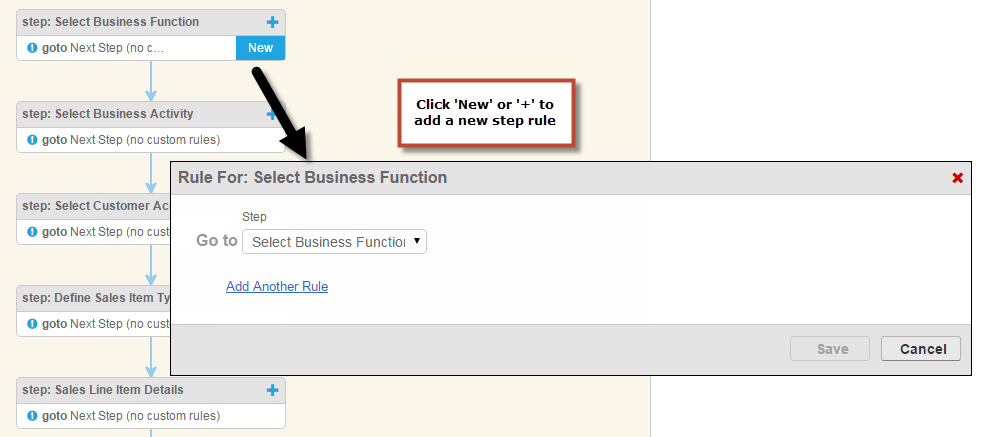
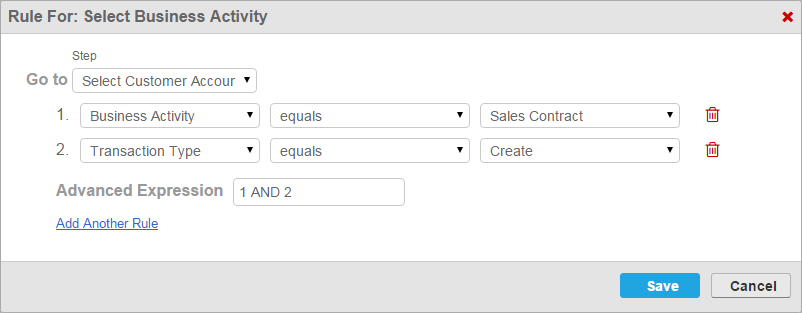
Choose a Go to Step rule from Step drop-down list.
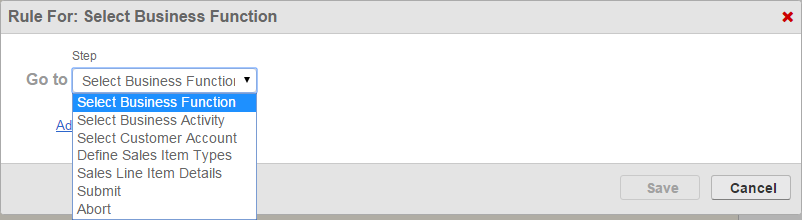
Go to Step Rule Description Go to Step Name Use this rule to define a specific step as the next step in the Wizard flow. For example, for the Select Business Function step rule, you could choose "Select Business Activity." Go to Submit Use this rule to make this step the last step in the Wizard. The Next button in Wizard runtime will be replaced with the Submit button. When Submit is clicked, the user is taken to the Wizard acknowledgement screen (or review page) and the Wizard is marked submitted (see Running Wizards for more information). Optionally, you can configure a URL to take an action upon Submit. Form your URL in one of two ways:
- If your Wizard creates a record as a result of submission (i.e. one of your inputs determines the focus Object AND Record Type), you can configure the URL to:
- take the user to the default Salesforce record page for the record created (e.g., "%Agreement%").
- take the user to a page name with parameters (e.g., Submit Request Mode for an Agreement "Apttus__AgreementSubmitRequest?id=%Agreement%"
- If your Wizard does not create a record but is simply posting information collected as the user interacts with the Wizard (for example, as a survey), use a REST URL for POST. The user is taken to the Wizard acknowledgement screen.
Note: Any URL entered for a Go to Submit rule must be relative, starting with the page name. For example, if you want to redirect the user to the agreement, use "%Agreement%" as the URL. The Object name between the % symbols represents the Label, not the API name.If there is NO URL specified for Go to Submit and the Wizard creates a record, by default the user will be taken to the Salesforce page for the newly-created record.Go to Abort Use this rule to Abort the runtime Wizard from this step. In most cases, a rule will conditionally trigger this Go to Step as it will not make sense to always have a step lead to Abort. As with the Go to Submit rule, you can optionally add a URL to another Salesforce page to Go to Abort, which will redirect the user to that page after they abort the Wizard. The URL enter for a Go to Abort rule must be relative, starting with page name.- If your Wizard creates a record as a result of submission (i.e. one of your inputs determines the focus Object AND Record Type), you can configure the URL to:
- To make your Go to rule conditional, click Add Another Rule to add a condition to your rule type.
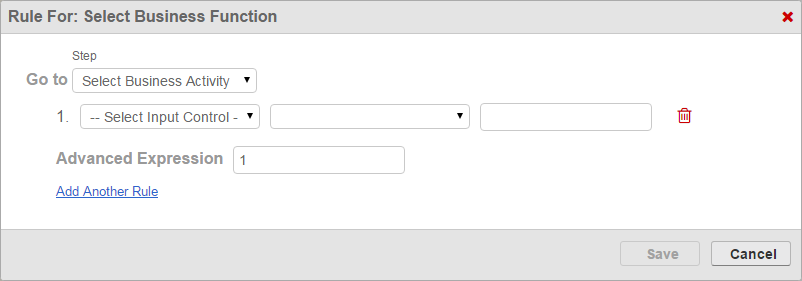
- Use the drop-down menus to build a condition expression:
- Choose an input from the list of inputs which are a part of the current step.
- Choose an operator for the expression which is specific to the chosen input's data type.
- Choose a value for the expression which defines the condition.
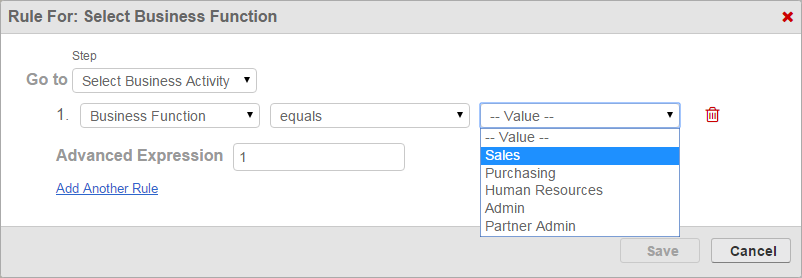
Add more conditions as necessary to complete the rule. By default, all expressions use AND logic, meaning all conditions are required for the rule to execute. You can use the Advanced Expression field to change condition logic to OR, or create your own custom condition (for example, (1 OR 2) AND 3 if you want to make only 1 of the first 2 conditions required).

There is no limit to the number of conditions you can create for a single step rule.
- Click Save to save your new step rule. The graphic changes to reflect the new flow based on the rule you have created. In the below example, a rule was configured to conditionally go to step 2 and a second rule was configured to conditionally abort the wizard.
- From the Wizard Step Rules tab you can:
- Click the
 icon to create another step rule.
 - Click Edit next to an existing step rule to make changes.
- Click Delete next to an existing step rule to delete the rule.
- Click Wizard Settings to return to the Wizard.
- Click the