Download PDF
Download page Salesforce: Configuring Product Pages.
Salesforce: Configuring Product Pages
This is an advanced feature that requires knowledge of Conga Collaborate auto-generated content as well as a good understanding of how data is structured within Salesforce and interpreted in Collaborate. You must be a system administrator to configure Product Pages. If you run into issues, submit a ticket to our technical support team.
If you are using the standard Quote object in Salesforce, use the Quote Pages feature
If you are integrated with Salesforce, you can use Conga Collaborate Product Pages. Product Pages is a feature that allows you to:
- Create a repeating page in a document template
- Generate documents that contain one repeated page per child record related to your launching object
- Access data from grandchild records related to your document launching object within the repeated page
For example, you might have an Opportunity Hierarchy set up in your Salesforce org, where you have a parent Opportunity custom object and a related child Opportunity object. You might want to create a document that launches from the parent Opportunity record and contains one page for each child Opportunity record, complete with data from the child Opportunity record and the child’s Opportunity Product data.
In this scenario, the parent Opportunity custom object would be the document launching object (where you click the New Document button), and the child Opportunity object would act as the source of data for the product page. Each child Opportunity would contain Opportunity Products, which act as grandchild records of the launching object.
Mapping Data for Product Pages
Product page variables must be mapped in their own object, otherwise known as the product page launching object, within the Salesforce Integration page. Follow these steps:
- From your user dropdown in the top right corner, go to Administration => Integrations => Salesforce => Edit
- Select your product page launching object in the Incoming Data section. In our example, this would be the standard Salesforce Opportunity object
- . Map the fields you want to use that live on that object
- Map child-level product page variables to use as auto-generated content. In our example, these would be fields that are on the Opportunity Products object
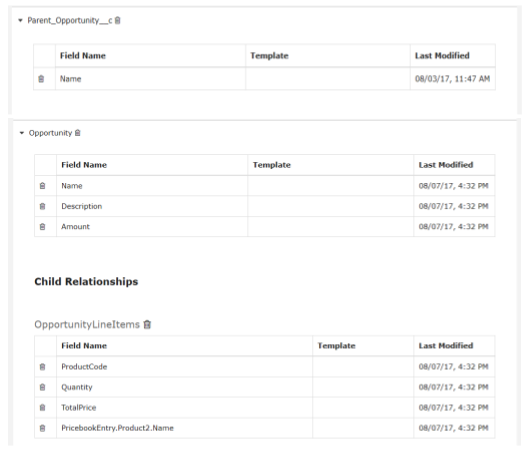
- Confirm the setup of your product page mapping. In our example, it would be:
- Parent Opportunity variables mapped as their own launching object
- Child Opportunity variables mapped as their own launching object
- Opportunity Product variables mapped as children of the child Opportunity
- The Incoming Data section within the Salesforce Integration page looking something like this:
Creating Product Pages
Product pages are created as content pages within your Collaborate Content library. Follow these steps to build a product page template:
- Go to Content
- Click +Add New button
- Click Page
- Add the content for your product page
- Add static content - text, images, links, etc.
- Add dynamic Salesforce content
- Insert product page launching object variables in {{double braces}}. In our example, these would be fields on the Opportunity object
- Insert product page child variables within [square brackets] and use the appropriate data-source. In most use cases, this involves creating an auto-generated table. In our example, these would be fields on the OpportunityLineItems object
- Name your product page. Naming a product page is one of the few scenarios in which you can use variables in the title of the page. Child object variables are often included in a page’s name to differentiate the pages
- Determine the field in Salesforce that will name your page. This must be a field on the product page launching object (in our example, the Opportunity object)
- Make sure the field is mapped in the Salesforce Integration page
- Copy and paste the API name of the field into your product page title surrounded by {{double braces}}. For example, if your child Opportunity name variable was Name, you could name your page Product Option – {{Name}} or just {{Name}}. In the latter example, if you had two child Opportunities with the names of New Business and Renewal, the product pages in your generated document would be named New Business and Renewal, respectively.
Configuring Product Pages
Product pages are configured within the Salesforce Integration settings in Conga Collaborate. Follow these steps to set up Product Pages:
- From your user dropdown in the top right corner, go to Administration => Integrations => Salesforce => Edit
- . In the Manage Features section, click on the Product Settings tab
- Fill out the Product Section Title field. This names the section within your Collaborate document where you want product pages to be created
- . If you type in the name of a current section of your template, the generated product pages will be added to that section
- If you type a new section name, this section will be added at the end of your generated document
- Check the Create Product Pages checkbox
- Choose a Page Template. Select the Content page you built in the Creating Product Pages section
- (Optional) Define a page include filter. This filter lets you include only pages for child records that meet the filter criteria. Using our example of the Opportunity Hierarchy from earlier, you might set a filter where a product page for the child Opportunities is only included if that child Opportunity has a stage of Proposal Creation Example syntax: Stage == ‘Proposal Creation’
- Select your child object in the Custom Line Item Object Name field. In our example, it would be Opportunity
- Type in the Salesforce API name for the lookup field that holds the ID of the parent object to the object you selected in step 7. This would be something like ParentOpportunityID in our example. No brackets are included around the API name
- (Optional) Define the field on your child object by which to sort the product pages within the document
- Select your document template from the list on the right. You can select multiple templates by Ctrl+clicking the templates you want to use
- Click Save
Mapping Templates
Product Pages only work when template mapping is enabled for the template you chose in step 10 above. Reference Salesforce: Template Mapping for more information on how to do this.
Launching your Document
Once all the above steps have been completed, create a document from within Salesforce. If everything was configured correctly, your generated document will contain a page for every child record on your launching object and each page will be populated with the content and data you defined in your Content page template.