Download PDF
Download page How to Create Nested Tables in Word Templates.
How to Create Nested Tables in Word Templates
This document outlines how to create a "nested table," in other words, one table built inside of another one. This is particularly useful when you want a multi-row / multi-column detail region to repeat.
While the screen shots below display traditional merge fields, the process of creating the Word tables is the same whether you are running Conga Composer Release 7 or Release 8 (only the style of merge fields may differ between releases).
This documentation explains how to nest Word tables but does not include guidance on nesting detail regions when using nested queries in Conga Composer Release 8.
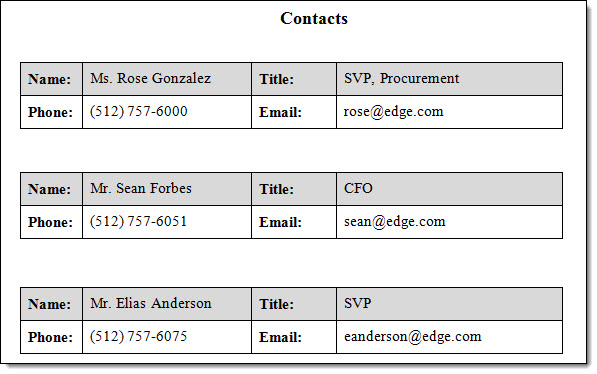
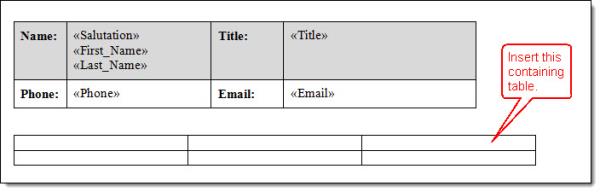
The objective of this exercise is to create a table like the one shown below. The example below is for a related list of Contacts, but the concept is applicable to any list.
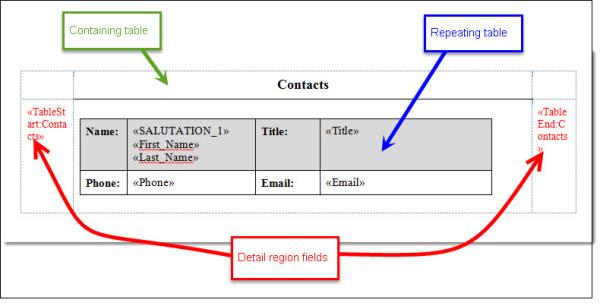
In this case, the desired layout for each record is a two-row, four-column table (the “repeating table”) that will be repeated for each item retrieved by a Salesforce report (or SOQL query) configured for use with a Conga Composer® solution:

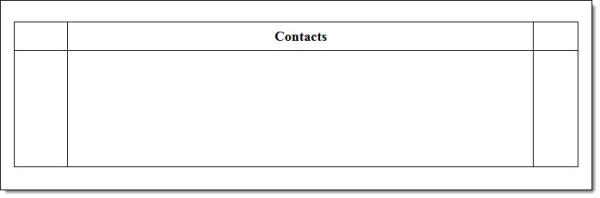
A containing table of three columns and two rows is used to provide a mechanism for controlling presentation of the repeating table:
This approach is superior to others in that the repeating table can be prevented from “breaking” across pages with the Word option to disallow the breaking of a row across pages (Table Properties → Row → uncheck "Allow row to break across pages"). A second benefit is the ability to repeat the header row of the table at the top of a subsequent page should the table need to flow across multiple pages.
The steps required to implement this are as follows:
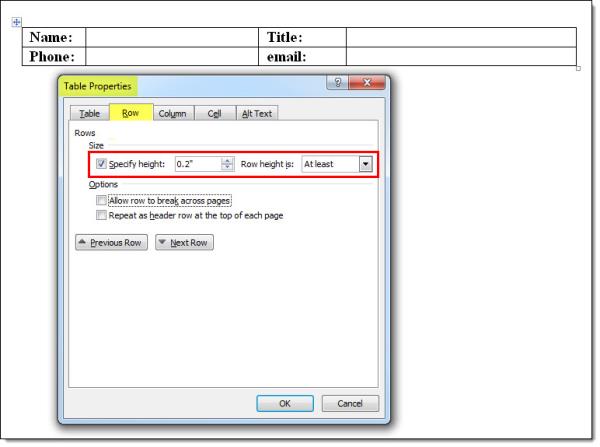
- Define the desired layout for the repeating items (the interior/nested table) in a stand-alone table. Below we have four columns and two rows. This is the table that will repeat for each result/record in the report or query.
- Optionally, set the desired row height for each row of the table, or simply allow them to adapt as necessary to accommodate the merge data. We recommend the “At least” option.
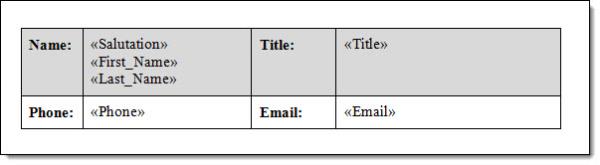
- Insert merge fields into the table you built in step 2.

- Adjust the border formatting and row shading, if desired. Here, a color has been chosen for only the top border of the table.
- Next, as a “container” for the repeating table created above, create a second table with three columns and two rows. Insert this table separately from the repeating table; we'll nest the two tables in a later step.
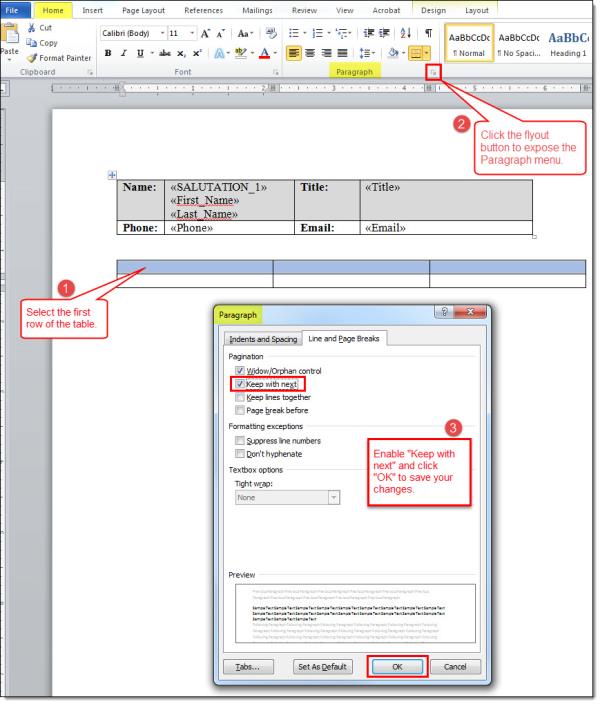
- In the containing table, select the first row (the “header” row) and from the Paragraph menu in Word, click the Line and Page Breaks tab, and enable the option "Keep with next." This ensures that the header row will never be left standing by itself at the bottom of a page:
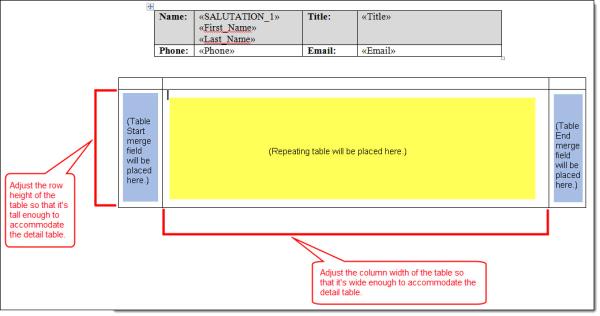
- Adjust the height of the second row of the containing table as well as the width of the columns so that the space is large enough to accommodate the repeating table. The middle column of the second row is where the repeating table will be placed while the left and right columns will function as "wings" to place the detail region (TableStart and TableEnd) fields.
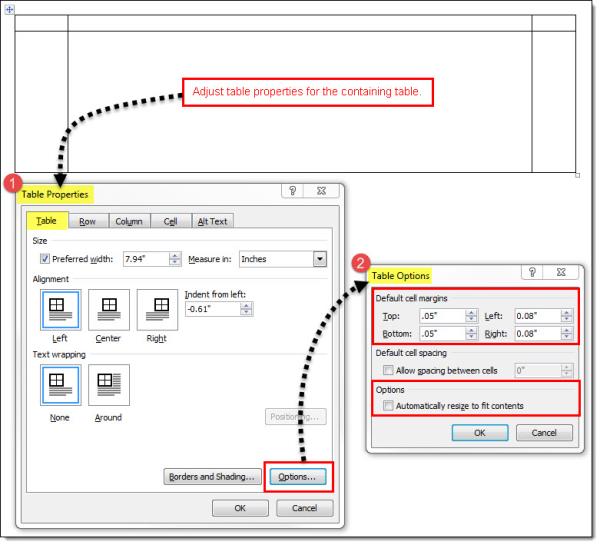
- Optionally, adjust the cell margins for the containing table so that the repeating table won't be up against the containing table's borders once you nest it inside. This is done in Table Properties | Options | Default cell margins. We also recommend disabling "Automatically resize to fit contents."
- Cut and paste the repeating table into the middle column of the second row of the containing table and add your TableStart and TableEnd fields in the "wings" (the left and right columns of the second row).
- Optionally, add a title to the containing table (here we've used "Contacts"), adjust the row height for the second row of the containing table to make it fit the repeating table a bit better, and turn off the borders for the containing table (we've done this below for all but the bottom border of the middle cell of the top row, which is why the remaining borders are shown as dotted blue lines).
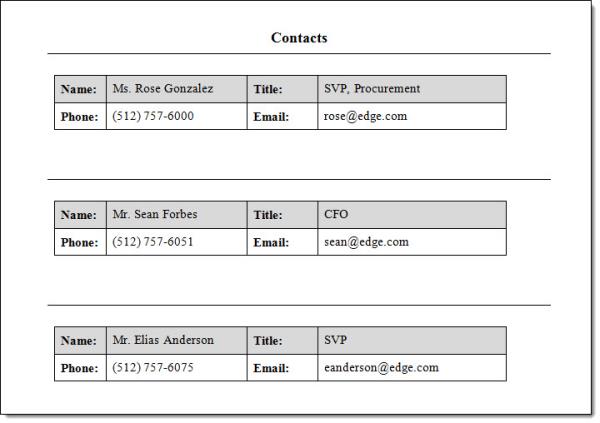
The output from your nested tables will now look like this. We may want to go back and adjust the height of the second row in the containing table so there is not so much white space between each of the repeated tables. We may also want to turn off the border below the heading of "Contacts" if we don't like the look of that border separating each of the repeated tables. Testing your solution is important as it will reveal these sorts of desired formatting tweaks.
Examples of Nested Tables in Conga Word Templates
Create the black table first, be sure to edit Table Properties so that table will not automatically resize to fit contents
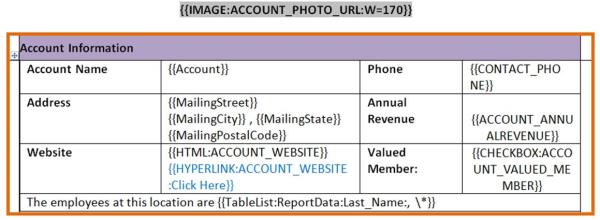
Insert the TableStart and TableEnd fields into the “wings” of the bottom row of the black table. These “wings” can be skinnier in width so the middle column of the bottom row better matches the width of the top row. The TableStart and Table End will get stretched out vertically, which will force the row to be taller – not to worry, that will go away in the output file as the TableStart and TableEnd disappear.