Download PDF
Download page Use Salesforce Reports with Conga Composer.
Use Salesforce Reports with Conga Composer
You can use a Salesforce report to retrieve data related to your Master Object. Conga Composer automatically filters the report by passing the Master Object ID into the report’s Advanced Filters. (You may override the default behavior and instead use other information to filter the report as needed.)
Conga Composer filters the report by passing the Master Object ID into the first cell of the value column in the report when the merge begins.
Ensure that the High Assurance Session Required setting is disabled, allowing Conga Composer to access exported report data. If this setting is enabled, the session security level required to export reports is increased, preventing Conga Composer to access the report data.
Let’s say your Conga Composer button is located on an Account and you’d like to use a report to retrieve all Contacts related to that Account so you can print a phone directory.
- Create a Conga Composer button and place it on your Account page layout.
- Create a Salesforce report based on Contacts & Accounts.
- Drag and drop the fields you’re interested in from Fields to Preview.
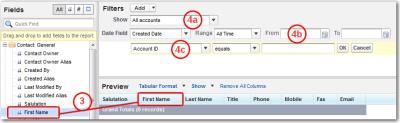
- In the Filters section, set the following:
- Show: View drop-down list to All Accounts.
- Date Field: Clear any values in Start Date and End Date.
- Required: Add Field Filter as the first Advanced Filter on the report. Set field drop-down list to the ID of the Salesforce object on which you built your Composer button or link (i.e. Account ID), the operator remains as equals, and value remains blank.
- Save the report into any publicly accessible folder, we recommend Conga Composer Reports.
This report is now ready to receive the Master Object ID (which is the Account ID) from Conga Composer.
Test your report by pasting sample data into the Advanced Filters and choose Run Report. Don’t save the report with the sample data. (In the above example, you would paste an Account ID.)
Focus the scope of each Conga Composer report to pull only the objects and fields necessary. If you include an ID column in your report, position it as the last (right-most) column.
Conga Composer will retrieve a report that contains a maximum of 2,500 rows and contains less than 5 MB of total data. Additionally, each Conga Composer solution has a combined row limit of 25,000. It is recommended to use a Tabular format, not Summary or Matrix style reports.
Add the Report to Your Composer Solution
After the report has been created, tested, and saved in the Conga Composer reports folder, you need to add the report to your solution. The best practice is to use a Report Alias in doing so.
You can add the report to your solution manually, or if you created the button using Solution Manager, you want to add the report using Solution Manager.
After adding the report, update your button (if using Solution Manager) and then launch the button. When the screen loads open the Template Builder from the Tools & Settings drop-down menu. In the template builder, you should see a new dataset with the name of the alias you used (if no alias was used the dataset will be called ReportData).