Download PDF
Download page Okta as a SAML Identity Provider.
Okta as a SAML Identity Provider
To integrate Okta as a SAML 2.0 identity provider, you must create an app in Okta to enable trust with the service provider (Conga Auth Service). After creating an app, you need external_organization_id, Metadata Location URL, and Organization ID Claim Type details.
Step 1: Create an app in Okta
- Log in to Okta.
- In the Admin Console, go to Applications > Applications.
- Click Create App Integration.
- Select SAML 2.0 as the sign-in method.
- Click Next.
- Provide the general information for the integration and then click Next.
- In the General section, enter and select details for the following:
- Enter the following Assertion Consumer Service URL (ACS Endpoint) per your region-specific environment and check Use this for the recipient URL and destination URL checkboxes.
Preview environment:
NA: https://login-rlspreview.congacloud.com/api/v1/auth/Saml2/Acs
EU: https://login-preview.congacloud.eu/api/v1/auth/Saml2/Acs
AU: https://login-preview.congacloud.au/api/v1/auth/Saml2/Acs
Production environment:
NA: https://login-rls.congacloud.com/api/v1/auth/Saml2/Acs
EU: https://login.congacloud.eu/api/v1/auth/Saml2/Acs
AU: https://login.congacloud.au/api/v1/auth/Saml2/Acs - Enter the Conga Platform Auth endpoint in the Audience URI (SP Entity ID) field.
Preview environment:
NA: https://login-rlspreview.congacloud.com/api/v1/auth
EU: https://login-preview.congacloud.eu/api/v1/auth
AU: https://login-preview.congacloud.au/api/v1/auth
Production environment:
NA: https://login-rls.congacloud.com/api/v1/auth
EU: https://login.congacloud.eu/api/v1/auth
AU: https://login.congacloud.au/api/v1/auth - Select the email address option for the name ID format field.
- Enter the following Assertion Consumer Service URL (ACS Endpoint) per your region-specific environment and check Use this for the recipient URL and destination URL checkboxes.
- In the Advanced Settings section, configure the following details:
- Attribute Statements: Enter
external_organization_idin the Name field and the unique value that is used as an external ID while configuring Okta as a SAML identity provider. - SAML Request: Click Browse files... and upload the signature certificate file (.CER file format). To generate the signature certificate:
- Use the following URL per your region-specific environment to download the service provider metadata file.
Preview environment:
NA: https://login-rlspreview.congacloud.com/api/v1/auth/Saml2
EU: https://login-preview.congacloud.eu/api/v1/auth/Saml2
AU: https://login-preview.congacloud.au/api/v1/auth/Saml2
Production environment:
NA: https://login-rls.congacloud.com/api/v1/auth/Saml2
EU: https://login.congacloud.eu/api/v1/auth/Saml2
AU: https://login.congacloud.au/api/v1/auth/Saml2 - Open the metadata XML file and go to the Base64-formatted X.509 certificate tag.
- Convert the Base64 to .CER format using this online tool.
- Copy the generated X.509 certificate with the header and save it with the .CER file extension.
- Use the following URL per your region-specific environment to download the service provider metadata file.
- Log Out: Select and enter details for the following:
- SLO Initiation: Check the Allow app to initiate single logout checkbox.
- Response URL: Use the following URL per your region-specific environment:
Preview environment:
NA: https://login-rlspreview.congacloud.com/api/v1/auth/account/SamlLogout
EU: https://login-preview.congacloud.eu/api/v1/auth/account/SamlLogout
AU: https://login-preview.congacloud.au/api/v1/auth/account/SamlLogout
Production environment:
NA: https://login-rls.congacloud.com/api/v1/auth/account/SamlLogout
EU: https://login.congacloud.eu/api/v1/auth/account/SamlLogout
AU: https://login.congacloud.au/api/v1/auth/account/SamlLogout - SP Issuer: Use the following URL per your region-specific environment:
Preview environment:
NA: https://login-rlspreview.congacloud.com/api/v1/auth
EU: https://login-preview.congacloud.eu/api/v1/auth
AU: https://login-preview.congacloud.au/api/v1/auth
Production environment:
NA: https://login-rls.congacloud.com/api/v1/auth
EU: https://login.congacloud.eu/api/v1/auth
AU: https://login.congacloud.au/api/v1/auth
- Attribute Statements: Enter
- Click Save.
Step 2: Get the external_organization_id, Metadata Location URL, and Organization ID Claim Type details
- Go to the application configured for authentication.
- Open the Sign On tab and go to the SAML 2.0 section.
- Copy and save the Metadata URL value for use as a Metadata Location URL.

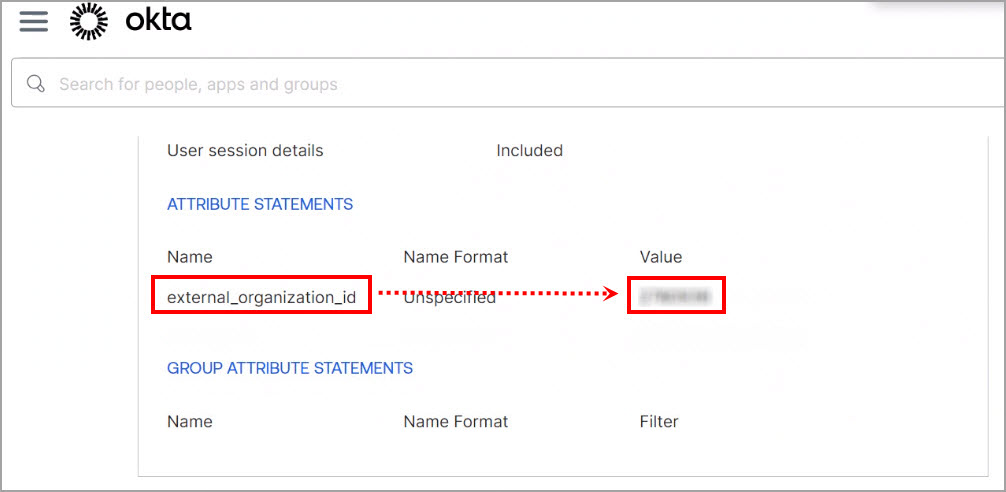
- Open the General tab and go to the Attribute Statements section.
- Copy and save the external_organization_id value for use as an External ID.

Step 3: Add Okta as an external integration
- Log in to the Conga Platform as an admin user.
- Click the App Launcher (
 ) icon from the top-left corner > Admin Console > Organization.
 - Go to the External Integrations tab.
- Click Add New.
The Add New External Integration screen appears. Choose SAML 2.0 from the drop-down list.
Enter values in the following fields as per your SAML 2.0 external integration:
Field
Description
External ID Enter the externl_organization_id value that you copied in Step 2.
Metadata Location URL Enter the Metadata URL that you copied in Step 2. Type Enter the type of this integration. It is a free-form text field. You can add types such as Dev, QA, UAT, Prod, etc.
Organization ID Claim Type Leave this field blank.
Description Add the description. Default IDP Enable the toggle to make it a Default External Integration IdP.
A user will be created for the external integration set as the Default IdP for the organization. For example, if you have set Okta, a SAML Identity Provider, as the Default IdP, all the new users will be created with the Okta IdP.
- Click Save.
Review the step 4 if you want to configure the Single Sign-On (IdP-initiated flow).
Users should only use the IDP-initiated flow to log in to the platform after they have been explicitly onboarded through the Platform Admin Console.
Step 4: Configure Single Sign-On (IdP-initiated flow)
- Log in to Okta.
- In the Admin Console, go to Applications > Applications.
- Select the application configured for authentication.
- Open the General tab and go to the Attribute Statements section.
- Add the following attribute details as per your environment:
Attribute Details redirect_uri Enter the Conga Platform App Url where the user should be redirected after authentication. Use the following URL per your environment:
- Preview Environment:
NA: https://preview-rls09.congacloud.com
EU: https://rls-preview.congacloud.eu
AU: https://rls-preview.congacloud.au - Production Environment:
NA: https://prod-rls10.congacloud.com
EU: https://rls.congacloud.eu
AU: https://rls.congacloud.au
client_id The SPA Client ID for logging in. Use the following client ID per your environment:
- Preview Environment:
NA: rls-preview-spa
EU: rls-previeweu-spa
AU: rls-previewau-spa - Production Environment:
NA: rls-prod-spa
EU: rls-prodeu-spa
AU: rls-prodau-spa
- Preview Environment:
- Click Save.