Download PDF
Download page Reviewing Imported Documents.
Reviewing Imported Documents
You can review and correct the clauses, fields, and table rows extracted from imported documents. Contract Intelligence converts all scanned or uploaded documents to PDF format for scanning and review. Provisions and other significant text are highlighted for review in an in-app PDF reader. For each detected clause you review, you can accept the extract, reject the extract, edit the extract, or flag the extract for review.
To review imported documents
Enter review mode:
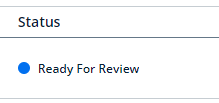
- From the home screen, click the folder icon to access the Project Dashboard, then open a file marked "Ready For Review."
From an open contract in Conga CLM click Review Intelligent Document Import (if available).
- If the administrator has configured it and if you are named as a reviewer, you can also check out batches of files by clicking the + GET NEXT BATCH button.
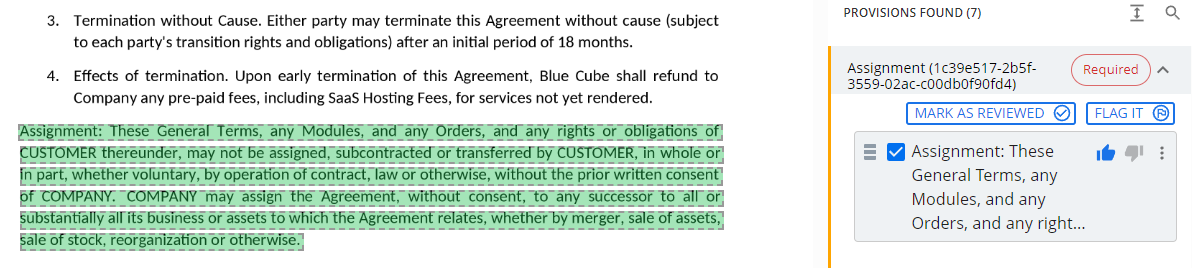
Passages from the extraction map that the AI has identified are highlighted in the text and identified by mapping category under the PROVISIONS FOUND heading in the review column to the right. For example, if a contract contains an amended effective date field, as has been mapped in the extraction map, that field is highlighted in the text and appears in the right column under its field-name heading.
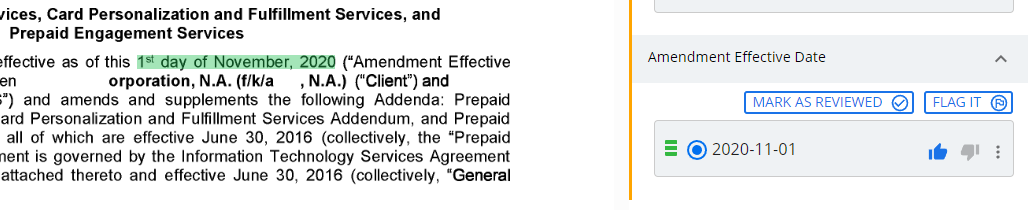
In this mode, you can offer feedback on extraction quality (using the thumbs-up/thumbs-down icons), mark a field or clause as reviewed (approved), or flag the entry for further attention. The AI's confidence score is indicated on the left, using color-coded bars: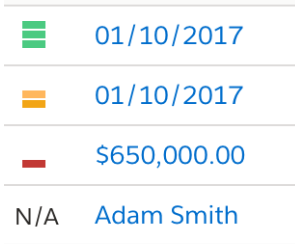
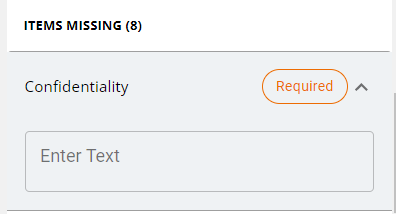
Mandatory fields are indicated by "Required" indicators. Your review cannot be completed until these required values are populated, either automatically or through manual editing.
![]()
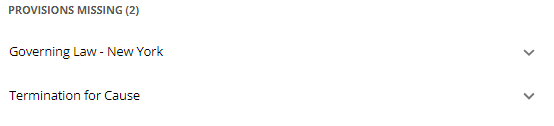
Provisions mapped for the document type that have not been found in the document are also called out in the review column below the found items, under the PROVISIONS MISSING heading.
Provisions that are in training are also called out in a special section, PROVISIONS BEING TRAINED.
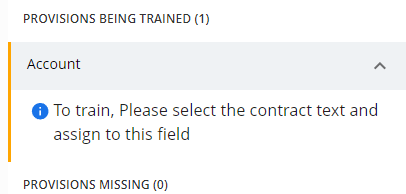
For more on this, see Training Provisions.
Selecting each item raises a summary of the item's name if it is a field or a clause, and a comparison of extracted values and their interpreted value.

For clauses, extracted clauses are compared to standard clauses and the match/non-match results displayed. Clauses that match are displayed with a "Matches with standard clause" heading. Clauses that do not match are displayed under a "Does not match standard clause" heading.
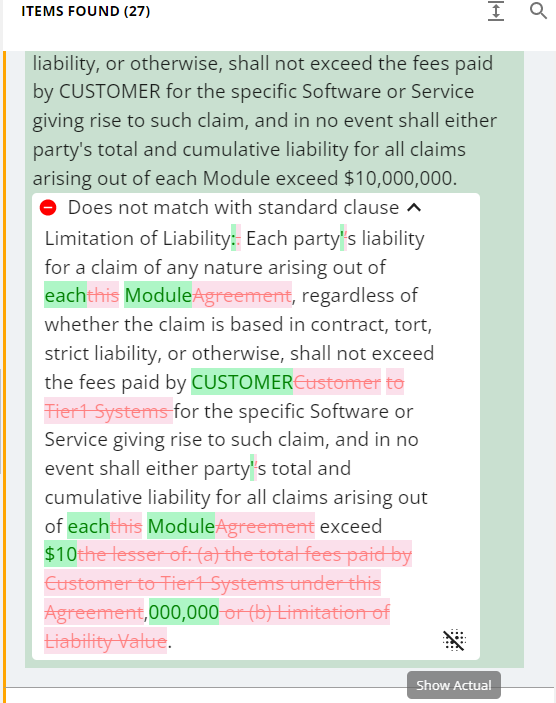
You are offered the ability to edit the extraction. Use this with care.
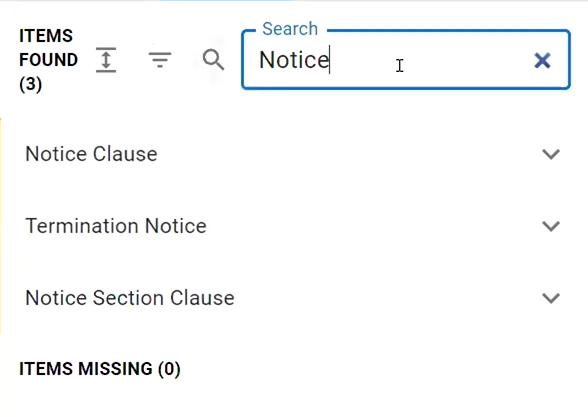
Clicking the search (magnifying glass) button opens a search feature that enables you to narrow the list of visible entries in the review column.
All entries in the review column can be expanded by clicking the down arrow, exposing the text of the found provision and some review tools.
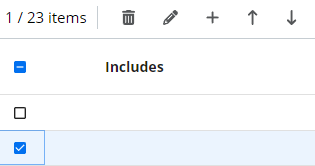
Tables are extracted as several expandable rows of fields and displayed individually:
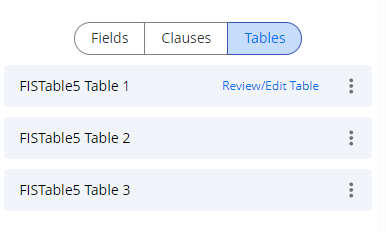
Click Review/Edit Table to raise a half-screen user interface for reviewing the table rows.
In this interface, you can delete, edit, add, or reorder a row, or select multiple or all rows for bulk editing.
When you have reviewed a selected table row and deem it satisfactory, click the Mark as Reviewed button to indicate acceptance. You can do this with multiple or all rows as well.
Clicking the preview button shows the table's values in context.
![]()
Some tables may be configured to show hierarchical entries. For such an entry, the name for the hierarchy and its possible values are preconfigured based on the appearance of the contract. Indicators of a hierarchic entry include a span row naming the group and indented rows below it.
For each found entry, you can:
- Click the trash can to delete the entry (this does not alter the underlying agreement, just the metadata). This feature is disabled for required fields.
- Click the pen icon to edit the entry (to remove extraneous scan artifacts from the entry, for example).
- Flag the item for later review. This marker remains visible even when the entry is collapsed.
This feature is not available for extracted table rows.
Missing items offer an input field (for clauses, a text box; for fields, a menu, date picker, or text field).
Clicking text captured by the extraction takes you to the page in the document and highlights the extracted text.
Details Tab
The Details tab, adjacent to the Review tab in the document review interface, contains these fields:
- Document Name/Record Type
- Review Level
- Review completed by
- Owner
- Assignee
- Comment
Agreement Summary
Some are filled in by the AI, while others are completed using manual pull-downs. The reviewer can identify the record type, designate an assignee, and comment on the document.
The Agreement Summary field is extracted by the AI engine for all documents, including those ingested as OCR-only. A document under summary is indicated as a blank in the review interface with a spinner running.
Caution
Document summary occurs when you open the document for review. Longer documents take longer to summarize.Editing Provisions
For each provision, you can edit or manually populate an entry.
To edit an extracted provision
- Click the "down" arrow to open the entry.
- Click the edit (pen) button to open the provision for editing.
- Edit the provision (This edits the clause, field, or line item's metadata, not the contract text).

Note
The Administrator may have configured the provision to insert a default value if Contract Intelligence could not find the provision's text in the document. Such values are clearly indicated in the reviewer UI. You can edit these provisions like any other.
- When you are done editing, click the Accept (check mark) button, confirming that it has been accurately extracted, marked, and categorized. To abort the edit, click the X.
- Edit another entry or click MARK AS REVIEWED.
To assign and edit a provision that has not been extracted
If a provision has been defined as manual-only or if the AI has missed a passage, you can manually assign a provision to a passage in the contract by one of two methods:
Note
The Administrator may have configured the provision to insert a default value if Contract Intelligence could not find the provision's text in the document. Such values are clearly indicated in the reviewer UI. You can edit these provisions like any other.
Copy from the Contract
- Click the "down" arrow to open the entry.
- Click the edit (pen) button to open the provision for editing.
Locate the relevant clause, field, or line item in the contract.

Tip
Use the built-in search feature to locate contract terms quickly.
- Either:
- Copy the information from the contract to the provision field and format it as you will, or
- Highlight the provision text, copy it and paste into the clause text box.
- The provision text appears in the right column, ready for editing.
- If it is necessary, edit the provision as described above.
- When you are done editing, click the Accept (check mark) button, confirming that it has been accurately marked and categorized.
Edit another entry or click the Review Complete button.
Tip
If you click the check mark icon to accept a clause in error, you can un-check it (and all other acceptances from this session) by clicking the Cancel button.
Highlight in the Contract
- Review the missing or manual-entry-only provisions in the PROVISIONS MISSING column to the right and locate a provision to fill.
- Search and highlight the provision text in the contract.
- Right-click the highlighted provision text and select the correct provision type from the drop-down menu.
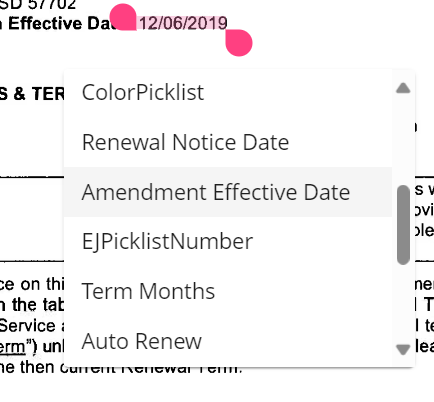
- The provision text populates the provision entry, which moves to the PROVISIONS FOUND column.
- Edit or approve the selected provision by clicking the pen or checkmark icons.