Download PDF
Download page Setting Up Data Extraction.
Setting Up Data Extraction
Discovery AI uses mappings to extract provisions from uploaded documents. For Discovery AI to do this, you must define the types of documents you expect it to receive. For example, you might define a master service agreement, a non-disclosure agreement, or a construction quitclaim. For each agreement type, you must map for extraction the provisions you anticipate in the agreement.
Provisions can be of three types: fields, clauses, or tables. A field contains some measurable, normal property: a date, a percentage, a duration, or a cash value. Clauses do not have a measurable characteristic; for example, a stipulation, an indemnification clause, or a representation of fact. Tables present values in rows, also called line items, which present values in columns. The column defines the type of data, and the row contains the value. It may be useful to consider a table as an array of fields. Access provisions through the Data Extraction Setup tab in the left navigation bar. Manage provisions using the Provision Library.
When built-in provisions do not meet your needs, you can create and train your own custom provisions to provide bespoke extraction solutions. Mapping Data Extractions
Provisions
Built-In Provisions
Discovery AI extracts these fundamental provisions (if possible) from all contracts it reviews:
- Agreement Title
- Parties
- Effective Date
- Commencement Date
- Original Expiration Date
- Termination Notice
- Renewal Type
- Renewal Period
- Renewal Notice
- Renewal Limit
- Signatures
- Notice
- Notice Address
- Related Master Agreement Name
- Total Contract Value
These provisions are required because without them a contract is not effective, and they are available for every Discovery AI extraction.
You can select from the following common built-in provisions as your needs dictate:
- Audit Rights
- Pricing/Billing Frequency
- Data Security Breach Notification
- Dispute Resolution
- Exclusivity/Not granted
- Exclusivity/Required
- Governing Law
- Indemnification Provision
- Non-Solicitation Period
- Pricing/Payment Model
- Pricing/Payment Terms
Additionally, you can pick specialized terms from our library of over 1,200 provisions for extraction. These are specialized for several industries and improve the granularity and specificity of your extractions.
Note
Not all provisions are available for attorney review with Verified Extraction. If you need Verified Extraction, you must negotiate the projected provision set with your Conga account executive.
Mapping Data Extractions
To set up a new data extraction map
- Click the Data Extraction Setup tab in the left navigation bar to raise the Data Extraction Setup window.
- Click the New button to raise the New Document Extraction Mapping popup.
- Give the new mapping a name, enter a brief description, and choose a record type from the Choose database record pull-down menu. These values correspond to a particular contract or document type. For example, in a CLM deployment, this shows agreement records.
- To remove the requirement to review, select 0 - Skip Review.
Note:
If any field's extracted value cannot be normalized to match its data type, the file is sent to Ready for Review and must be reviewed.
- To use a single-stage review process, select 1- One level - Review and Complete from the "Choose review level" pulldown.
- For a more formal process, select 2 - Two levels - Review and Approve and select one or more approver names from the "Choose reviewer(s)" menu.
- To remove the requirement to review, select 0 - Skip Review.
- To let users to check out batches of documents for review, slide the Allow reviewers to get next batch toggle, then set the batch size. This convenience enables users to check out a block of records with a single "get batch" action. Users cannot request a new batch until they review or reassign all documents currently assigned to them.
Under Import Options, select extraction options to make available to your users. These are:
- OCR to import the document as searchable text
- Automated Extraction to submit the document for AI-only extraction, or
- Verified Extraction to submit the document for AI extraction with attorney review.
- Depending on whether this is a purchase or vendor agreement, set the Organization Role? toggle to either Buyer or Seller.
- Click Save to return to the Data Extraction Setup window.
- Click the name of the new mapping to raise its detail window.
- Click the WORKSHEETS tab.
Select the Fields, Clauses, or Tables tab, then click New to raise the New Field Mapping, New Clause Mapping, or "Select table provision" popup.
For each field or clause, select either Auto Extraction or Manual Extraction and the default value (If there is no extraction, this value is assigned to the provision.)
Note
When a default value is assigned to a provision, it appears in the reviewer's Provisions Found section, clearly marked as a default value. A default value does not fail validation checks for required fields.
- If the reviewer modifies the default value or marks it as reviewed, the updated value is saved to the agreement record.
- If the user does not modify the default value or mark it as reviewed, the default value is saved to the agreement record.
Default values are not sent to the AI engine for training.
Also choose whether the extraction is required. For clause extractions, choose whether to extract the complete paragraph in which the clause is found. Manual extractions require no further provision configuration.
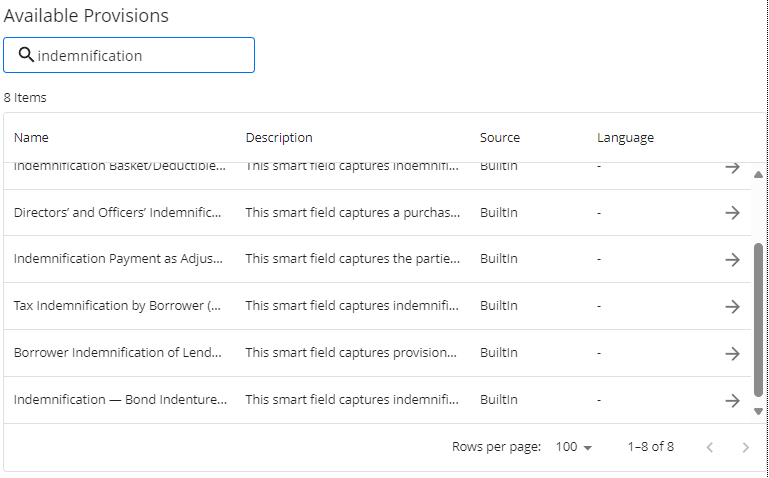
For auto-extractions, select a field or clause from the left column, then select applicable provisions from the Available Provisions list. You can narrow your provision choices dramatically by entering one or more words in the search bar:

Tip
Hovering over a provision type in the Available Provisions column raises explanatory text describing the provision.
When you find a provision to assign, click the right-arrow icon to copy it to the Mapped Provisions: Approval Indicator column.
For each table, select the table you will use from the Search Table Provision dropdown and then select either manual or automatic extraction.
Note
You can only map one CLM object per table mapping. You cannot map two tables with a common agreement line item in one mapping.
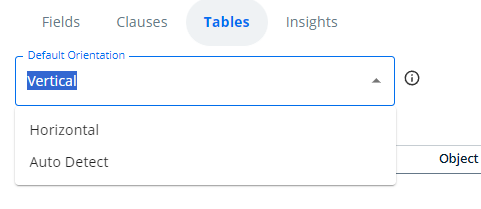
For each table, select Horizontal, Vertical or Auto Detect as the orientation. Vertical tables (default value) have headings in the top row, with values laid out in columns beneath. Horizontal tables place headings in the left column and lay out each heading's values in rows. If you do not know how tables are arranged, you can select Auto Detect, which engages AI to analyze the tables. This will slow down the extraction.

Click DONE to save the mapping.
To clone a worksheet in a data extraction map
- Click the Data Extraction Setup tab in the left navigation bar to raise the Data Extraction Setup window.
- Click the name of the map with the worksheet you want to clone.
- Click the Worksheets tab.
- Select the worksheet you want to clone from the Choose Worksheet dropdown menu.
- Click WORKSHEET ACTIONS > Clone
- Enter a name for the worksheet, select the target record type, and check the component you want to clone.
- Click SAVE.
The cloned worksheet appears in the destination record type.
To edit a data extraction map
- Click the Data Extraction Setup tab in the left navigation bar to raise the Data Extraction Setup window.
- Find the name of the map you will edit.
- To edit the name, description, or record type, click the Edit (pen) button.
- To edit the provisions mapped to the named extraction, click the name hypertext in the Name column.
- Edit the mapping as described in To set up a new data extraction map.
To delete a data extraction map
From the Data Extraction Setup window, either click the trash can button next to any single mapping or click the checkbox next to one or multiple rows and click the DELETE button.