Use Case: Terminating Assets When Billing Management is Installed
If you have the Conga Billing package installed in your org, the billing impact is shown while terminating an asset. During billing, CPQ determines the refund value from the Cancellation Date captured in the asset and refunds to the customer accordingly. For more information, see Billing Concepts.
If Conga Billing is not installed, the system calculates the different values based on the calendar dates. For more information, see Terminating an Asset.
Prerequisites
- The fields displayed during termination depend on how your administrator has configured the Asset Termination Fields setting. For more information, see Configuring Installed Products Settings.
- CPQ enables you to edit selected fields on a cancelled line, based on the configured Editable Fields For Cancelled Lines. You can edit the end date on the cancelled line and reprice the cart to calculate the net price. You can also edit a custom currency field to pass credit amounts to downstream applications through the proposal or order. Apart from the fields you selected, the remaining fields are read-only fields. You cannot edit sensitive managed package fields such as list price related currency fields. For more information, see Configuring Installed Products Settings.
- The values you edit at the bundle level cascade to the associated option lines.
- The end date of a cancelled bundled header line overrides any change to the end date at the option level.
- If a particular field is read-only at the bundle level, the field is read-only at the option line level also in the Cart.
- When the Conga Billing package is installed, it is recommended to display the Confirm Termination page instead of the Confirm Termination pop-up. In Display Column Settings for the Display Type Asset Termination, select all billing fields required. For more information, see Configuring Display Column Settings.
To terminate an asset
New Sale
- From an account, create an opportunity.
- Create a quote from the opportunity and configure products.
- Add products to the cart and finalize it.
- After your customer accepts the quote, an order is generated.
- After you activate the order, assets are generated. The assets are active and visible on the account.
Termination
- Create a quote to terminate assets.
- Navigate to the Installed Products page.
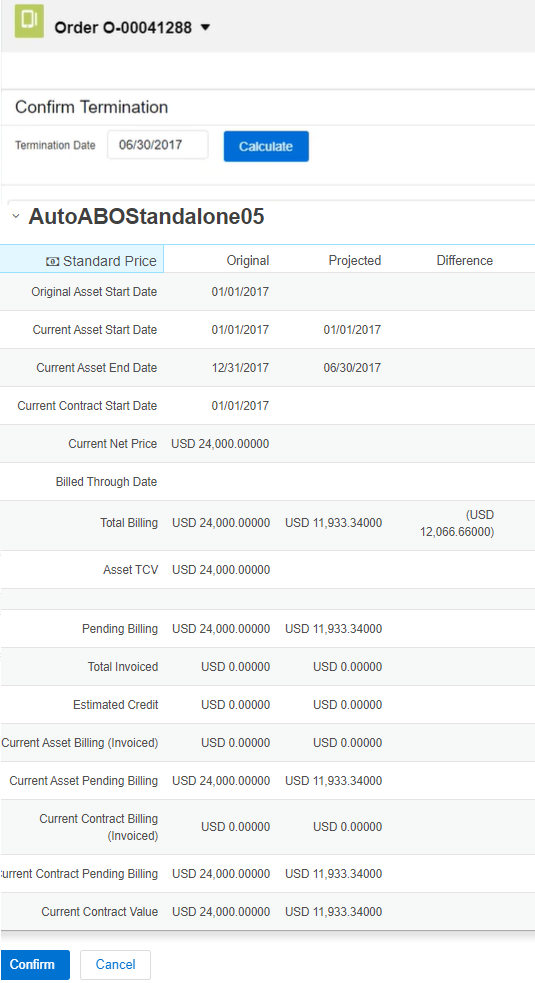
Select the assets that you want to cancel and click Terminate. The Confirm Termination page is displayed.

Enter the Termination Date.
The termination date can be in the past, the current date, or any date in the future. You can use custom logic to validate the date entered for the cancellation. If the validation fails, an error message is displayed.Click Calculate to calculate the difference in billing amount.
CPQ displays values for different fields, such as the Pending Billing (Original = the amount you had paid, Projected = the amount to be credited/debited depending on the termination date, and Difference = the difference between the former field values).If your product has different Charge Types, the system displays the amount divided among the different Charge Types also. If your product is a Bundle and contains multiple Options, the system displays the amount divided among the Option products. Also, terminating a bundle cancels all the associated options configured inside that bundle.
The Projected and Different amount is calculated simultaneously when you click Calculate using the Billing Schedules and Billing APIs. This gives you a quick overview of the difference you have to pay to or receive from the customer.
For example, if your Asset, priced at USD 1200, contains the Start Date as 01/01/2016, End Date as 12/31/2016, and Termination Date as 07/31/2016, the amount populated in the different fields are:
Original = USD 1200
Projected = USD 300
Difference = USD -900- Click Confirm.
The status of the cancelled asset line items shows Pending Cancelled on the Installed Products page. Go to the Cart and review the following fields and their values.
- Net Price
- Line Status
Selling Term
- End Date

You can view the change in the Delta Quantity and Delta Price on the Cart. For the above example, Delta Price is shown as USD -900.
Delta Quantity and Delta Price is 0 for the following scenarios:
- Your Bundle or Standalone product has Charge Type = One Time.
- You do not have Conga Billing installed in your org.
- Click Finalize.
After you accept the quote and activate the order for the terminated assets, you can view the impact on the following fields on the Account page:
- For an Asset Line Item, Asset Status changes to Cancelled, Delta Price and Delta Quantity contain new values.

- For an Order Line Item, Line Status changes to Cancelled, Delta Price and Delta Quantity contain new values.

After the assets are cancelled, CPQ selects the Inactive flag for the asset line items with Cancelled status so that these asset line items do not show on the Cart for the successive ABO actions.
To check the status of your assets, the Approval Stage of the Quote/Proposal must be Accepted. To view the assets, select the account of the proposal and navigate to Asset Line Items (Sold To) related list.
A new entry is also made in the Asset Transaction History related list. For more information, see Asset Transaction History.