Download PDF
Download page Configuring Products from the Catalog.
Configuring Products from the Catalog
If you have attributes and/or options associated to your products, you can configure them from the Catalog page.
Configure Product Attributes - You can select and configure attributes for your products from the Attributes page.
Configure Options for bundle product - You can select and configure options for your products from the Configuration page.
If the system is configured such that you have to include one or more products along with your regular product selection, you may view the following possibilities on the Catalog page and Configuration page:
- If there is only one product, it is auto-included automatically and you will see only the Add to Cart button.
- If there is an option to select only one product from a product group, you will see a radio button next to each product and the Add to Cart button.
- If there is an option to select multiple products, depending on the minimum/maximum number of products set for your organization, you will see a checkbox next to each product and the Add to Cart button. This enables you to select multiple products at once.
- If no option products are visible due to Visibility rules configuration or different price lists, and the administrator have set the minimum options as zero, the system considers this configuration as invalid. Ensure that your administrator has set the right configuration for the Min/Max option for an option group.
- CPQ does not display a message when you hover over an option product which is disabled on the configuration page. As a part of notification and error handling, CPQ provides a defined Rule Messaging for exclusion rules. If you run the exclusion rules successfully, no hover over message is displayed, unlike in the case of inclusion rules where such messages are helpful for you to make a decision about adding products to the cart.
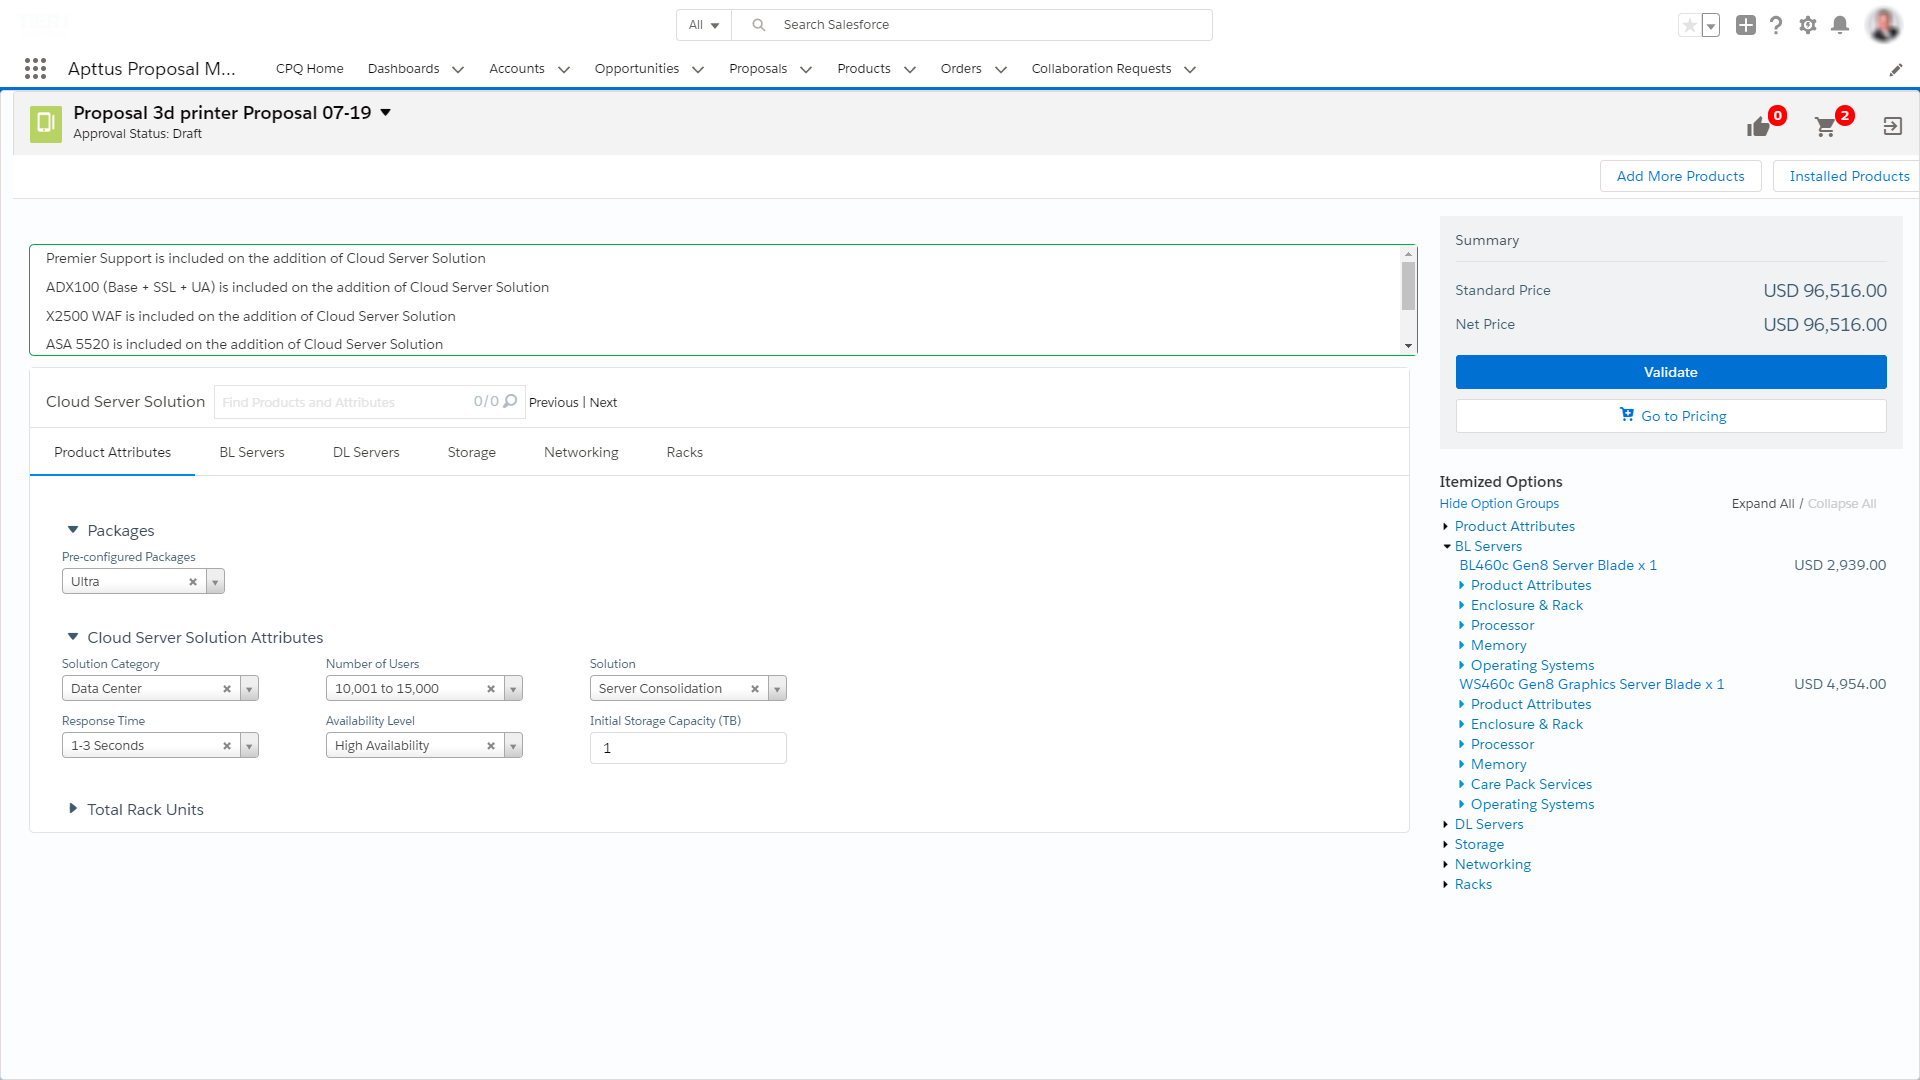
You can see the following buttons on the Configuration page:
| Action | Description |
|---|---|
| Validate | Validates that the Catalog is configured correctly, that is, there is no validation or other rule-related errors in catalog configurations. This button ensures that the constraint and pricing rules are processed for your products. While the configurations are validated, the Go to Pricing button is disabled on the Configuration page. After the configurations are validated, the Go to Pricing button is enabled. After you click Go to Pricing, the Cart page is displayed. |
| Go to Pricing | Calculates the price of products on the Configuration or Catalog page, and navigates you to the Cart page. When your administrator has enabled the Bypass Shopping Cart setting, this button is hidden on the Configuration and Catalog pages. However, you can still finalize the quote using the Mini cart. |
| Add More Products | Returns to the Catalog page to add more products. |
| Installed Products | Navigates to the Installed Products page. You can select products from a list of purchased products that are associated with the account, which is associated with the proposal. This enables you to select products directly that are previously purchased by the account. |
| Update Price | Calculates the price of a bundle and its options on the Configuration page. This button is enabled whenever you change field values on the Configuration page and is disabled once the pricing is updated. |
| Abandon | Abandons the current cart (deletes the cart). |
| Close | Closes the cart without saving any changes to it. |
| Edit | The Edit button in the menu under the proposal name enables you to edit the Quote details. |
| View | The View button in the menu under the proposal name enables you to view the Quote details. |
| Confirm Option Selections | Initiates calculation of pricing, expression, and execution of rules on the Configuration page. Click this button after you configure all the options and attributes. This button is only displayed if the administrator enables it. |
To configure product attributes
- Follow one of the following ways to find a product on the Catalog page:
From the Browse Catalog list, select a category hierarchy you want to view.
From the Browse section, navigate to the category hierarchy for the desired product.
In the Search bar, type a category or product name and click Search.
- From the Product Catalog section, to configure attributes for a product, click the Configure button.
Configure the required attributes. You can search for attributes using the search bar next to the bundle name. Type full or partial text and click Next or Previous or press Enter to search the attribute. The search result is highlighted under the respective tab.

The values of attributes can depend upon the selection of other attributes. The visibility of values in the attributes is based on the dependent attributes. If you select a certain value in an attribute, only the relevant values are displayed in the dependent attribute. You must remove or select a different value in the attribute to see different values in the dependent attributes.
If you want to see all the values of an attribute after the values are filtered, click the cross icon (
 ). Regardless of the values of dependent attributes, all the values are displayed and when you select a different value, the dependent attributes are filtered based on your selection. For example, the values of Attribute B depend on the selection of Attribute A. When you select a value in Attribute A, only relevant values are displayed and all other values are hidden on Attribute B. If you change the value of Attribute B, the value of Attribute A changes automatically.
While changing attributes, you must wait until the constraint rule execution is complete. If you keep changing the attribute value multiple times and switching between the Product Attributes tab and the Product Options tab on the Configuration page, the Product Options tab disappears intermittently.
- The following actions are available for you once you select the attributes.
- Click Next. This button appears in case of bundled products where you may need to configure or add additional products.
- Click Add More Products, to add additional products.
- Click Remove Item, to remove a product.
- Click Go to Pricing to price the product.
- Click Validate to verify your configuration.
Based on your selected attributes, the system saves the product in your shopping cart.
- On the Product Attribute Group Detail page, you can set the Two or Three Column Display for the product attributes in order to view the configured attribute groups in two or three-column format.
- CPQ displays a red border on the left when attributes are set required in the UI.
Attributes can derive the price for a product from an attribute without additional configurations to the Attribute Group for that attribute.
Consider a product Internet Plan, with three attributes - Internet Speed, Data Limit, and Package Price. On configuring the product from the cart page, the user enters the value for Internet Speed and Data Limit. Create an attribute Package Price, for which the value is calculated using the formula Internet Speed * Data Limit using field expression builder. The Package Price attribute value will not be shown to the user on the ProductAttributeDetail, ConfigureBundle, and ConfigureOptions pages. The user can choose to derive the Base Price of the product Internet Plan from the Package Price Attribute Value using the Default Price From field from the Default tab of the Price List Item.
The attributes calculated using formula fields are hidden from the following pages:
- Apttus_Config2__ProductAttributeDetail3- Attributes for Bundle or Standalone products
- Product Attribute Detail page
- Page Configure Bundle page - Attributes for Options
- Select Config Options Detail View- Attributes for Options shown in line with the option
- Configure Option page.
To configure bundle products
- You can select a product by doing any of the following:
- From the Browse Catalog list, select a category hierarchy you want to view.
- From the Browse section, navigate to the category hierarchy for the desired product.
- In the Search bar, type a category or product name and click Search.
- From the Product Catalog section, to configure options for a product, click Configure next to it. The selected product is displayed in the Selected Products section on the right and the options page is displayed.
- Select the options for your bundle. You can search for products using the search bar next to the bundle name. Type full or partial text and click Next or Previous or press Enter to search the product in various option group tabs. The search result is highlighted under the respective tab.
- The following actions are available for you once you select the options.
- Click Add More Products, to add additional products.
- Click Remove Item, to remove a product.
- Click Go to Pricing to price the product.
- Click Save to save your selected product for that quote.
- Select Optional to consider a particular line item as an optional one.
The values in the Quantity field for options can be driven by the numeric expression builder configured for the selected option.
The precedence for calculating the default quantity of an option product is as follows:
- Transactional input provided by the sales representative on the Configuration page
- Default quantity defined at the bundle structure level
- Default quantity defined at the price list item level
The Save button is used in case you want to save your configuration before proceeding to the attributes and cart page. For example, if you change the Quantity of the options associated with your bundle product, you might want to save the configuration before moving to the cart page.
The administrator must enable the search bar on the Configuration page. For more information, see Configuring Config Page Settings.
Hidden options and attributes are not displayed in the search result.
Configuring Optional Line Items
You can mark bundles, sub-bundles, and options in the bundle as optional. This helps you to give customers a choice and recommend the product to them as part of the configuration. You can present these optional products separately in a proposal document or keep them as a part of the configuration. Click is Optional checkbox next to a product to mark them optional.
Whenever you mark any product as optional, the price of the product is not included in the total. If you mark a bundle as optional, the price of that bundle is not included in the total and if you mark an option in a bundle as optional, the price of that option is not included in the bundle price.
Keep in mind the following when you mark options or bundles as optional.
- When you mark a bundle as optional or clear the is Optional checkbox, the action is cascaded to all options and sub-bundles associated with that bundle. That is, if you mark a bundle as optional, the options and sub-bundles are also marked as optional. Though, you are allowed to edit the is Optional checkbox for the associated options and sub-bundles.
- You can edit is Optional checkbox for options or sub-bundles added because of rules.
- You can edit is Optional checkbox for options or sub-bundles that are marked as required only if the parent bundle is marked optional.
- You cannot edit is Optional checkbox for options in the radio button group, unless the parent bundle is marked optional.
- The options for which you selected is Optional checkbox are not considered in the Option Group Min/Max validation. You must select other options in that Option Group that are not marked optional to satisfy the Min/Max validation.
- The options in an optional bundle which is marked by the is Optional checkbox, are not considered in the Option Group Min/Max validation regardless of the is Optional value for the individual options themselves. The details like amount and quantity are not considered in the validation.
You can edit is Optional checkbox on the Cart page as well.
Optional products are not considered in the Min/Max criteria only if Exclude Options Products was enabled by the administrator in Config System Properties. For more information, see Excluding Optional Product in Min/Max Criteria.
The Validate button ensures that the constraint and pricing rules are processed for your products. While the configurations are validated, the Go to Pricing button is disabled on the Configuration page. Once validated, the Go to Pricing button is enabled.
After you click Go to Pricing, the Cart page is displayed.
You can clone a bundle within the same quote, make modifications, and use it as another bundle.
This feature enables you to clone a bundle with attributes, options, and pricing, make desired changes and save it as another bundle.
Min-Max Messaging: On the product configuration page, when you make a selection of options in the desired Option Group, CPQ displays the min-max messages guiding you about how many options can be selected. For example, If you want to select X number of options where options can be X to X+n (n=1,2,3...). Then you will see an appropriate message for selecting those options from the desired Option Group. Optional products are not considered in the Min/Max criteria if Exclude Options Products is enabled in Config System Properties.
Horizontal Scroll for Option Groups Tab: The Product Configuration page provides a horizontal scroll bar when you have many option groups. You can see a single line of tabs for option groups and for menus with many option groups, you can also see the submenus with option groups being available for selection.
Increased Threshold for Bundle Maintenance Job: You can run Bundle Maintenance Job without failure when CPQ has a large number of options validated with the following scenarios.
- 10,000 options groups for the entire system
- 10,000 options in a given option group
- 2,000 option groups for a given bundle with an average of 3 to 5 options each group
To clone a product
You must have an existing product in the cart.
- On the Cart page, select products using the checkbox.
- Click the Copy icon (
 ). The product line items are cloned on the cart page.
 - You can configure the products and make the desired changes.
If you clone bundles with complex structure multiple times, CPQ may encounter STRING_TOO_LONG or Apex CPU Time Limit Exceeded error. The errors may also be encountered if the administrator has defined Option Filter Callback.
You have created another bundle from an existing bundle. You can proceed to pricing.
To lock an option value
A lock icon appears when the quantity of the option is derived using a numeric expression.You can click the lock icon next to the option, to ensure that any updates to the field from which its value is derived do not affect the value set the first time. For example, you can lock the quantity field for an option that is populated based on multiple attribute values using the field expression builder, once you enter the attribute value on the Attribute Detail page and click Next, the value for quantity is auto-populated.
- Select the option and click the Lock icon.
- Navigate back to the Attribute detail page and edit the attribute value and click Next. Notice that the value of the Option does not change even though the attribute value has changed.
- If you skip any mandatory configurations, the status of your configuration is shown as pending with a red exclamation mark on the Cart page. You must complete the pending configurations in order to finalize the Cart.
When a product is added by a rule that populates the AddedByRuleInfo__c field on the line item with a value, CPQ does the following:
- Clears the is Optional checkbox if is Required checkbox for the line item is selected at the Option Group level.
In both cases above, you can edit the is Optional checkbox.
To select products from prompt
The prompt appears on the Catalog page when you add a product to the cart that cannot be sold alone, but other specific products must be sold with that product. When you add such product, CPQ requires you to select a minimum or a maximum number of products from the prompt to add to the cart. The product listed in the prompt is based on the inclusion constraint rule defined by the Administrator.
There are two types of prompt that appear on the Catalog page.
- With checkboxes: In the prompt with checkboxes, select the checkbox against the product you want to add to the cart and click Add to Cart. The Add to Cart button is not enabled until you select at least a minimum number of products and the remaining products are disabled when you have selected a maximum number of products. The prompt is closed when you click Add to Cart.
- Without checkboxes: In the prompt without checkboxes, you need to click Add to Cart button against the products. After you click Add to Cart, the product is removed from the prompt. When you select less than the maximum value, you have to manually close the prompt because the prompt closes automatically only when the maximum number is reached.
After you add the product to the cart, the counter on the mini-cart icon at the top right-hand side corner is updated. The number of products in the cart is reflected on the counter. If there is a recommendation constraint rule defined on any product you added to the cart, the counter on the recommendation icon is also updated.