Download PDF
Download page Creating a Constraint Rule.
Creating a Constraint Rule
- Go to ADMIN SETUP> Product Administration > Constraint Rules. The Constraint Rules page is displayed.
Click the ellipsis icon
 below the Edit page button and click Create New. If you want to create a specific type of rule, select the required rule type from the menu.
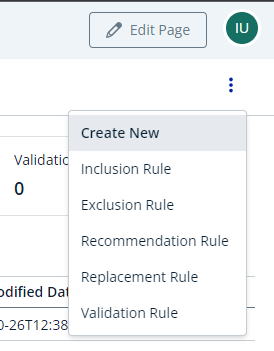
Enter the following details:
Field Description Rule Name CPQ populates a constraint rule name based on the product name. Enter a different name for the constraint rule if required. Rule Type Select a rule type. Supported values are:
- Inclusion: Enforces selection of certain products as specified by the product scope specification or criteria specification in the inclusion rule.
- Exclusion: Enforces exclusion of certain products from the shopping cart.
- Validation: Displays the error message when the criteria conditions are fulfilled.
- Recommendation: Product recommendations are displayed when the condition is fulfilled.
- Replacement: Product replacements are suggested when the condition is fulfilled.

If you create a specific type of rule directly from the drop-down arrow next to the Create New button, this field is populated with your selection. However, you can change the selection if required.
Condition Scope Select the condition scope. This defines what must be present in the shopping cart to fulfil the condition.
- Product: This implies that the product must be present in the shopping cart to fulfil the condition.
- Product Family: This implies that one or more products from the specified product family must be present in the shopping cart to fulfil the condition. The number of products that should be present depends on the Match Rule.
- Product Group: This implies that one or more products from the specified product group must be present in the shopping cart to fulfil the condition. The number of products that should be present depends on the Match Rule.
- Product Option Group: This implies that one or more products from the specified product option group must be present in the shopping cart to fulfil the condition. The number of products that must be present depends on the Match Rule.
Condition Item
Select a condition item based on your selection in Condition Scope. Match In Select an option where the condition match must happen. Supported values are:
- Match In Options: Selecting this means the condition is fulfilled only when the condition products are in the option line items of the shopping cart.
- Match In Primary Lines: Selecting this means the condition is fulfilled only when the condition products are among the primary lines (bundle or standalone) of the shopping cart.
Action Intent Select the intent of the action. Supported values are:
- Auto Include: Adds selected products automatically. When the number of products selected by the rule action is more than the number mentioned in the Match Rule condition, auto-inclusion of products is not triggered. A message is displayed from the rule action instead.
Note: Auto Include is not applicable when the Match Rule value is Include All. - Prompt: Displays a message with choices of products that you can select or remove.
- Show Message: Displays a message.
- Check on Finalization: Applies rule action on finalization of the shopping cart.
- Disable Selection: Disables selection of excluded products.
- Hide: Hides the selection of excluded products.
Rule Type Selected Options Available on the Action Intent Drop-Down Inclusion - Auto Include
- Prompt
- Show Message
- Check on Finalization
Exclusion - Prompt
- Show Message
- Check on Finalization
- Disable Selection
- Hide
Validation - Show Message
- Check on Finalization
Recommendation - Prompt
- Show Message
- Check on Finalization
Replacement - Prompt
- Show Message
- Check on Finalization
Action Scope Select the action scope. Supported values are:
- Product: In the Product field, click to select a product to be included or excluded. You search the product using product name or code.
- Product Family: In the Product Family field, enter a product family. One or more of the products from the product family will be included or excluded based on rule type and match rule specifications.
- Product Group: In the Product Group field, enter a product group. One or more of the products from the product group will be included or excluded based on rule type and match rule specifications.
Action Item Enter a keyword to search a product, product family, or product group on which the action must be applied. From the displayed search result, select a product. - You can now:
- Create the rule with more conditions, actions, additional scopes, or additional criteria. Click Advanced Rule Setup. The rules details page with the Conditions & Actions tab is displayed.
- Save the rule. Click Save. Only a constraint rule header is created. The rules details page with the Details tab is displayed.
On the Details tab, enter the following details:
Field Description Rule Name Enter a name for the constraint rule.
Description
Description for the constraint rule. Sequence Enter the number in which you want to sequence the constraint rule. Effective Date Select the date from which the constraint rule is in effect. Expiration Date Select the date until which the constraint rule is valid. Is Active Turn this setting on to indicate whether the constraint rule is active.
Bundle Context Turn this setting on to indicate whether the constraint is evaluated within a bundle. On the Conditions & Actions tab, create one or more constraint rule conditions and one or more constraint rule actions. For more information, see Configuring a Constraint Rule Using the Advanced Rule Setup.
- Click Save.
A constraint rule is created and saved.
To delete a constraint rule
- Go to ADMIN SETUP> Product Administration > Constraint Rules. The Constraint Rules page is displayed.
Click the ellipsis icon
next to the constraint rule name and click Delete.