Download PDF
Download page Managing Quotes.
Managing Quotes
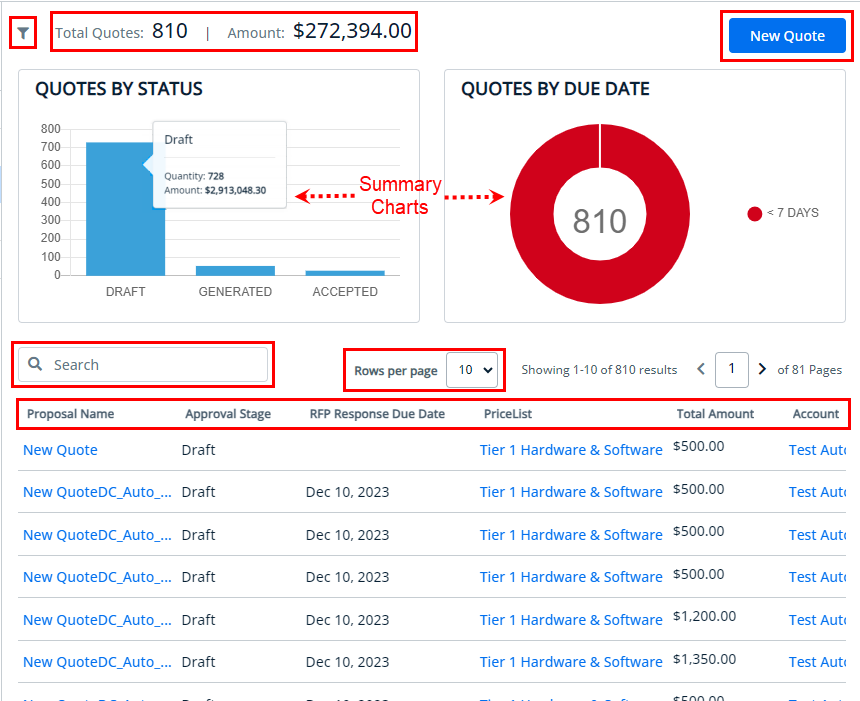
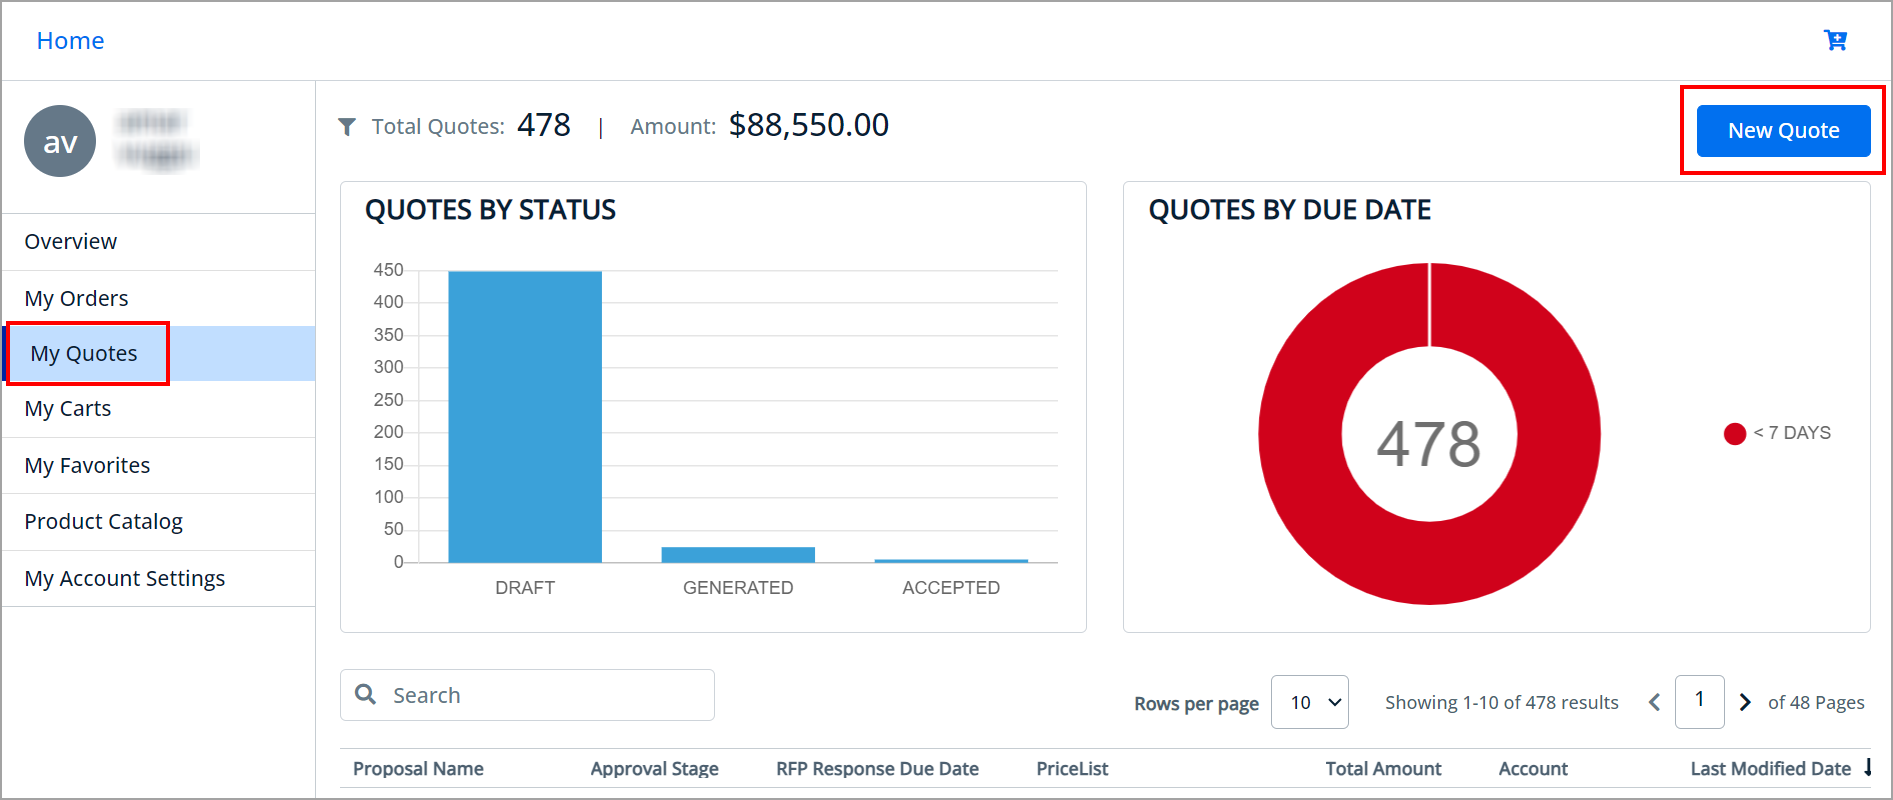
My Quotes page displays a list of all quotes that you have requested and created for the selected account. You can also see the total quote number and amount at the top of the My Quotes page. The total quote number and amount will change depending on the filter applied.
The following API with the appropriate parameters is used to retrieve the selected account's quote data. For more information, click here.
GET https://<URL_of_the_Instance>/api/quote/v1/quotes
From the My Quotes page, you can:
- View summary chart: You can view the summary chart for all of the quotes that are placed. You can also customize the chart by applying the advanced filters. Quotes by Status (bar chart) and Quotes by Due Date (pie chart) charts are available with out-of-the-box template. Hovering the mouse over a status displays the quantity and amount for that status.
- Request a new Quote: You can request a new quote by clicking the New Quote button and then adding line items (products) for the quote. For more information, see Requesting a Quote section below.
Search for a quote: You can search for the quote to refine the quote list. Enter a keyword related to the name. It displays all quotes that contain that keyword.

The following API with the filter parameter is used to search for the particular quote. For more information, click here.
GET
https://<URL_of_the_Instance>/api/quote/v1/quotesFor example:
https://<URL_of_the_Instance>/api/quote/v1/quotes?filter=eq(Account.Id:'<actual accountId>')&filter=noteq(Status:'Saved')&sort=DESC(ModifiedDate)&Page=1&limit=10- Sort the quote list: You can sort the quote list by clicking the column names.
Set pagination: You can specify how many quotes should be displayed on a single page. To enable pagination, go to the per page field on the top right bar and select a value.
- Filter the quote list: You can sort the quote list by clicking the filter icon. The Advanced Filters pop-up appears. You can filter the quote list based on the following fields. You can also add multiple filter criteria by clicking the Add Criteria button.
- Approval Stage
- Bill To
- Created Date
- Grand Total
- Pending Duration
- RFP Response Due Date
- Ship To
The following API with the filter, page, limit, and sort parameters is used for sorting, pagination, and filtering. For more information, click here.
GET https://<URL_of_the_Instance>/api/quote/v1/quotes
For example: https://<URL_of_the_Instance>/api/quote/v1/quotes?filter=eq(ApprovalStage:'Draft')&filter=eq(Account.Id:'<actual accountId>')&sort=DESC(ModifiedDate)&Page=1&limit=10
Before placing an order, you can create and request a quote for a customer in order to get better pricing and product configuration.
After requesting a quote, you can perform the following:
- Generate a quote document so you can email the proposal to the customer.
- View and track quotes.
- Modify the quote by editing the header and line items in a requested quote. You can only add, change, or delete items from the requested quote in the draft stage.
- View and manage details of a requested quote created by the customer or created for the customer.
As an experienced buyer, you can also use the Quick-Add (![]() ) button to add multiple products to the cart and create quotes and orders quickly. For more information, see Using CTA (call-to-action) button.
) button to add multiple products to the cart and create quotes and orders quickly. For more information, see Using CTA (call-to-action) button.
Requesting a Quote
You can request a quote from the following two places:
- Add products to the cart and request a quote by clicking the Request Quote button on the cart details page.
- Create a quote by clicking the New Quote button on the My Quotes (quote list) page and adding line items (products) for the quote.
My Quotes Page
Cart Details Page
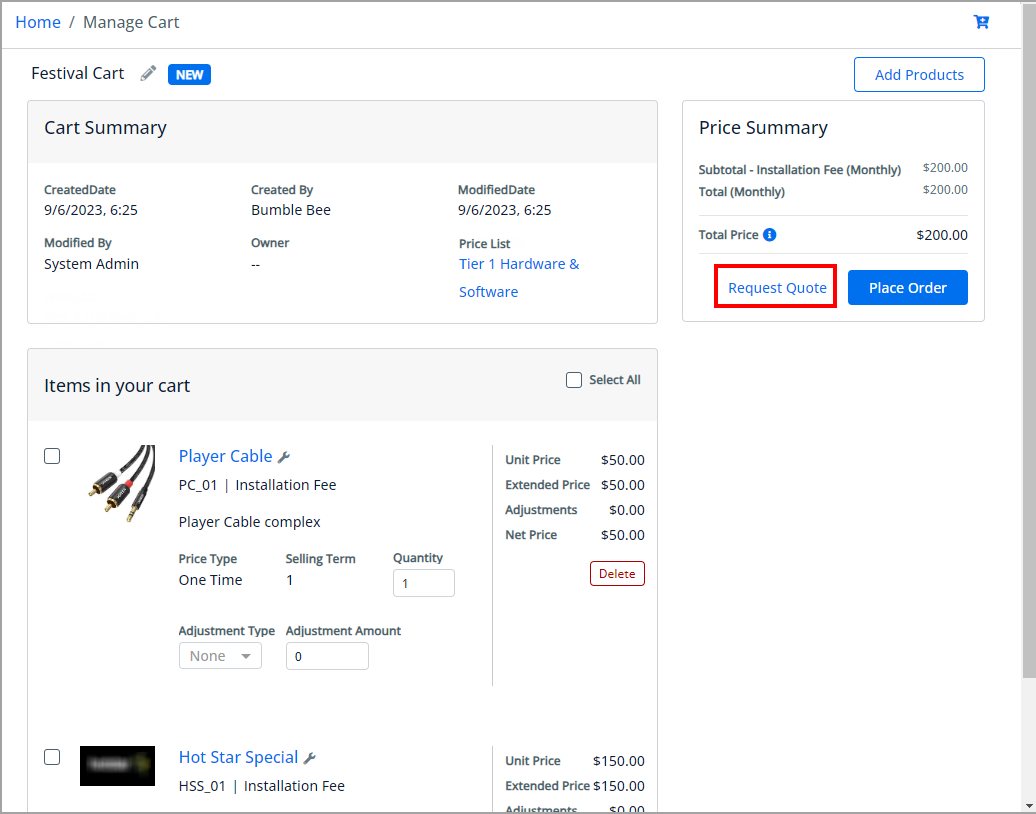
To request a quote from the Cart details page
- Click Request Quote from the Cart details page.
Enter the following details for the quote on the Request Quote page.
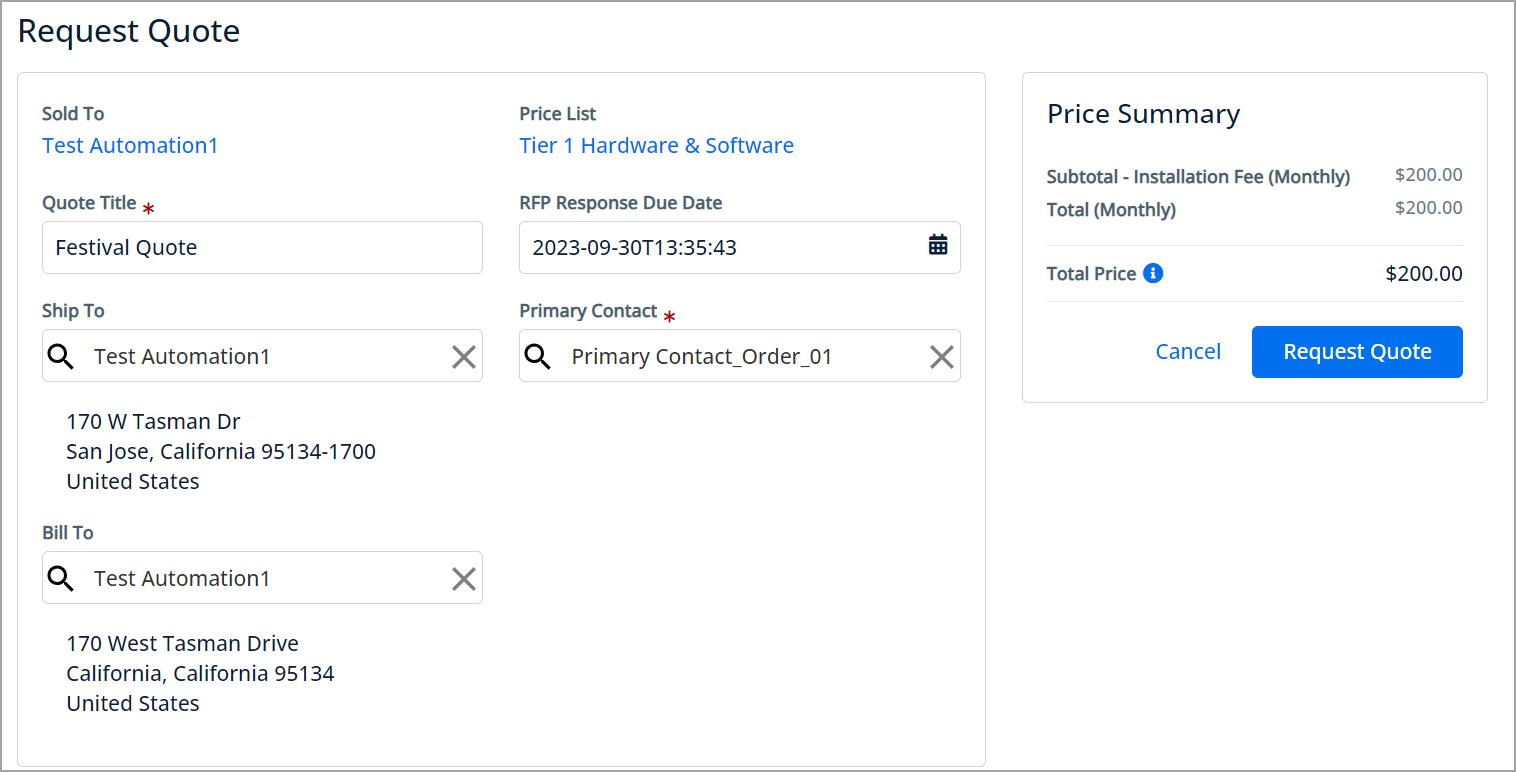
Field Name Description Sold To Shows the name of the account associated with the primary contact. You cannot edit this field.
Price List Shows the name of the price list associated with the account selected. You cannot edit this field.
Quote Title Enter a meaningful Quote Title. By default, it is auto-populated as a New Quote.
RFP Response Due Date
Enter an RFP Response Due Date by which you are expecting a response on the quote request. Ship To
Shows the Ship To location of the account associated with the primary contact. You can search and select another value to update this field.
Primary Contact
Search and select the Primary Contact associated with your account.
Bill To
Shows the Bill To location of the account associated with the primary contact. You can search and select another value to update this field. Click Request Quote. If the implementor has enabled the CAPTCHA functionality, follow the next step.
By default, CAPTCHA functionality is not enabled. The implementor must set the captchaSiteKey? parameter to the template (see the Configuring Templates topic) and add the captcha property (see the image below) with the Price Summary component while configuring the template. For more information on the Price Summary component, see SDK Reference > Components section > Price Summary component.

Check the captcha checkbox labeled "I'm not a robot". Sometimes, you may need to solve a captcha puzzle after clicking the checkbox.
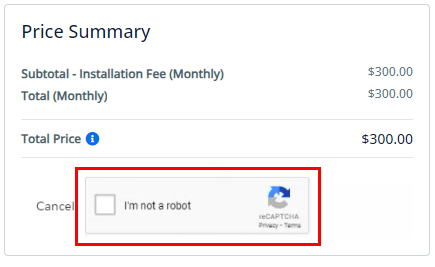

After successfully verifying the Captcha, a request for a quote will be sent out, and you will see a success confirmation popup after the quote has been generated.
To see more information about the quote, click Review Your Quote. This opens the Quote details page.
The following API is used for requesting a quote.
POST https://<URL_of_the_Instance>/api/cart/v1/carts/{cartId}/quote
The following API with the includes parameter is used for reviewing the requested quote (on the Review Your Quote button). For more information, click here.
GET https://<URL_of_the_Instance>/api/quote/v1/quotes/{Id}?includes=items
To request a quote from the My Quotes page
- Click New Quote from the Quote list page.
Enter the following details for the quote on the Place Quote page.
Field Name Description Name Enter a meaningful Quote name. By default, it is auto-populated as a New Quote.
Primary Contact
Search and select the Primary Contact associated with your account.
Description
Enter the appropriate description.
Bill To
Shows the Bill To location of the account associated with the primary contact. You can search and select another value to update this field. Ship To
Shows the Ship To location of the account associated with the primary contact. You can search and select another value to update this field. Click Request Quote.
The following API is used for requesting a quote. For more information, click here.
POST
https://<URL_of_the_Instance>/api/quote/v1/quotesClick Review Your Quote to see the information on the quote. This opens the Quote details page.
The following API with the includes parameter is used for reviewing the requested quote (on the Review Your Quote button). For more information, click here.
GET
https://<URL_of_the_Instance>/api/quote/v1/quotes/{quoteId}?includes=items- Go to the Line Items section and click the Add button to add line items to the quote. When you click the Add button, a new Cart is created, activated, and associated with the quote.
- On the Cart details page, click the Add Products button or View All Products link. You are redirected to the Product Catalog page.
- Select and add product(s) to the cart. For more information, see Browsing Catalog.
The product is added to the cart and you can view the complete list of products in the mini cart by clicking the cart icon on the top right. - Click Finalize & Submit to apply the changes to the cart and quote or click Discard Changes if you do not want to apply your changes to the cart and quote.
You can add more products and perform additional functions on the cart details page. For more information, see Working with the Cart.
Viewing and Modifying a Requested Quote
After requesting a quote, you can view and modify the requested quote. To view all the quotes created by you and belonging to the same account, go to My Accounts > My Quotes page.
Click the Proposal Name link from the Quote list page or click the Review Your Quote button from the Quote Request confirmation popup. The quote page appears where you can view and update the following details:
Quote Summary
You can update the Quote Title, RFP Response Due Date, Primary Contact, Account Name, Ship To Account, and Bill To Account.
The following API is used for updating the value. For more information, click here.
PATCH https://<URL_of_the_Instance>/api/quote/v1/quotes/{quoteId}
Line Items
- Click the Edit button to edit the line items in a requested quote to add, clone, modify, and delete line items.
- After the changes are done, click Finalize & Submit.
You can also open the Product Details and Configuration by clicking the product name and wrench icon respectively.
You can only modify the line items when the quote is in the Draft stage.
Attachments
If you want to upload some required document(s) in a particular quote, you can upload it from the Attachments section.
Prerequisites
The implementer must create an IsPrivate custom field with a boolean data type and default value as false on the DocumentMetadata object. Use the Admin User Interface or the following API and sample payload: POST https://<URL_of_the_Instance>/api/schema/v1/objects/{objectName}/fields
Sample Payload
{
    "FieldName": "IsPrivate",
    "DisplayName": "IsPrivate",
    "DataType": "Boolean",
    "DefaultValue": "false"
}- From the quote details page, click the Attachments tab.
- Drag and drop the file or click the browse link and select the file.
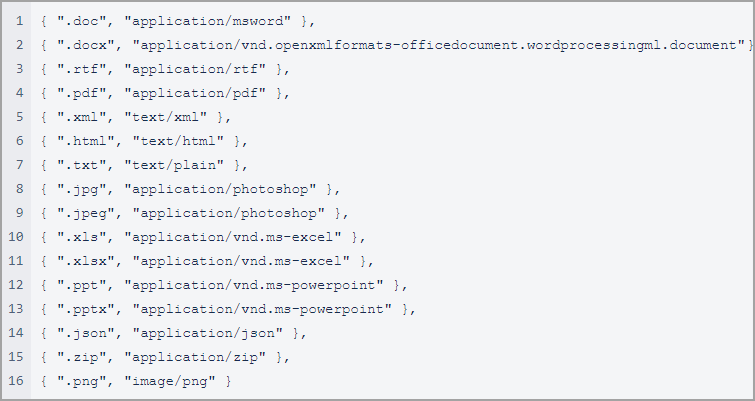
Refer to the following image for the supported file type. - Check the Make visibility private checkbox to make the attachment only visible to you on the quote details page.
- Click Clear if you want to remove the selected file.
- Click Upload to upload the selected file to the quote.
You can File Name, Size, Type, Created By, and Created Date information under the Attachments section. The file types listed in the following image are supported. You can upload up to 28 MB of document(s).
The following API is used for uploading the document. For more information, click here.
POST https://<URL_of_the_Instance>/api/document-management/v1/documents/upload
For example: https://<URL_of_the_Instance>/api/document-management/v1/documents/upload?objectType=order&objectId={objectID}
Generating a Quote Document
As a partner sales rep, you can generate a quote document so that you can email the proposal document to the customer for their review and acceptance. The Generate Quote button is available for a quote in Draft or Approved status.
To generate a quote document
- From the quote details page, click the Generate Quote button.
Select a template from the list.
The list of templates is retrieved from the Template object, where the business object is Proposal and the IsActive flag is set to True. The following API is used to get the list of templates. For more information, click here.
GET
https://<URL_of_the_Instance>/api/data/v1/custom-objects/Template?criteria=BusinessObject=ProposalSelect the document format of the file to be generated. For example: DOCX, PDF, or PDF/A.
- Check the Include Watermark checkbox to include DRAFT as a watermark in the generated document.
Click Generate to initiate quote document generation. A confirmation message appears and the quote details page is displayed.
The following API is used to generate the document. For more information, click here.
POST
https://<URL_of_the_Instance>/api/ingress/v2/documents/generate
The quote stage moves from Approved to Generated, the generated quote is available under the Attachments section, and a notification email is sent to the primary contact of the quote. You can also download and delete the generated document.
The following API is used for the email notification. For more information, click here.
POST https://<URL_of_the_Instance>/api/email/v1/emails/bulk