Download PDF
Download page Setting Up Multi-Language Support.
Setting Up Multi-Language Support
You can set up multi-language support for your site. Translation can be set up for the following:
- Static labels or text (page titles, header, footer, tabs, descriptions) translations
- Schema or field label translations
- Data translation on the product catalog
Static Labels or text (Page Titles, Header, Footer, Tabs, Descriptions)
To translate static labels and text, you can use the local translation folder or add translation details on the Conga Platform.
The following table shows the effect of these translations' availability:
File on Local Translation Folder | Translation details on the Conga Platform | Description |
|---|---|---|
| Available | Not Available | The application checks the user's locale and translates static labels or text based on the local translation file. Refer to step 2 below. |
| Not Available | Available | The application checks the user's locale and translates static labels or text based on the translations added to the Conga Platform. Refer to step 3 below. |
| Available | Available | The application always merges with unique values, checks the user's locale, and appropriately translates static labels or text. |
| Not Available | Not Available | The application considers English as a default language. |
Perform the following steps to add the translation details:
Step 1: Set the user-level locale
For translation, the application uses the user-level locale. You can set the user's locale using the following API: PATCH https://<URL_of_the_Instance>/api/user-management/v1/users/{userId}.
- Sample request body to set the user's locale to the Spanish (es_ES) language.
{
  "LocaleName": "es_ES"
}
C#
To list supported locales, use the following API:
GET https://<URL_of_the_Instance>/api/user-management/v1/localesStep 2: Add local translation file(s)
The application first checks the local translation files (JSON files used to define translations) in this folder: https://github.com/congarevenuecloud/partner-commerce/tree/release/february-23/src/assets/i18n and then translates accordingly. The base template comes with some sample translation files under the asets/i18n folder for your reference. You can clone any of the sample files and modify them to accommodate your preferred language.
Step 3: Add translation details on the Conga Platform
- Add a translation module using the Admin User Interface or the following API: POST https://<URL_of_the_Instance>/api/localization/v1/translations/modules
- Update the environment.ts > translationModule parameter with the module name added in the first step.

You must update the translationModule parameter in the environment.ts file while configuring templates. For more information, see Configuring Templates.
Add a translation value for the given locale and module using the Admin User Interface or the following API: POST https://<URL_of_the_Instance>/api/localization/v1/translations/{locale}/{module}.

You must use the CustomLabels in the parameter as a key and the stringified value of your translation JSON file as a value.
For example:
{
  "Key": "CustomLabels"
  "Value": "<stringified value>"
}
CODE
Schema or Field Label
Define field label translation for the given object using the following API: POST https://<URL_of_the_Instance>/api/schema/v1/objects/{objectName}/translations/{locale}.
You can also use other CRUD operations for field label translation using Object Definition Translation APIs.
Example 1:
To translate the Phone Number field label on the Account object into the Spanish language and locale (es_ES):
- Use the POST https://<URL_of_the_Instance>/api/schema/v1/objects/{objectName}/translations/{locale}
- Enter
Accountin the objectName parameter. Enter
es_ESin the locale parameter.
To list supported locales, use the following API:
GET https://<URL_of_the_Instance>/api/user-management/v1/localesUse the following sample request body.
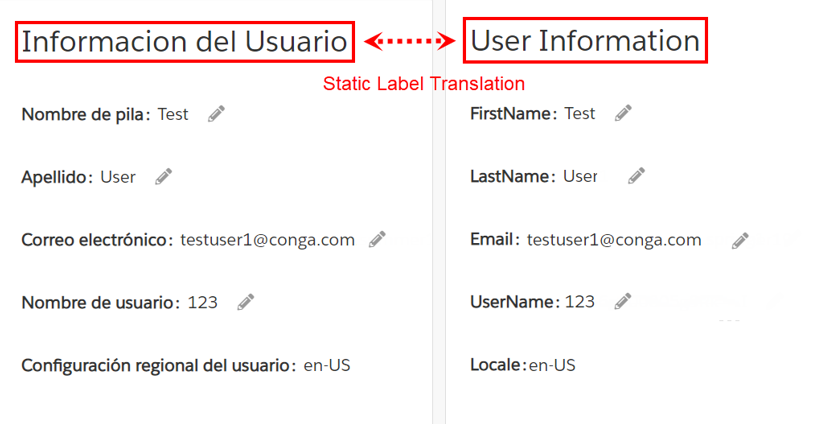
{
  "ObjectName": "Account",
  "MetadataTranslations": [
    {
      "Scope": "Field",
      "Name": "Phone Number",
      "DisplayName": "Nombre de usuario",
      "Description": "English to Spanish translation for Phone Number field."
    }
  ]
}
CODE
Example 2:
To translate the Email and Shipping Address field label on the Account object into the Italian language and Swiss locale (it_CH):
- Use the POST https://<URL_of_the_Instance>/api/schema/v1/objects/{objectName}/translations/{locale} API.
- Enter
Accountin the objectName parameter. Enter
it_CHin the locale parameter.
To list supported locales, use the following API:
GET https://<URL_of_the_Instance>/api/user-management/v1/locales
Use the following sample request body.
{
  "ObjectName": "Account",
  "MetadataTranslations": [
    {
      "Scope": "Field",
      "Name": "Email",
      "DisplayName": "Correo electrónico",
      "Description": "English to Spanish translation for Email field."
    },
    {
      "Scope": "Field",
      "Name": "Shipping Address",
      "DisplayName": "Indirizzo di spedizione",
      "Description": "English to Spanish translation for Shipping Address field."
    }
  ]
}
CODE

Data Translation on Product Catalog
Data translation localizes such elements as product names, categories, and error messages from the Catalog API. Translation data is configured and verified across Product, Category, Attribute, AttributeGroup, Option, and OptionGroup modules within the product catalog. Use the following steps and APIs to translate data.
To set up data translation
Follow the below steps to set up data translation:
Step 1. Set the user-level locale
You can set the user-level locale via Admin User Interface using the "To edit a user" topic in the Conga Platform Admin Guide or the following "Update a user" API:
PATCH /api/user-management/v1/users/{userId}
To list supported locales, use the following API:
GET /api/user-management/v1/localesTo set the user-level locale via Admin UI, follow the steps below:
- Log in to the Conga Platform as an admin user.
- Click the App Launcher (
 ) icon from the top-left corner > Admin Console > Users.
 - Click the desired active user name link from the User List page, or click the More (
 ) icon at the start of the user record.
 Click Edit to update the locale.
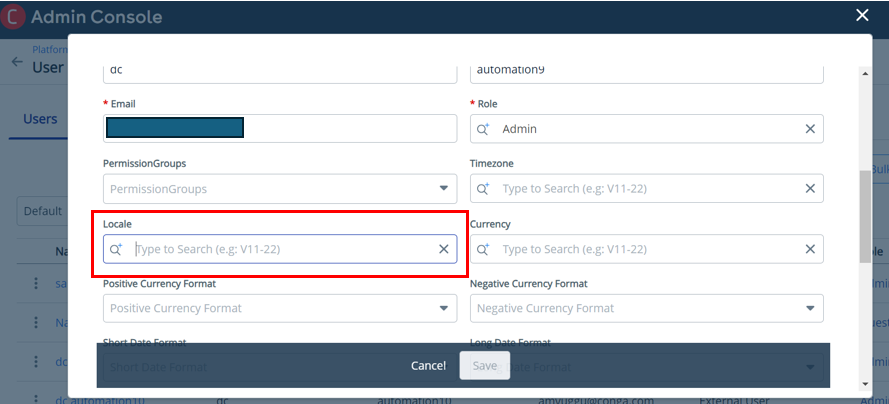
- Search and select the desired locale to set.
- Click Save.
Example
Admin UI
To set the user's locale for Chinese language, follow the steps:
- Click the desired active user name link from the User List page, or click the More () icon at the start of the user record.
Click Edit to update the locale.
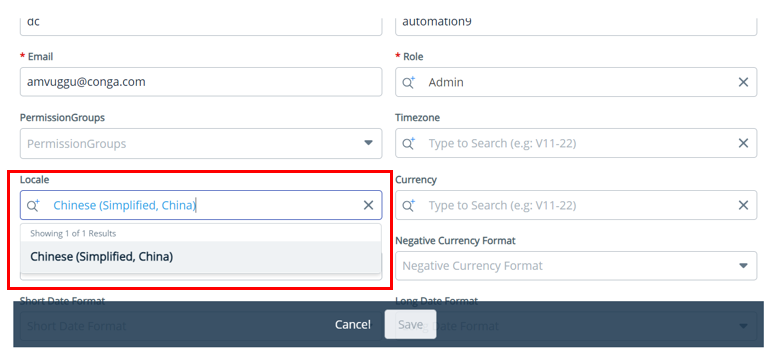
- Search Chinese and select it for the locale.
- Click Save to set locale as Chinese.
API
To set the user's locale for Chinese language "zh-Hans-MO", follow the steps below:
- Use the PATCH /api/user-management/v1/users/{userId} API.
- Enter the userId parameter.
Use the following sample request body to update the locale name.
{
  "LocaleName": "zh-Hans-MO"
}
C#
Step 2. Add translation values
You can add the translation values via Admin User Interface for the module using the "To add translation entries" topic in the Conga Platform Admin Guide or the following "Add translation value" API:
POST /api/localization/v1/translations/{locale}/{module}
To add translation entries via Admin UI, follow the steps below:
- Log in to the Conga Platform as an admin user.
- Click the App Launcher () icon from the top-left corner > Admin Console > Translation Workbench > Translation tab.

- Search and select the desired Locale and Module.
Add Translation Entries option enables. - Click Add Translation Entries option to add translation values.
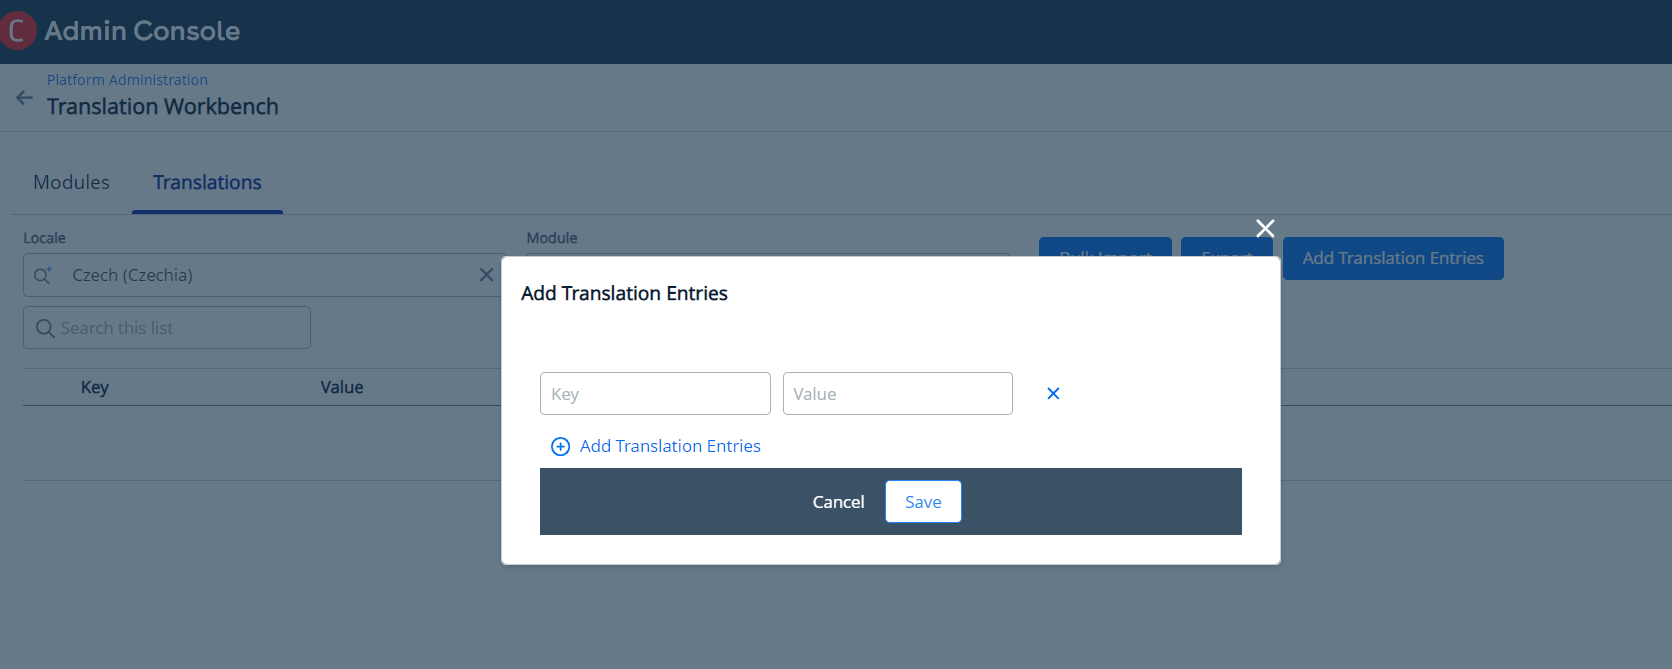
- Enter product ID in the Key field.
You can find the product ID by clicking the product item in the commerce product catalog and looking for it at the end of the URL.

- Enter product name and ID as values to add translation details in the Value field for the selected locale and module.
Value includes an array of fields (mostly of type string, longstring, etc.) where translation can be applied.
- Click Save.
Examples:
Admin UI
To add Chinese values for product module, follow the steps below:
- After selecting Locale and Module, click Add Translation Entries option.
Add Translation Entries popup appears.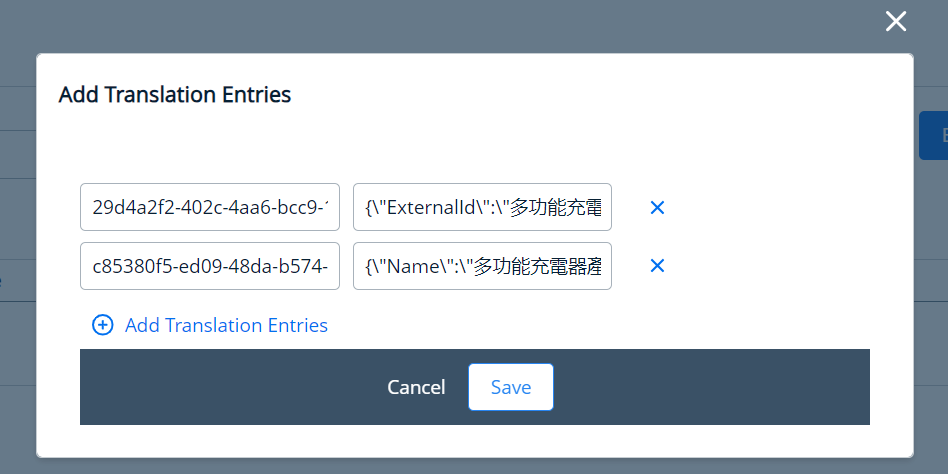
- Enter the desired key and values for it.
For example
Key: 29d4a2f2-402c-4aa6-bcc9-1cdc09711056
Value: {\"ExternalId\":\"多功能充電器產品\",\"ProductId\":\"29d4a2f2-402c-4aa6-bcc9-1cdc09711056\",\"ProductName\":\" 多功能充電器產品\",\"Description\":\" 多功能充電器產品\",\"Id\":\"29d4a2f2-402c-4aa6-bcc9-1cdc09711056\",\"ProductCode\":\" 多功能充電器產品\"}
- To add multiple translation entries, click Add Translation Entries icon.
- Click Save to save the translation entries.
Translations Entries are available in the application for the selected locale and module.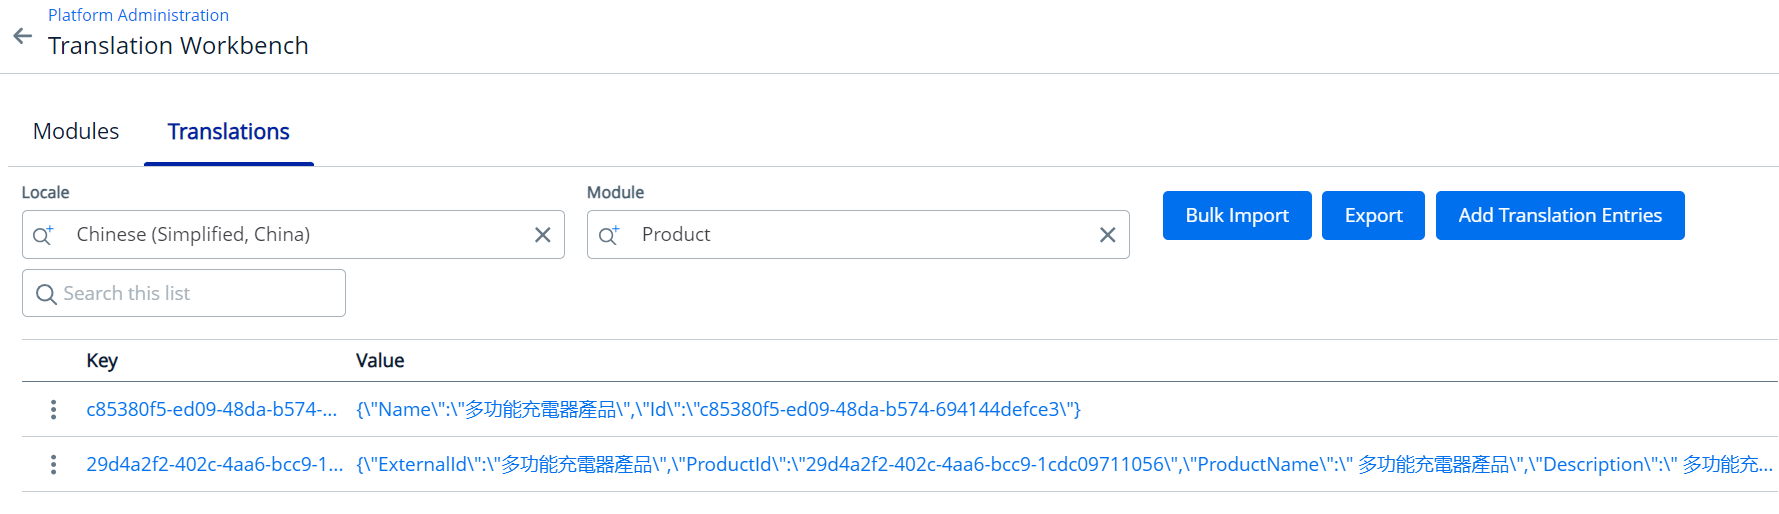
API
To add Chinese "zh-Hans-MO" values for product module, follow the steps below:
- To add translation values, use POST method /api/localization/v1/translations/{locale}/{module} API:
- Enter zh-Hans-MO for locale parameter.
- Enter Product for module parameter.
- Use the following samples request body.
You can use the product ID as a key and the product name and ID as values to add translation details. To get a product ID, click the product item and look for it at the end of the URL:
{ "Key": "string", "Value": "string" }CODETranslation data model request body sample
{
  "Key": "29d4a2f2-402c-4aa6-bcc9-1cdc09711056",
  "Value": "{\"ExternalId\":\"多功能充電器產品\",\"ProductId\":\"29d4a2f2-402c-4aa6-bcc9-1cdc09711056\",\"ProductName\":\" 多功能充電器產品\",\"Description\":\" 多功能充電器產品\",\"Id\":\"29d4a2f2-402c-4aa6-bcc9-1cdc09711056\",\"ProductCode\":\" 多功能充電器產品\"}"
}

AttributeGroup
{
  "Key": "c85380f5-ed09-48da-b574-694144defce3",
  "Value": "{\"Name\":\"多功能充電器產品\",\"Id\":\"c85380f5-ed09-48da-b574-694144defce3\"}"
}

Attribute
{
  "Key": "eee0fdb3-d290-43b3-a1b9-929152518dd2",
  "Value": "{\"DisplayName\":\"多功能充電器產品\",\"Id\":\"eee0fdb3-d290-43b3-a1b9-929152518dd2\"}"
}

OptionGroup

{
  "Key": "ff2238a8-1484-49ed-98c8-6437a9979b8e",
  "Value": "{\"Label\":\"多功能充電器產品\",\"Id\":\"ff2238a8-1484-49ed-98c8-6437a9979b8e\"}"
}

category
{
  "Key": "f5cd71c1-5b05-4a2d-b4db-0e7dc7e6fb24",
  "Value": "{\"Label\":\"硬體配置器\",\"Id\":\"f5cd71c1-5b05-4a2d-b4db-0e7dc7e6fb24\"}"
}

api_error_message

{
  "Key": "PRICELIST_IS_INVALID",
  "Value": "多功能充電器產品"
}
C#
The application displays the translated modules based on the provided key and value.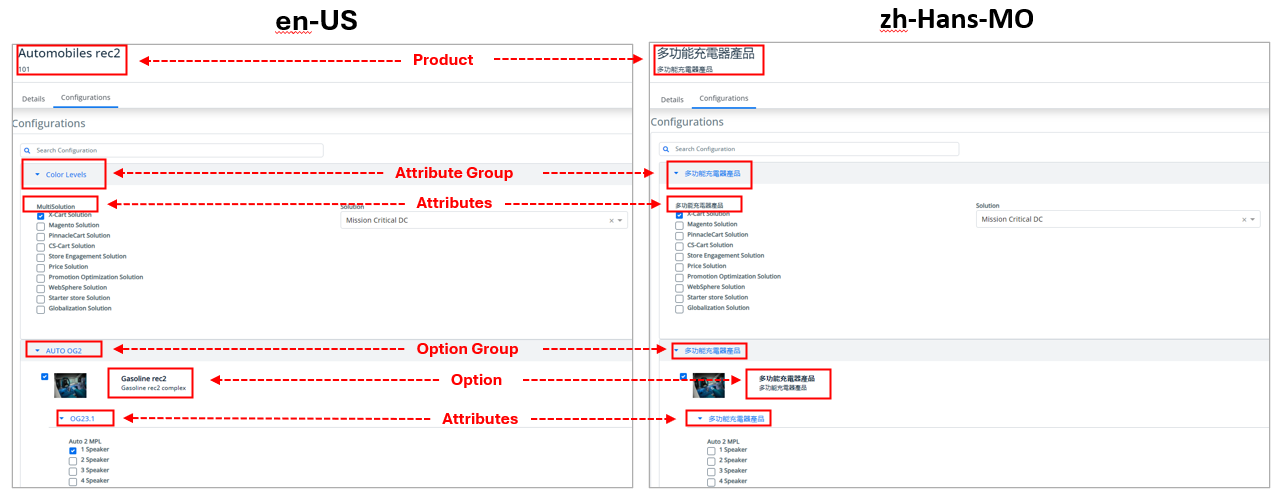
You can review the implemented changes for the product at the catalog level. For more information, see Browsing Catalog and Viewing the Product Details.