Download PDF
Download page Checking in a Contract Document.
Checking in a Contract Document
After generating and editing an agreement document, you can check in the document to update its contents in Conga CLM. Whether you are saving a redlined version, clean version, or final version, the process for each is similar and each makes use of X-Author's Check-In feature. Only Microsoft Word documents in DOC and DOCX format are supported for maintaining versions, opening and checking in agreement documents. When you check in from X-Author, the document you are working on is converted back to the same document format as when it was first checked out.
Prerequisite
The custom permission setting must be available for your profile. For more information on how to configure custom permissions, see Assigning Custom Permissions in CLM for Administrators.
Custom permission in Conga CLM | Save options available in X-Author for Contracts |
|---|---|
| XA_CheckinAsFinal | Final - to be signed, Without Redlines, and With Redlines |
| XA_CheckInWithoutRedlines | Without Redlines and With Redlines |
| XA_CheckInWithRedlines | With Redlines |
If all the custom permissions are disabled, you can view all the save options.
To check in an agreement document
- Open Microsoft Word and launch the add-in.
Log in to X-Author for Contracts.
- After you finish working on the agreement document, from the Contracts pane, click the Finish tab. The Check-in page is displayed.
From Save Options, choose one of three options for saving the document:
Option at Check-in Description With Redlines This saves a draft version of the agreement document with all markups. By default, the file is saved with "_Redlines" appended to its name. A DOCX version of the document is saved in Notes & Attachments. If Contract Document versioning is enabled, selecting this option creates a new version under the document versions related list in your agreement record.
Without Redlines This saves a draft version of the document without markups and is typically done before sending an agreement to a third party for review. Track changes/redlines are automatically removed from the Word file and "_Clean" is appended to document names by default. A DOCX version of the document is saved in Notes & Attachments. If Contract Document Versioning is enabled, selecting this option creates a new version under the Document Versions related list in your Agreement record. Final - to be signed This option saves a version of the document without markups and creates and saves a PDF version of the document to the agreement's Notes & Attachments related list. By default, "_Final" is appended to document names by default. If Contract Document Versioning is enabled, selecting this option creates a new version (DOCX) under the Document Versions related list in your Agreement record. Update Current Version This saves the changes made to the document, but does not create a new version of the document. All the changes made to the document are retained in the same version and after checking in. The changes in the document are based on the document's protection level. For example, if the document is Insert and Track Changes mode, then the changes you make are shown as redlines. 
When you select "Final - to be signed" as the check-in option, Create PDF attachment is automatically checked if you have the Comply System Property Auto Enable PDF for Final Docs enabled. When Create PDF attachment is checked, the Create PDF/A attachment option becomes available to check. For more information, see Comply System Properties in CLM for Administrators.
When you select "Update Current Version: as the check-in option, Create PDF attachment option is not available.
- In the Agreement Name field, enter the required name for the document or leave it as suggested by X-Author. The default name includes the agreement name, revision number, and version type. X-Author automatically saves the agreement in DOCX format.
Select Retain Document Name to use the document name from the document version properties in CLM instead of from Comply settings. You can edit the name after this option is checked.

For this option to be available, the custom permission xa_displaycheckinretaindocumentname must be set to True.
- Review the watermark option. This option is automatically selected, but you can deselect it if you want to remove the watermark from your document.
- Select Reconcile Document to synchronize the Salesforce Agreement object fields with those that were updated in the document. See Reconciliation for more details.
Select Asynchronous Check-In to start the check-in and continue to work with X-Author for Contracts. Use this option when the agreement document has many pages and you do not want to wait for the check-in process to complete.
After clicking check-in, the following message is displayed: "
Check-in process has been initiated and you will be notified once it is completed". Both the contract owner and the user will receive an email notification indicating the check-in status or an error (if the check-in process fails).
If the contract owner and logged-in user are same, then only one email notification is sent out.
You can configure a recipient role to receive Asynchronous Check-in status email by using the Asynchronous Check-in Recipient comply system property. For more information, see Comply System Properties in CLM for Administrators.
- Select Mark as private to enable the Private indicator for this agreement. This is used only in custom implementations. To view the Mark as private option in the agreement, the Auto Enable Private Indicator comply system property must be enabled in CLM. For more information, see Comply System Properties in CLM for Administrators.
- In the Keywords/Tags field, enter the keywords and tags to be associated with the document on check-in. Separate the keywords and tags using a comma. These tags/keywords are displayed in CLM along with the respective document versions. CLM users can also use these tags while using document finder on an agreement record.
- Click the tag (
 ) button next to the Keywords/Tags text box to choose from a list of existing tags to apply to the new version of the document you are checking in.
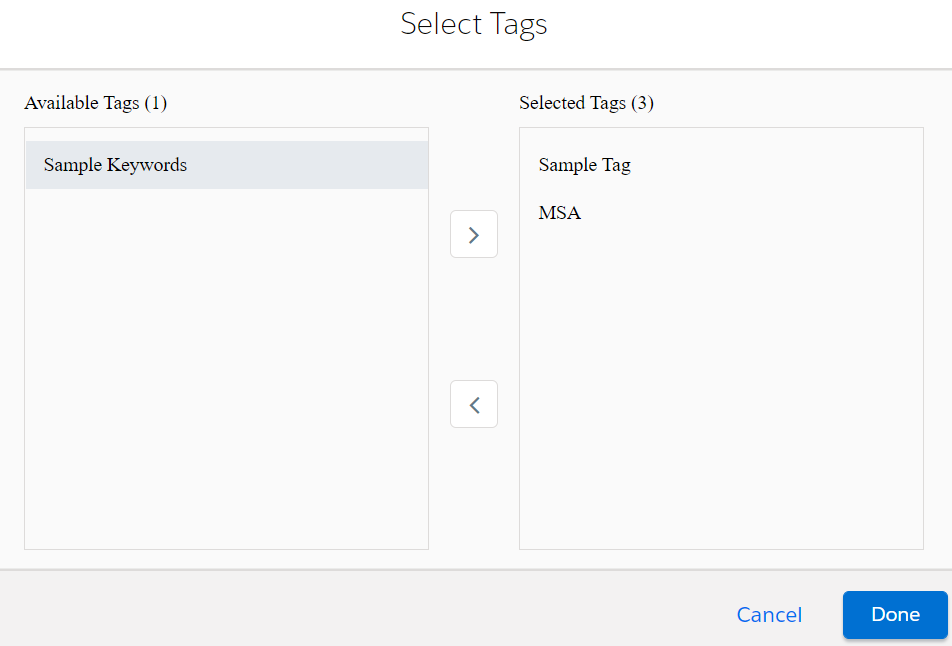
- Select tags from the Available Tags list and click the right arrow button to add that tag to the Selected Tags list. Click Done to add them to the list of keywords/tags.
Click Finish to confirm checking the document. If you have selected the Reconcile option, you will see "Save and Next" button which takes you to the reconciliation page. After confirming check in, the document is checked in to Salesforce and the saved document is opened in a new Microsoft Word instance. You can continue to work on the document if necessary.
If the xa_disableautocheckout profile permission is set to true in Conga CLM, clicking Save only shows a confirmation message and the agreement document does not open in a new instance. No lock icon appears, and both the Work and Finish tabs are disabled. To work on the agreement, search the agreement again, open it, make changes and then check it back in.
For more information on disable auto-checkout, see Assigning Custom Permissions to User Profiles. For more information on enabling and using contract document versioning, see Versioning Contract Documents.