Download PDF
Download page Making Table Columns and Rows Conditional.
Making Table Columns and Rows Conditional
This topic contains instructions for Conga CLM (Contracts for Salesforce) users. If you are a Conga CLM user and you are looking for information regarding making columns and rows conditional in a table, see Making Columns and Rows Conditional in a Table.
You can mark any or all of the rows and columns in a table as conditional. In practice, these conditions operate as filters, allowing rows and columns in the table to be conditionally shown (and populated) or hidden. When you are constructing your template, you define various condition expressions on rows and columns of a table. These conditions are then evaluated at runtime when an agreement document is generated using the template.
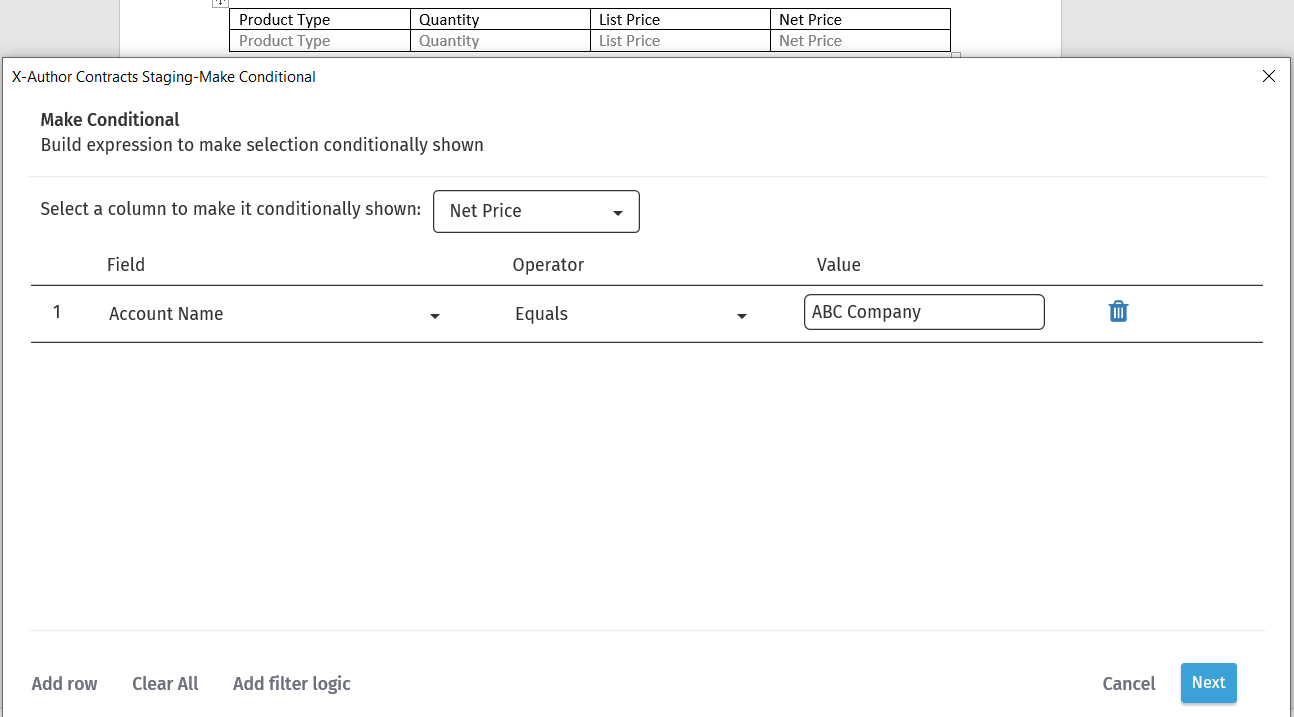
For example, your table consists of 4 columns: Product Type, Quantity, List Price, and Net Price. You can define a condition to show the Net Price column only when the Account Name is ABC Company.
To make columns conditional in a table
- In the Templates pane, go to the Work tab, click the Dropdown icon (
 ) and select Fields. The Fields pane displays the Repeat Table. Use the Search Field box to search by keyword.
 - Click the Settings icon (
 ) next to the Repeat Table name.
 - In the Repeat Table Settings pane, click Add Condition to open the template expression builder.
- Select a column from the picklist at the top of the expression builder that you want to make conditional.
To create a conditional expression, enter values for the following fields:
Field Description Field Select the field which you want to set as the criteria for the condition. You can select any field from the parent object (parent of the object whose fields are displayed in the table) or lookup objects. You must select a field name. The fields are listed and grouped according to their hierarchy.
Operator Select the logical operator from the drop-down. This forms the relationship between the Field and its Value. Value Enter the value of the field name selected in the Field. - Click Add row to create additional expressions for the same column. You can create up to a maximum of 9 filters for a single column.
- Enter Custom Logic to add a logical relation between multiple rows. The supported filter logic operators are AND and OR. You can use parentheses for setting the precedence. For example, if you have five rows you can create a filter logic like, (((1 AND 3) OR (2 AND 4)) AND 5). In the absence of a filter logic, the default relationship between the rows is the Boolean operator AND.
- Click Test to check whether your filter logic expression is correct. If your logic is incorrect, you will see a message in red.
- Repeat steps 4 - 10 for each column you want to filter.
Click Next when you are finished to continue to the next screen in the expression builder to define any conditional rows in your table (see the next section for complete instructions).
Click Save to save your table filters and return to your document.
Once the condition is successfully saved, a lightning icon (![]() ) is displayed next to the particular repeat table. Click the lightning icon to view the conditions added to the particular repeat table. Click the lightning icon (
) is displayed next to the particular repeat table. Click the lightning icon to view the conditions added to the particular repeat table. Click the lightning icon (![]() ) again to collapse.
) again to collapse.
The column condition is created for the table. You can modify or delete the condition.
If you are defining column filters for a table inside a section that contains third-level fields, you cannot apply column filters on objects that are not included in the table.
To make rows conditional in a table
- In the Templates pane, go to the Work tab, click the Dropdown icon () and select Fields. The Fields pane displays the Repeat Table. Use the Search Field box to search by keyword.
- Click the Settings icon () next to the Repeat Table name.
- In the Repeat Table Settings pane, click Add Condition to open the template expression builder.
- Follow instructions from the previous section to create conditional columns in the table.
- Click Next.
To create a conditional expression, enter values for the following fields:
Field Description Field Select the field which you want to set as the criteria for the condition. You can select any field from the object, parent object (parent of the object whose fields are displayed in the table), grandparent object (parent’s parent), or lookup objects. You must select a field name. The fields are listed and grouped according to their hierarchy. Operator Select the logical operator from the drop-down. This forms the relationship between the Field and its Value. Value Enter the value of the field name selected in the Field. - Click Add row to create more conditional expressions. You can create up to a maximum of 9 rows of expression conditions to be used in a single expression.
- Click Add filter logic to add a logical relation between multiple rows. The supported filter logic operators are AND and OR. You can use parentheses for setting the precedence. For example, if you have five rows you can create a filter logic like, (((1 AND 3) OR (2 AND 4)) AND 5). In the absence of a filter logic, the default relationship between the rows is the Boolean operator AND.
- Click Test to check whether your filter logic expression is correct. If your logic is incorrect, you will see a message in red.
- Click Save to save your table filters and return to your document.
Once the condition is successfully saved, a Lightning icon (![]() ) is displayed next to the particular repeat table. Click the Lightning icon to view the conditions added to the particular repeat table. Click the lightning icon again to collapse.
) is displayed next to the particular repeat table. Click the Lightning icon to view the conditions added to the particular repeat table. Click the lightning icon again to collapse.
The row condition is created for the table. You can modify or delete the condition.
To edit or remove column and row conditions
- In the Templates pane, go to Work and click Fields.
- Click the Settings icon () next to the Repeat Table name.
- Click Delete icon (
 ) to remove the condition and click Remove.
 - Click the Edit icon (
 ) and update the conditions.
 - Click Save.