Download PDF
Download page Getting Started with X-Author for Excel.
Getting Started with X-Author for Excel
This section contains information to help you get started with X-Author for Excel.
Licenses and User Assignment for Salesforce
Running or designing apps requires a combination of X-Author licenses and user assignment to managed packages:
Conga Licenses
One or more X-Author for Excel product editions (for example, X-Author Enterprise or X-Author Power Admin):
- Analytics (formerly "Reporting")
- Enterprise
- Presto
- Power Admin
User Assignment:
- X-Author Designer Package—Assignment to this package is required for app designers.
- X-Author for Excel Package —Assignment to this package is required for designer and runtime users who can run any app that has been both activated and assigned to them by a designer.
Salesforce Licenses
- To access Salesforce.com from Microsoft Excel using any X-Author for Excel edition, a user must have an API-enabled Salesforce.com license to the objects they need to access.
Setting Salesforce Permissions
Unless they have a System Administrator profile, users will not automatically have access to the package contents that are required to access X-Author functionality.
To provide access to users, Conga recommends that administrators create new permission sets for both Runtime and Designer and assign them to the appropriate users.
As an alternative, you can assign the below permission to user profiles rather than creating permission sets, if it is more convenient.
To create a permission set for Runtime users
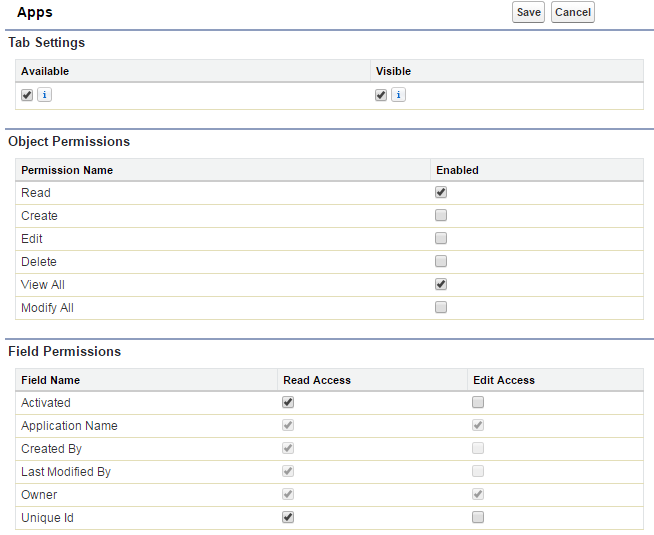
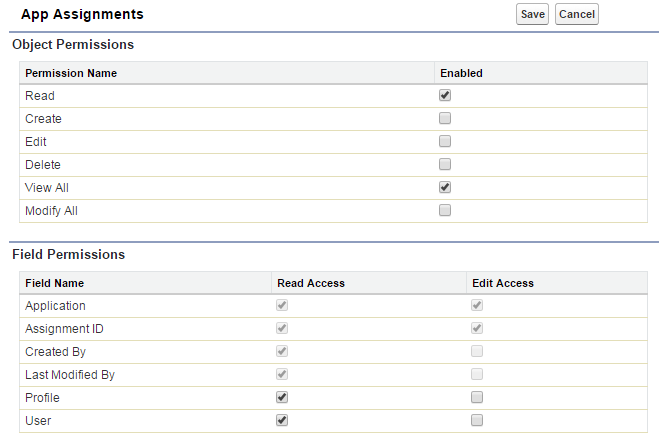
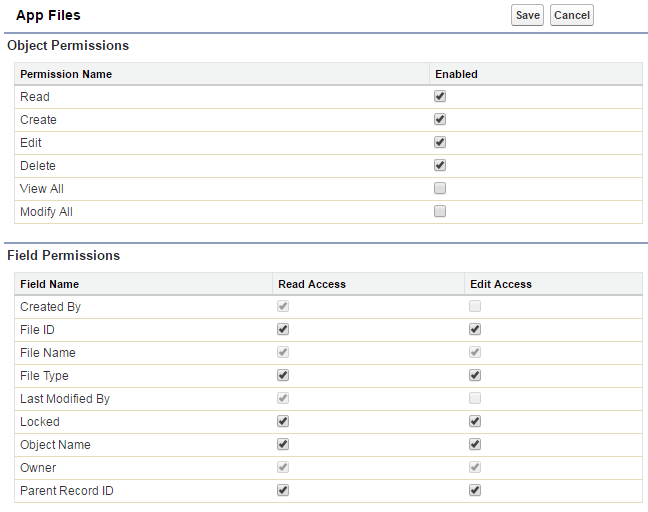
Follow the standard Salesforce steps for creating a permission set and configure the following settings and permissions. After creating the permission set, assign it to one or more Runtime users in your org.
| Runtime Users | |
|---|---|
| Custom App Settings | Conga X-Author for Excel: Visible |
| Tab Settings | X-Author for Excel: Default on |
| Custom Object & Field Permissions | Permission Sets > Permission Set Overview > Object Settings > Apps
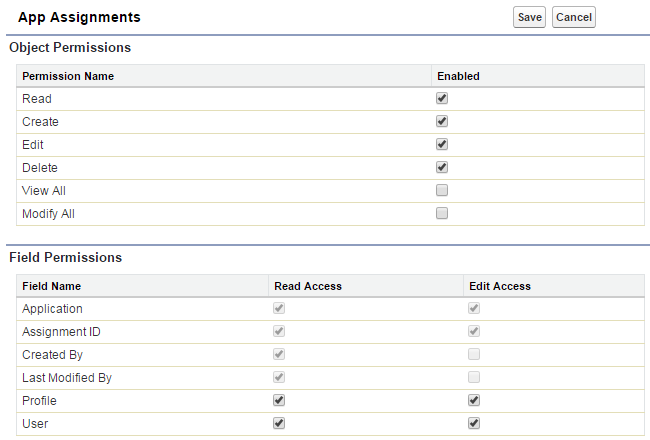
Permission Sets > Permission Set Overview > Object Settings > App Assignments
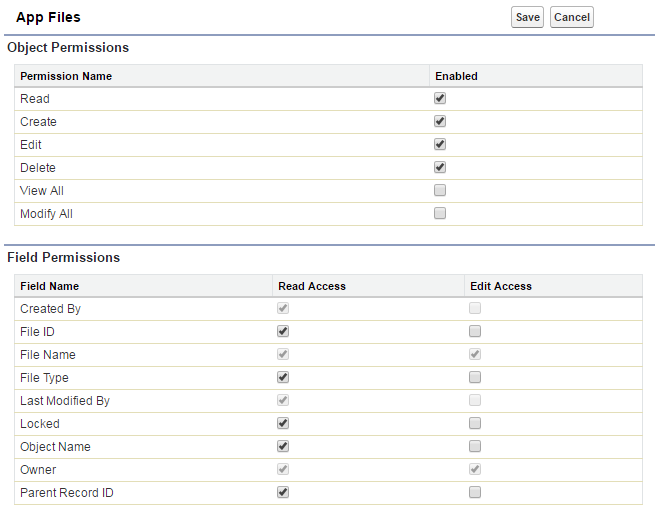
Permission Sets > Permission Set Overview > Object Settings > App Files
|
| Enabled Apex Class Access | Apttus_XApps.AppBuilderWS |
| Enabled Visualforce Page Access |
|
To create a permission set for Designer users
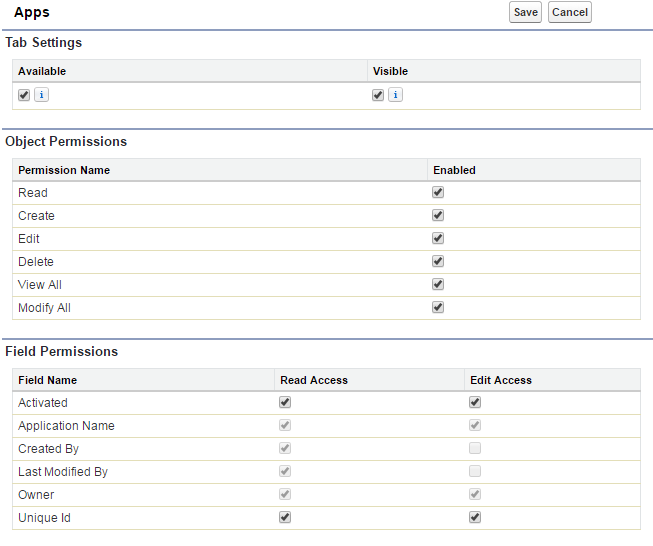
Follow the standard Salesforce steps for creating a permission set and configure the following settings and permissions. After creating the permission set, assign it to one or more Designer users in your org.
| Designer Users | |
|---|---|
| Custom App Settings | Apttus X-Author for Excel: Visible |
| Tab Settings |
|
| Custom Object & Field Permissions | Permission Sets > Permission Set Overview > Object Settings > Apps
Permission Sets > Permission Set Overview > Object Settings > App Assignments
Permission Sets > Permission Set Overview > Object Settings > App Files
|
| Enabled Apex Class Access | Apttus_XApps.AppBuilderWS |
| Enabled Visualforce Page Access |
|
Assigning Field-Level Permissions
The Activated and UniqueId fields on the App object must be set to visible. Usually, these permissions will be set during the installation of the managed package. However, depending on org-specific security settings, you might need to set these permissions manually.
To set the field-level permissions
- In Salesforce App Setup, go to Create > Objects > App.
- Click Custom Fields and Relationships.
- Click Activated.
- Click Set Field Level Security.
- Make sure that the Visible check box is selected for every profile that requires app access.
- Repeat steps 3 – 5 for the UniqueId custom field definition.
- Click Save.
Setting Microsoft Dynamics Permissions
After you install X-Author for Excel, you must provide users with the proper permissions for accessing the managed solutions. Additionally, you must set field-level permissions on the App object that is created during the installation of the managed solution.
Assigning Users to Records in Microsoft Dynamics
Assigning users to the Solution is always controlled by Security Role Permission Setup. Solution in Microsoft Dynamics is used for installing your customization only. Applying security to a user has to be done through Security Roles. For example, Runtime user should be assigned with a Role which has user Level Permission to App Object (Entity) for Read, Write, Delete, Update, Assign, Append, and Append To.
User level roles make sure that user can only access apps created by them. Also a user can assign only their application to other users.
Designers must have access to a Role which has Organization level access to App Object with Read, Write, Assign, Delete, Append, and Append to. This implies that a Designer would have access to All Apps and can assign any app to any runtime users.
To assign a user to a specific record
- Go to Advanced Find > Query and in Look for, type Apps.
- From the Use Saved View drop-down list, select Active Apps.
- Click Results.
- Select an App.
- Click Assign in the fixed bar.
Assigning User Role Permissions in Microsoft Dynamics
You must assign the following permissions in the Microsoft Dynamics CRM to the roles of users who will use X-Author for Excel. Unless they have a System Administrator profile, users will not automatically have access to the package contents that are required to access X-Author functionality. The following permissions must be configured.
| Runtime Users | |
|---|---|
Create Tabs for X-Author for Excel in Dynamics CRM Navigate to Customizations > Customize the System > Entities > Click Display in Activities Menu | Apps |
Custom Entities permissions Settings > Security > Security Roles (Select an existing security role or create a new role and provide access to the following Custom Entities.) |
|
| Designer Users | |
|---|---|
Create Tabs for X-Author for Excel in Dynamics CRM Navigate to Customizations > Customize the System > Entities > Click Display in Activities Menu |
|
Custom Entities permissions Settings > Security > Security Roles (Select an existing security role or create a new role and provide access to the following Custom Entities.) |
|
