Download PDF
Download page Launching an X-Author for Excel App from Salesforce.
Launching an X-Author for Excel App from Salesforce
From a button on any page in Salesforce, users can launch an App that opens in Excel and automatically retrieves data from Salesforce. Depending on how this feature is configured, the flow can vary, but is essential as follows:
- The X-Author user clicks a button on any Salesforce page (that can accommodate a button).
- A new instance of Excel is opened and connects to Salesforce without any additional login required by the user.
- The App id specified in the button and (optionally) parent id are passed as parameters to the App.
- The App opens in Excel and executes the named or auto-execute Action Flow.
To implement this feature, perform the following steps in order.
- Configure Launch from Salesforce using a custom button or Excel App setup.
- Make your app launch-ready from Salesforce.
- Add an External ID to action flow query actions.
Any app configured to launch from Salesforce must have at least one Action Flow to execute when the app opens.
Configuring Launch from Salesforce
There are two ways to configure Launch from Salesforce by customizing the target (contextual) object.
Option 1: Create a custom button with a launch script (For Salesforce classic Users)
- Go to Setup > Create > Object > Buttons, Links, and Actions. (for standard objects, go to Customize > Object > Buttons Links, and Actions)
- Click New Button or Link.
- Enter the Label. Name is auto-populated.
- Enter the Description of the button to help users understand the button.
Select a Display Type for the button.
Display Type Description Detail Link Page To display the custom button as a link Detail Page Button To display the custom button as a detail button. For example, to display the custom button with Edit, Delete, Cancel, and Clone buttons. List Button To display the custom button as a list button. For example, to display the custom button with Merge Contacts, New, Add to Categories and so on. - Click the Behavior drop-down and select Execute JavaScript.
- Click the Content Source and select OnClick JavaScript.
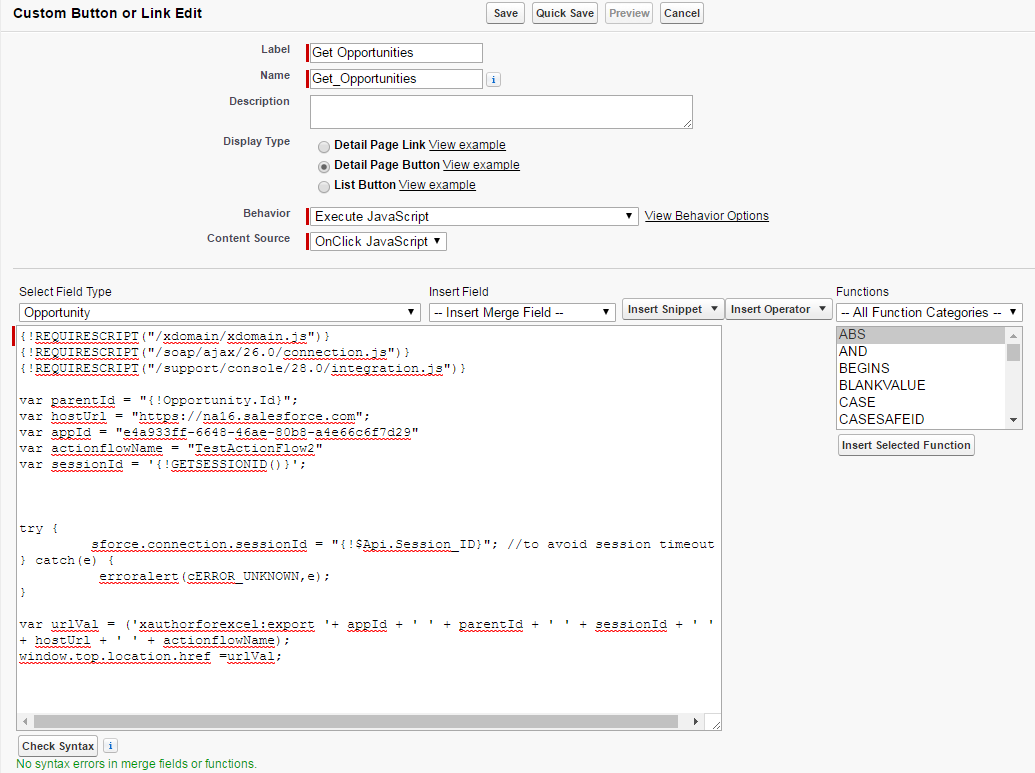
Enter the following JavaScript code in the Formula Editor:
Launch from Salesforce JavaScript Code (Customize)
{!REQUIRESCRIPT("/xdomain/xdomain.js")} {!REQUIRESCRIPT("/soap/ajax/26.0/connection.js")} {!REQUIRESCRIPT("/support/console/28.0/integration.js")} var parentId = "{!Opportunity.Id}"; var hostUrl = "https://na16.salesforce.com"; var appId = "e4a933ff-6648-46ae-80b8-a4e66c6f7d29" var actionflowName = "TestActionFlow2" var sessionId = '{!GETSESSIONID()}'; try { sforce.connection.sessionId = "{!$Api.Session_ID}"; //to avoid session timeout } catch(e) { erroralert(cERROR_UNKNOWN,e); } var urlVal = ('xauthorforexcel:export '+ appId + ' ' + parentId + ' ' + sessionId + ' ' + hostUrl + ' ' + actionflowName); window.top.location.href =urlVal;CODEChange the following in the above code to refer to your app and action flow:
parentId – id of the context object or related parent object where the button is placed.
hostURL– top domain name of the Salesforce URL
appId– App's unique id taken from any app record.
actionflowName– (Optional) Name of the action flow to execute when the App launches.

We recommend the use of a named action flow (actionflowName) when the same app with all its mappings needs to be launched from different object records. This prevents the need to clone copies of the same app and helps in better maintainability.
Click Check Syntax to verify that no errors have been made in the script.
- Click Save.
Option 2: Configure Excel App Setup (For Salesforce Classic and Lightning users)
There is no limit to the number of different Apps that can be launched from Salesforce. It could be a list of opportunities, or a list of opportunities or contacts for an account. You can place buttons anywhere Salesforce allows them to be located. X-Author for Excel provides a few sample buttons. To see an example, search for buttons from Salesforce Setup, then navigate to the Opportunity buttons, and locate the Edit in Excel button.
- Switch to the X-Author for Excel application from the Force.com App Menu or locate Apps using the + on the menu.
- Click the Apps tab.
Click the Excel App Setup button from the Apps list view. You will see a list of example Apps that come with the X-Author for Excel managed package.

Note
If the Excel App Setup button is not visible, you need to add it to your App page layout. Refer to Completing Setup for Designers for instructions.
- Enter a Name to describe the app you want to invoke (for example, if launching Contacts from the Accounts page, "Accounts and Contacts").
Click the Application drop-down and select the App to launch.
Note
Only activated apps are displayed in the picklist. Also, remember that a user cannot launch an app from Salesforce unless they have been assigned to the app.
- Click Save.
To create the Edit in Excel button on any standard or custom object
- Go to Setup > Build > Customize > Opportunities and select Buttons, Links and Actions.
- Click New Button or Link.
- Enter the Label. Name is auto-populated.
- Enter the Description of the button to help users understand the button.
Select a Display Type for the button.
Display Type Description Detail Link Page To display the custom button as a link Detail Page Button To display the custom button as a detail button. For example, to display the custom button with Edit, Delete, Cancel, and Clone buttons. List Button To display the custom button as a list button. For example, to display the custom button with Merge Contacts, New, Add to Categories and so on. - Select a Behavior. Click View Behavior Options to view the options of behavior.
- Select Custom Source.
Enter the following code into the Formula Editor:
/apex/Apttus_XApps__EditInExcelLaunch?parentRecordId={!Account.Id}&appName=<your_app_Name>CODEparentRecordId is the Id of the context object, and appName is the name you enter in the Edit in Excel table.
- Click Save. Don't forget to add the Edit in Excel button to the Salesforce page.
Making an App Launch-Ready from Salesforce
An app needs an Action Flow to be specified to automatically run when the app is launched. There are two ways to specify an Action Flow:
- Named Action Flow (from Option 1, above). Enter the name of the Action Flow from the App that you want to execute on launch by defining the actionflowName parameter. This is recommended when the same app is required to be launched from different object records.
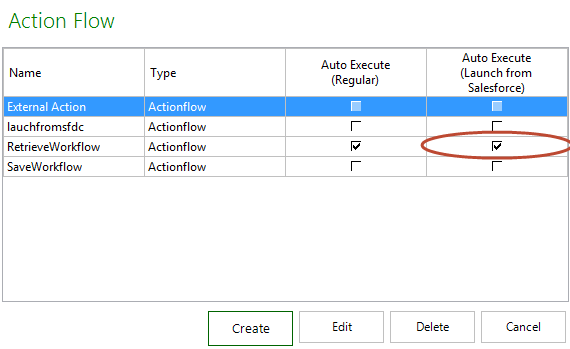
- Auto-Execute configuration from the App (Option 1 or 2, above). From the X-Author for Excel Designer ribbon in the app, click Action Flow. Click the check box for the correct action flow under "Auto-Execute (Launch from Salesforce") and save the app. Only one Action Flow can be selected.
Adding an External ID to the Query
If this is an App that has no parent, such as a list of opportunities, make sure the query has the appropriate hard coded filters to retrieve the records you want.
If this is a parent/child App, then the query requires a filter to identify the parent field. For example, if the button is on the Opportunity related list for Accounts, then the Account Id is the parent id that is passed as a parameter.
To add an External ID to a query
- Open the query that is retrieving the data.
- Add a filter as follows - this example uses Account/Opportunity but you should select the parent id field in the object that looks up to the parent.

Click Save and Save App.