In the previous scenarios, we have considered only one dimension that is quantity. However, it is possible to configure the PLI to have multiple dimensions.
Consider a case where you need to bill your customer based on the volume of the quantity consumed. The price for each volume tier varies as per the customer rating. In such a scenario, you need two dimensions, quantity and customer rating.
For example, the customer is billed at a flat rate based on the volume consumed for a product 'StarKit'. As per the customer rating, different flat rates are defined for each volume slab as per the following:
| Units | Customer Rating |
|---|
| Gold | Silver |
| 1 - 10 | 100 | 120 |
| 11 - 20 | 180 | 200 |
| 21 - 30 | 255 | 275 |
| 31 + | 480 | 500 |
Ensure that following prerequisites are satisfied:
- A field named Customer Rating on the Account object.
- New price dimension called Customer Rating created on the basis of the above field.
- A field named Customer Rating on the Usage Input object.
Steps:
PLI Configuration
- The first step is to configure the PLI for the Starkit. Set following values for the given fields.
Price Type= Usage
Frequency= Monthly
Price Method= Flat Price
Price UOM= Each - To enable a user to modify the usage tier, select Is Usage Tier Modifiable.
Apply Price Matrix
- From the Price List Item tabs, open the Matrices tab and click New to add a new Price Matrix.
- Select Matrix Type as Dimension.
On the Detail page, Dimension1 as Quantity and Dimension1Value Type as Range. Dimension2 as Customer Rating, and Dimension2Value Type as Discrete. Go to Matrix Detail and list the entries as
| Sequence | Quantity | Customer Rating | Adjustment Amount | Adjustment Type |
|---|
| 1 | 10 | Gold | 100 | Tier Price |
| 2 | 10 | Silver | 120 | Tier Price |
| 3 | 20 | Gold | 180 | Tier Price |
| 4 | 20 | Silver | 200 | Tier Price |
| 5 | 30 | Gold | 255 | Tier Price |
| 6 | 30 | Silver | 275 | Tier Price |
| 7 | 999999 | Gold | 480 | Tier Price |
| 8 | 999999 | Silver | 500 | Tier Price |
The tiered pricing for this product is inherited from the Price Matrix. After defining the tiered rates, click Save. The PLI configuration for a Usage product is complete.
Note
A usage product is always billed in Arrears. It is recommended that you set the Billing Rule to Bill In Arrears.
Create an order with this usage-based product. The product which is now an activated asset will have a Usage and a Billing Schedule generated automatically. Next, you should provide a Usage Input to record the usage quantity consumed within a specific duration.
Process Usage Input
Go to Usage Inputs object.
- Enter the Asset Number. This asset number must match with the corresponding asset number that you have specified in the Asset Line Item Detail page.
- Enter a Usage Date that corresponds with the Billing Schedule.
- Enter the Product UOM. This value should match the value provided on the Product PLI.
- Ensure that Status is Loaded.
- Enter the Quantity and click Save.
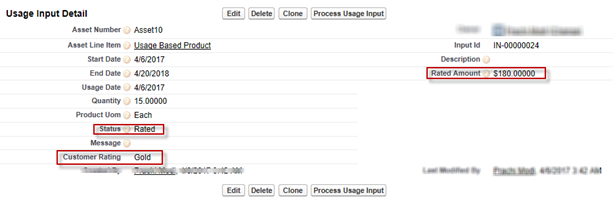
After saving the input, click Process Usage Input to process the amount against the entered quantity.
When the usage is processed successfully, the Status will change to Rated and you will see the amount under Rated Amount.
- For example, if you specify Quantity as 15 and Customer Rating as Gold, you will see the Rated Amount as $ 180.
- And if you specify Quantity as 15 and Customer Rating as Silver, you will see the Rated Amount as $ 200.
