Download PDF
Download page Working with the Cart.
Working with the Cart
Click the cart (![]() ) icon on the top right of the storefront, and then click the View Cart button to view the active cart. You can also go to the My Carts page and click the particular cart name link to view the active cart.
) icon on the top right of the storefront, and then click the View Cart button to view the active cart. You can also go to the My Carts page and click the particular cart name link to view the active cart.
New Cart
You can do one or more of the following from the new cart:
- View the complete list of selected products on the cart or from the mini cart
- Change the cart name: Click the pencil (
 ) icon and modify the cart name.
 - View cart status
- View cart summary
- Search for line items using the search bar.
- Clone the cart: Click the Clone Cart button to clone the new cart.
- Activate the Cart: Click the Activate Cart button to make the cart an active cart.
- Add products to the cart: Click the Add Products button to add more products to the cart.
- Add recommended products to the cart: If a recommendation rule is set for the product, you can see the Recommended Products tab next to the Details or Configuration tab that displays a list of recommended products, and you can add recommended products directly from the list.
By default, the recommended products feature is enabled. If you do not want to display the recommended products, disable the feature by setting the EnableProductRecommendation flag to false in the ConfigSystemProperties. Use the following API to disable the flag. For more information, click here.
PUT https://<URL_of_the_Instance>/api/revenue-admin/v1/flows/{flowname}/settings/ConfigSystemProperties
- Change quantities
- Change adjustment type and amount
- Change the start date and end date for Subscriptions
- Delete line item(s). For more information, see Deleting Primary Line Item(s).
- Configure fields on the cart details page in real time. For more information, see Configuring Cart Line Item Fields.
Add Contract Number to apply contract pricing. You can add up to 10 contract numbers.

- The implementer creates a contract price list and adds the Contract Number while creating a Contract Price List. (API reference)
- The implementer creates a contract price list item. For more information, see Creating a Price List Item. (API Reference)
- The user applies contract pricing at the cart level and adds the Contract Number while creating a Cart. Cart level contract pricing is not available with an out-of-the-box template. You need to implement it for the Cart Details page.
- The user applies contract pricing at the cart line item level and adds the Contract Number while creating a Cart Line Item.
- Navigate to the Product Details page: Click on the product name to go to the product details page and also update the configuration.
- View product-level price summary and totals
- View cart level price summary and total price
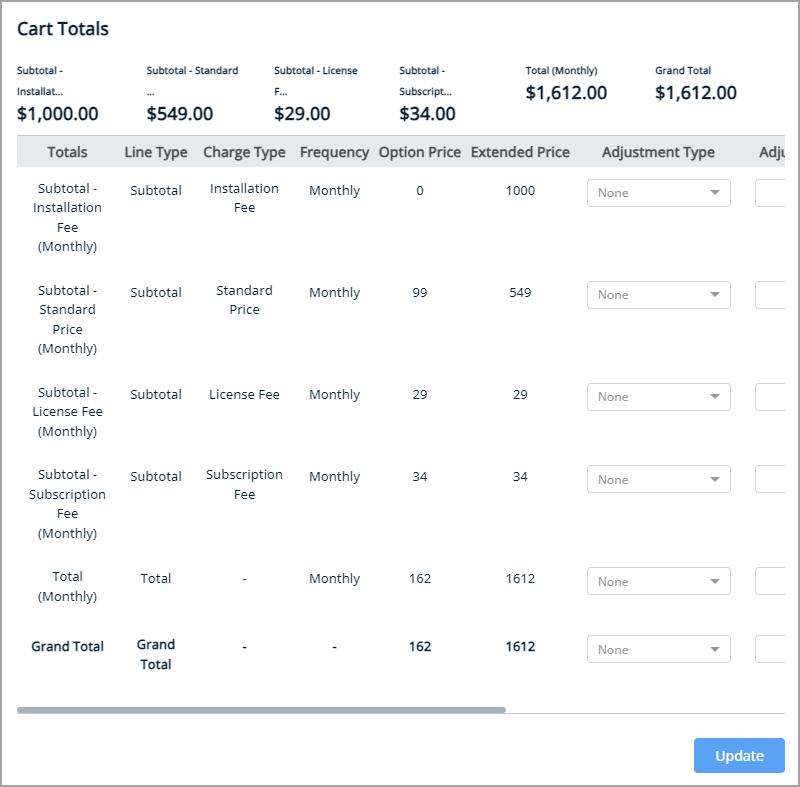
View cart level detailed breakup:
Click the View Details ( ) icon available next to the Total Price label. A Cart Total popup with the default columns is visible. While reviewing the details, you can also update the editable fields (for example, Charge Type, Frequency, Adjustment Type, Adjustment Amount, etc.) and click Update to update the pricing in the Price Summary section.
The implementer first sets up the flow and configures the column display (list and sequence of fields), and then passes the flow name to the default field DefaultFlow of the Storefront, which displays the required columns when you click the View Details icon. If you do not specify a flow name, the application will use System flow by default. The implementor can also set the field as editable while configuring the column display.
For more information on how to create Flow and configure columns, see Configuring the Flows and Configuring Column Settings.
- View/update configuration details: Click on the wrench icon (
 ) to view or update the product configuration.
 - Create a favorite configuration: Select a particular line item or all line items and use the Save as favorite option. For more information, see Managing Favorites.
- Apply promotions. For more information, see Applying Promotions.
- Request a quote
- If the quote is in the draft status, you can click the edit button from the Quote details page and add, delete, and modify the line items.
- Click Finalize & Submit to apply the changes to the cart and quote.
- Click Discard Changes if you do not want to apply your changes to the cart and quote.
- Place an order
- If the order is in the draft status, you can click the edit button from the Quote details page and add, delete, and modify the line items.
- Click Confirm Changes to apply the changes to the cart and order.
- Click Discard Changes if you do not want to apply your changes to the cart and order.
When you update any of the fields, the following API is used to reflect the changes and reprice the product and cart price. For more information, click here.
PATCH https://<URL_of_the_Instance>/api/cart/v1/carts/{cartId}/items
The following API is used when you delete any product. For more information, click here.
DELETE https://<URL_of_the_Instance>/api/cart/v1/carts/{Id}
Finalized Cart
You can do one or more of the following from the finalized cart:
- View the complete list of selected products on the cart
- Change the Cart name: Click the Pencil () icon and modify the Cart name.
- View cart summary
- Search for line items using the search bar.
- Use the Associate to link to review the Order or Quote record associated with the cart.
- View cart level price summary and total price
- View cart level detailed breakup: Click the View Details () icon available next to the Total Price label under the Price Summary section.
- Create a favorite configuration: Select a particular line item or all line items and use the Save as favorite option. For more information, see Managing Favorites.