A Save Action pushes Excel workbook data into your environment based on a Save Map.
To create a Save Action, you must have an existing Save Map.
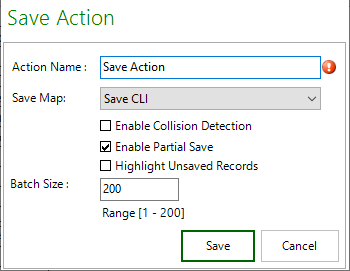
To create a Save Action
Click the lower section of the Actions button and select Save. A Save Action pop-up window is displayed.
In Action Name, type a name. Pick a descriptive name to identify each Save action you create.
From Save Map, select an existing save map.
Note
Consider the following optional settings:
Select the Enable Collision Detection check box to enforce collision detection during a Save Action. If another user has modified a field in a record subsequent to when that record was retrieved by the current Excel user and the current Excel user is trying to update that same field, then X-Author will prevent that record from being saved.
Select the Enable Partial Save check box to allow valid rows to be saved to your environment even if other rows have errors or other issues (for example, rows that cannot be saved due to collision detection). Deselecting this box will prevent all rows from being saved even if there is a single error.
Info
When a validation rule is configured in your org, the Enable Partial Save option is ineffective.
Select the Highlight Unsaved Records check box to highlight the cells or rows that have an error during a Save Action.
In Batch Size, enter the number to specify the batch size. You can Insert, Update, and Upsert the records based on the number entered in the batch size. The batch size must be between 1-200.