Download PDF
Download page Managing Report Settings.
Managing Report Settings
For any Agreement Explorer report (Agreement Search, Agreement Hierarchy or Agreement Hierarchy by Account(s)), the report results are determined by three main parameters:
- the Search Type (e.g., Agreement Search, Agreement Hierarchy or Agreement Hierarchy by Account(s))
- the individual Agreement Explorer report's Field Sets (sequenced columns displayed in the report)
- Agreement Explorer Filter Settings (displays report results based on simple or advanced expressions)
The following topic describes how to edit report settings after running any report for which you have access.
To edit the settings for any report
- Run the report.
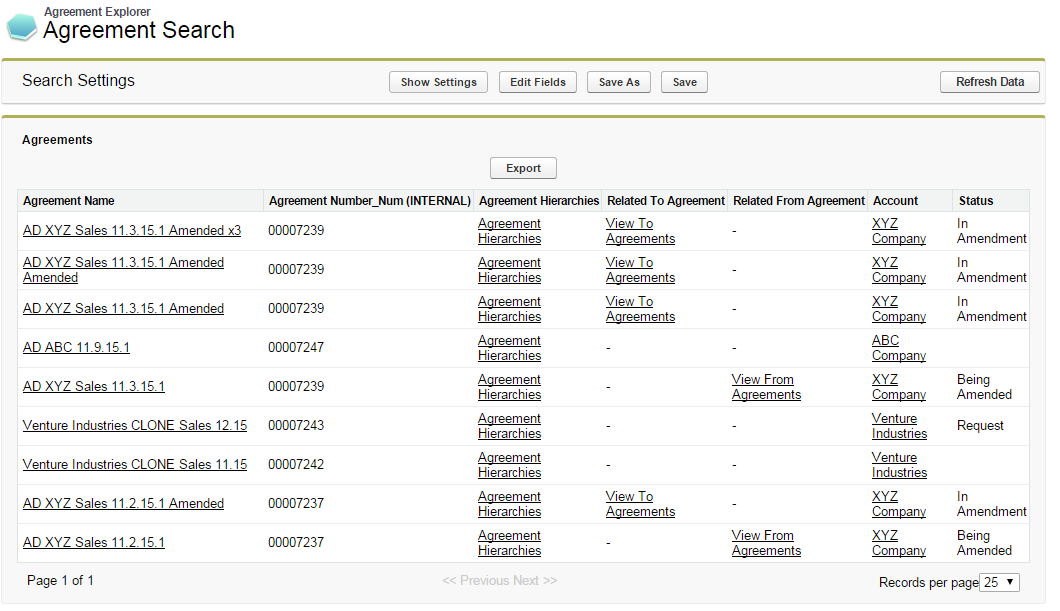
- Click Show Settings to expand the report settings section.
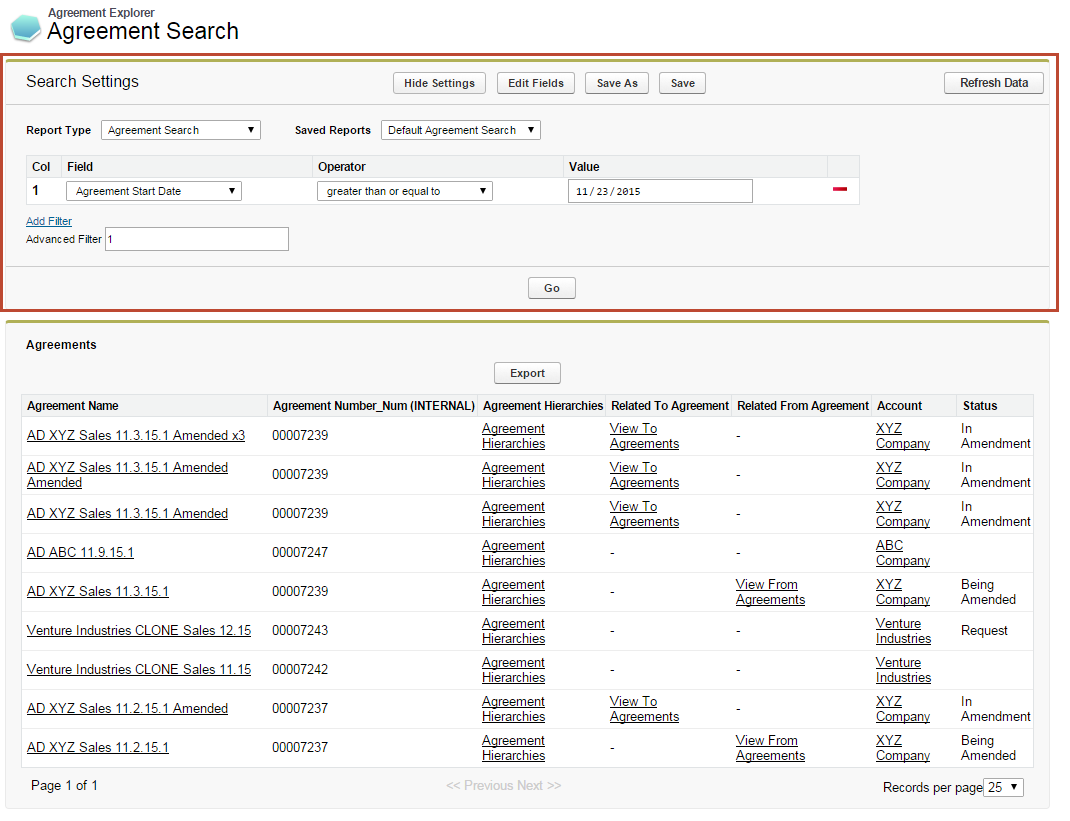
Use the following links to quickly jump to a task:
To Change the Saved Report Type
You can change the search settings to display results based on a different report type.
To Change the Report Type to Agreement Search
- Click on the Type drop-down menu and choose Agreement Search.

- Click Go. The report listing is refreshed to display a list of agreements according to the current filter settings and fieldsets defined for the report. Any agreement or account lookup field is removed from the settings view.
To Change the Report Type to Agreement
- Click on the Type drop-down menu and choose Agreement.

Search Settings are refreshed to display the Agreement Lookup field. - Click on the Agreement Lookup
 icon to display a lookup dialog for agreement records.
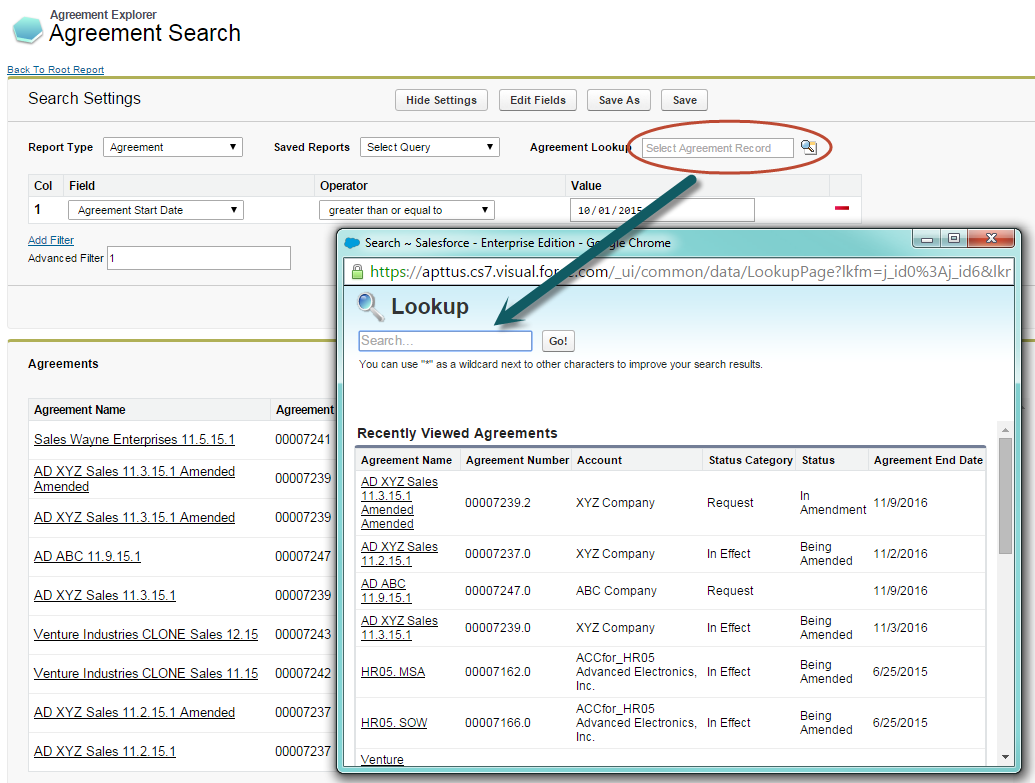
- Search for and click on an Agreement Name.
- Click Go. The report listing is refreshed to display a list of agreement records organized into a hierarchy according to the filter settings and fieldsets defined for the report. The specific record chosen in the previous step is highlighted in the list.
To change the report type to Agreement Hierarchy by Account(s)
- Click the Type drop-down menu and choose Agreement by Account(s).

Search Settings are refreshed to display an Account lookup field. - Click the Account Lookup
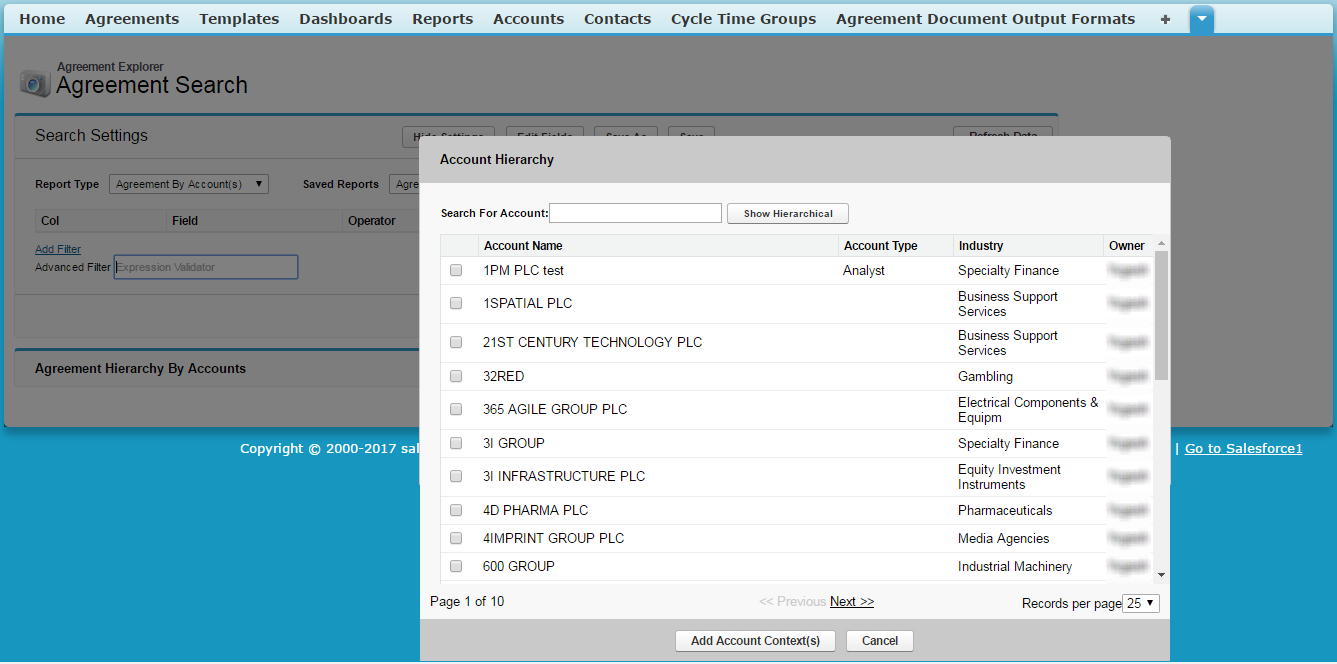
 icon to display a lookup dialog of accounts organized in a hierarchy.
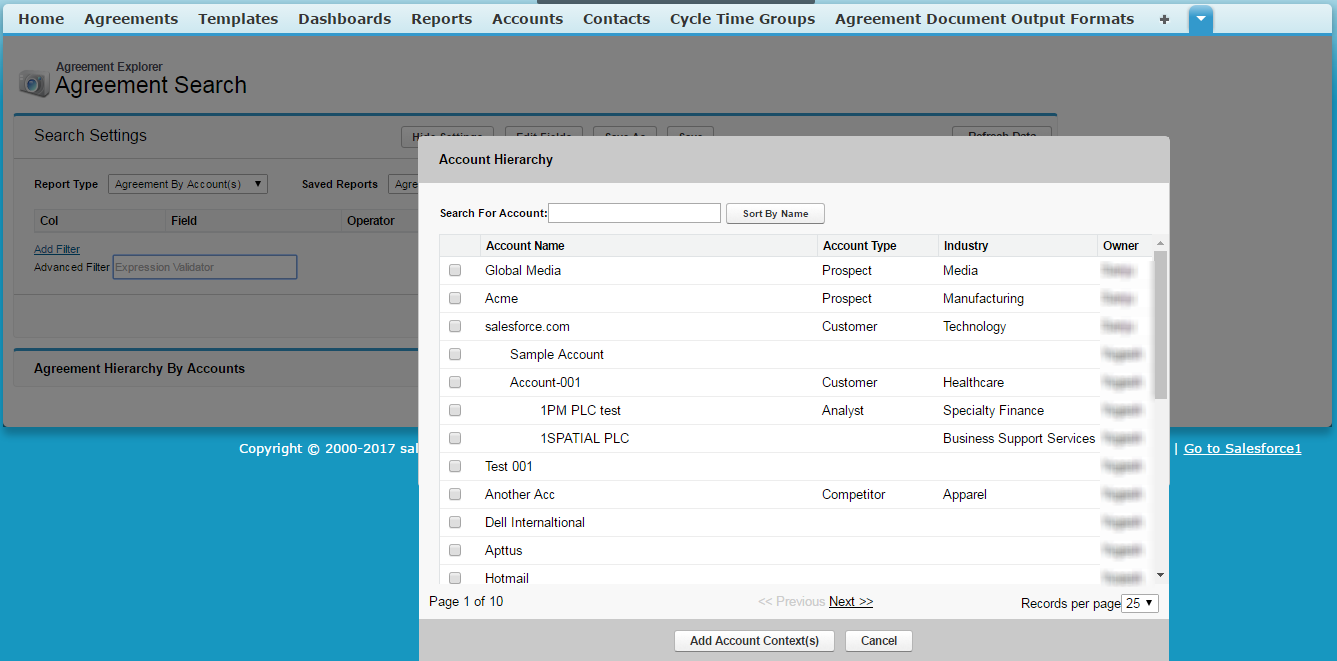
- Click Sort By Name toggle button (shown above), to view the alphabetical list of accounts in the Account Hierarchy window. To switch back to the hierarchy view, click Show Hierarchical button (shown below.)
- You can also search Agreement Accounts by searching the account name as a search string in the Search For Account field in the Account Hierarchy window. The result displays account names sorted alphabetically.
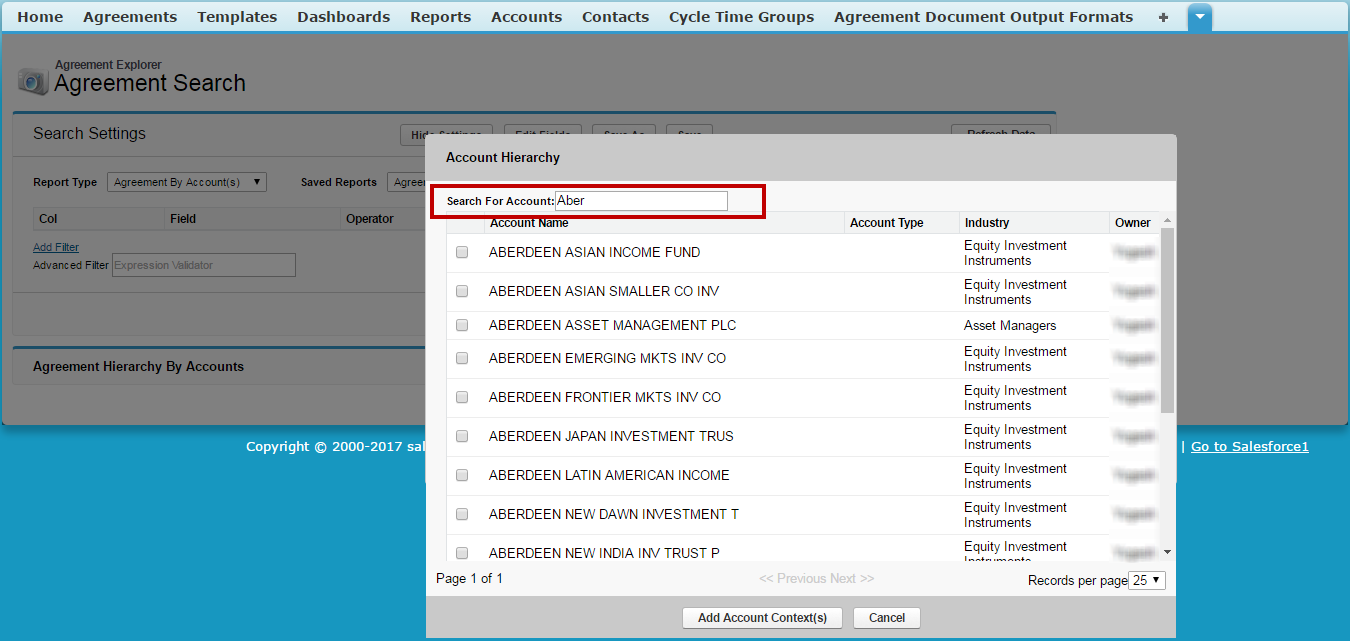
- Select one or more Accounts from the list and click Add Account Context(s).
- Click Go. The report listing is refreshed to display a hierarchy of agreements organized by the account(s) specified using the current filter and fieldsets defined for the report.
To run a saved Agreement Explorer report
You can edit report settings to change the type and choose an already saved report for that context. You have access to the following saved reports for any type:
- Public Agreement Explorer reports available to all users.
- Private Agreement Explorer reports you have created.
- Change the current Agreement Explorer context type as described in the previous section.
- Click the Saved Reports drop-down menu and choose a saved public or private report. Filters and fieldsets are changed based on saved settings for the selected report.

- Click Go. The report listing is refreshed to display an Agreement Explorer report that matches the chosen saved report.
To Edit Fields Displayed in a Report
You can Edit Fields from Agreement Explorer reports to modify the fields (columns) displayed in the report and expand or limit the actions that can be taken from report results. When you edit, add or remove fields in this way, you are creating a new FieldSet unique to the report which is displayed. The only field that is always required (and cannot be removed) is Agreement Name, because reports always display a list or hierarchy of agreement records.
FieldSets in Agreement Explorer reports are always defined explicitly for each report and change depending on settings for a specific report.
- From any report listing, click the Edit Fields button at the top of the page. The Edit Fields dialog is displayed, showing the current fieldset used for this report.
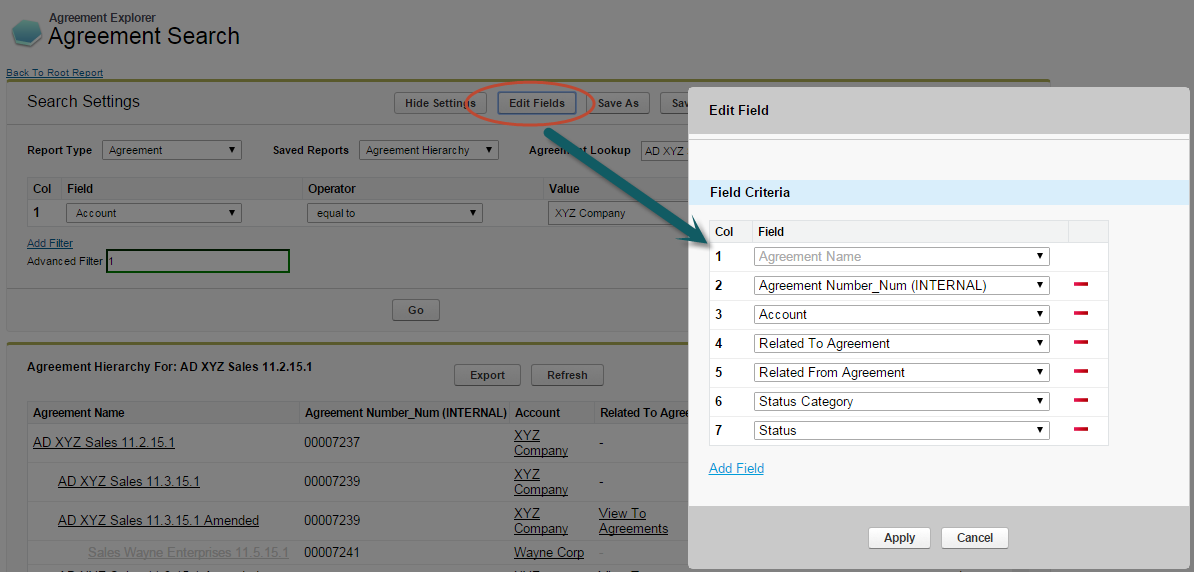
Individual fields are listed in sequence by column number. "Agreement Name" is always the first field in the fieldset and cannot be removed or reordered. - Use the drop-down menu to choose or change fields to add to the Fieldset. You can add any field which is a part of the Agreement or Account object, including any lookup fields from these objects.
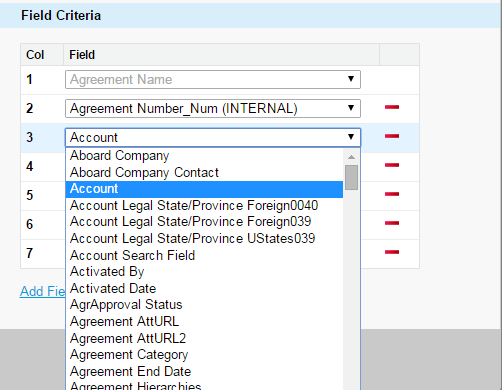
When you add certain fields to your Field Set, they enable you to take actions from the Agreement Explorer report listing, depending on the type of the report. The following table describes which actions you can take with these fields and defines which contexts use these fields:
Field Description of Action Agreement Explorer Context Type Agreement Name Click on Agreement Name to open the corresponding agreement record in a new tab. Agreement, Agreement Search, Agreement Hierarchy by Account(s) Account Click on Account name to open the corresponding account record in a new tab. Agreement, Agreement Search, Agreement Hierarchy by Account(s) Related TO Agreement Click View To Agreements to change the report view to a list of agreement records related to the agreement of context. Agreement, Agreement Search, Agreement Hierarchy by Account(s) Related FROM Agreement Click View From Agreements to change the report view to a list of agreement records related from the agreement of context. Agreement, Agreement Search, Agreement Hierarchy by Account(s) Agreement Hierarchy Click on Agreement Hierarchies to navigate to the default Agreement Hierarchy report for the agreement of context. Agreement Search
Click Add Field at the end of the Field Set to add another field. Click the
 button to remove a field from the FieldSet. Field Sets for Agreement Explorer reports can have a maximum of 24 fields.
Although Agreement Explorer report FieldSets can have up to 24 fields, only the first 12 fields can be displayed in the Agreement Explorer listing. When you export a report to an Excel spreadsheet, all fields and any data they contain are displayed. Keep this in mind when planning the sequence of fields in your Fieldset.
- Click Apply to save the changes to your report Fieldset.
- Click Go to execute the report using your modified Fieldset.
To Change Filter Settings for a Report
Agreement Explorer report results can be constrained through the use of Filter Sets defined for any given report. When you first run an Agreement Explorer report, the report listing is displayed based on the defined Filter Set. You can change these Filter settings to return specific results based on a set of expressions you build.
- Click Show Settings if the Search Settings are not already visible.

Any already existing Filter Sets are displayed in this section. Define or change Filter Sets to filter the report based on the criteria you specify.
Field Description Field Choose a field from an alphabetical list of fields available for the Object (including lookup fields). For example, if you want to filter the agreement records where Agreement Name contains "MSA," select Agreement Name from this drop-down list. Operator Choose an operator based on the data type for the field you selected. In the example above, you would choose "contains."
Datatype Operator Account lookup equal to; not equal to Date, Number, Currency equal to; not equal to; greater than; less than; greater than or equal to; less than or equal to Text starts with; equal to; not equal to; contains; does not contain Value Enter the value to be met for the condition expression. In the example above, you would enter "MSA." - Click Add Filter to create additional expressions to add to the Filter set. Click
 to remove an expression.
 Choose an option from Filter for to define the logic used in the Filter set.
Filter for Filter logic used All AND Any OR Advanced Advanced expression which can use either logic By default, all Filter Sets use AND logic. Choose Advanced if you want to apply more than one type of logic to your filter. For example, if you have 3 Filter Sets and but you want to make only 1 of the first 2 required, you would manually change the expression to "(1 or 2) AND 3."
- When you are finished configuring the Filter Set, click Go to run the report using your modified Filter conditions.
To Refresh Agreement Data for a Report
Because the Agreement Explorer uses data stored in the most recent cache for the Agreement object, you may find that more recently created agreement records are not listed in your reports. If you are uncertain how recently agreement data was updated from the backend or want to include agreement records that were just created, use the Refresh Data button in Report Settings to refresh the data pool extracted from object tables in the database.
- Click Show Settings to display Search Settings.
- Click Refresh Data.

Return to the Agreement Explorer tab or Agreement or Account record and run the report.
Alternatively, the Contract Management administrator can schedule a job using the Apex Scheduler to refresh data such as agreement hierarchy and account hierarchy. For more information, see Schedule Jobs to Refresh Agreement Data.
To save Edits to report settings
When you edit report settings, you can run reports in an ad hoc fashion without saving any changes to the existing report by changing settings as described in the previous sections. Agreement Explorer also gives you the option to save edits you have made to an existing report, or to save edits as a new report.
- Add, remove or change Filter settings for the report, including changing the context type of the report.
- Add, remove or change the order of Field Sets for the report.
- Click Go to run the report using any new Filter or Field Set settings.
- Click Save to save your changes. Settings are changed for the existing report. You can only save changes to an existing report if you own the report (private).
- Click Save as to save your changes as a new Agreement Explorer report.
- Make changes as needed in the Save Report dialog box.
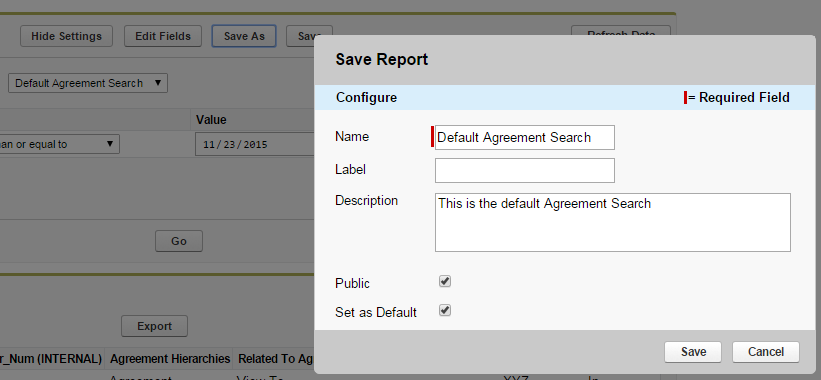
- Click Save. A new Agreement Explorer report is created using the new report settings and the details you specified.
- Make changes as needed in the Save Report dialog box.