This page contains instructions for creating a new agreement or clause templates when Template Versioning is enabled. For instructions on creating templates without versioning, see Creating New Agreement Templates (Pre-FX2 Format) in this guide.
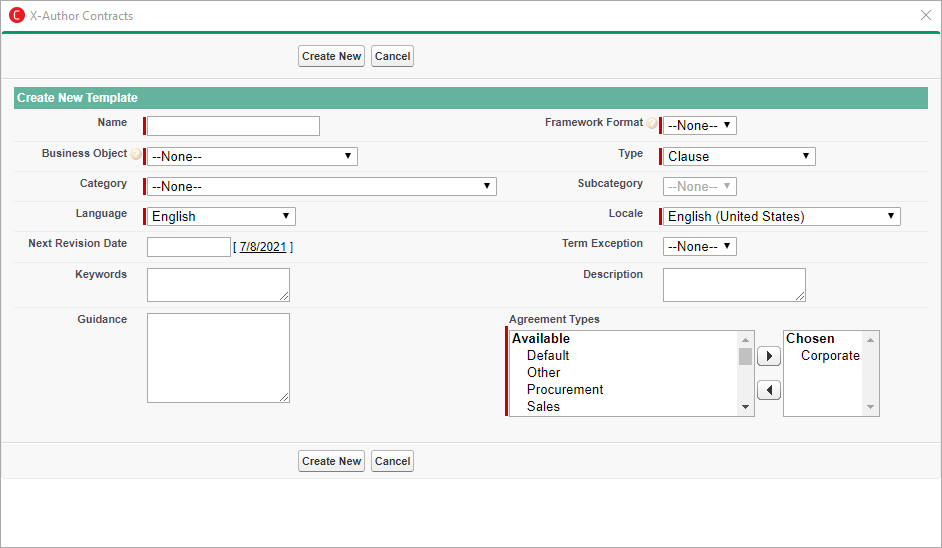
From the X-Author Templates tab, click New. The Create New Template dialog is displayed.
Enter values in the fields provided as described in the following table (fields marked in red are required):
Field
Description
Name
Give the template a meaningful name according to its agreement type.
Framework Format
Choose the format of your template (FX2 or Pre-FX2)
Business Object
Choose the valid business context (for contracts, "Agreement")
Type
Choose the type of template to create (e.g. "Clause" or "Agreement").
Category
Choose the administrator-defined category.
Subcategory
Choose the administrator-defined subcategory based on the chosen category.
Language
Choose the default template language.
Locale
Choose the default template locale.
Next Revision Date
Identify a date for the next revision of the template.
Term Exception
Use the lookup to search for an choose a Term Exception to apply to the template.
Keywords
Enter comma-separated keywords to associate with the template. Can be used as tags with Document Finder.
Description
Enter a description for the template.
Guidance
Enter guidance to help users determine the purpose of the template.
Agreement Types
Choose which Agreement Types are valid for this template. Use the arrow buttons to determine available agreement types.
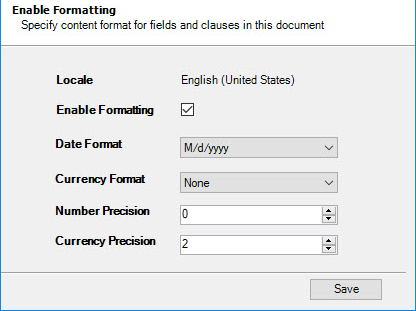
Click Create New. This opens the enable formatting dialog box.
From the Enable Formatting dialog, configure the following fields to enable formatting:
Field Name
Description
Enable Formatting
Select this checkbox to enable locale formatting at the template and field level for your template. This allows you to define locale settings for Currency, Number, Percent and Date formats.
Optional: Specify the following fields when "Enable Formatting" is selected to modify locale formatting.
Date Format
Select an option from the drop-down to choose the default format for all the Date fields in your template.
Currency Format
Select an option from the drop-down to choose the format for all the Currency fields in the template. Choose "None" to only display Currency field values in generated documents.
Number Precision
Enter a number to define the precision for Number/Percent field values in your template (e.g., "2" if the Number/Percent field should display two digits following the decimal point.)
Currency Precision
Enter a number to define the precision for Currency field values in Your template (e.g., "2" if the Currency field should display two digits following the decimal point.)
The template is created in the system and flagged as transient.
Note: Only the header information is captured. You must check in the template to create a version.