Download PDF
Download page Creating Apps with Quick Apps.
Creating Apps with Quick Apps
Prerequisite
Before you can create an app, you must connect to your environment instance that is configured for X-Author for Excel. For information on configuring and connecting to your environment, refer to Getting Started with X-Author for Excel.
Use the Quick App wizard when you need to create a simple single object list on its own (for example, Opportunities) or a list filtered by a parent object (for example, Opportunities by Account).
The Quick App produces a complete, ready to run app that includes:
- Two objects (maximum).
- One Display Map, one Save Map, two Action Flows (Data Retrieve and Save), and two User Menus (Retrieve and Save). No additional components are available. The Quick App functionality equates to the X-Author Essentials license. A Quick App can be edited using the Quick App editing function but if a Quick App is opened and customized using the full Designer, it can no longer be an X-Author Essentials app.
Follow the step-by-step instructions in the next two sections to create either a single-object or parent-child Quick App.
To create a Single Object app
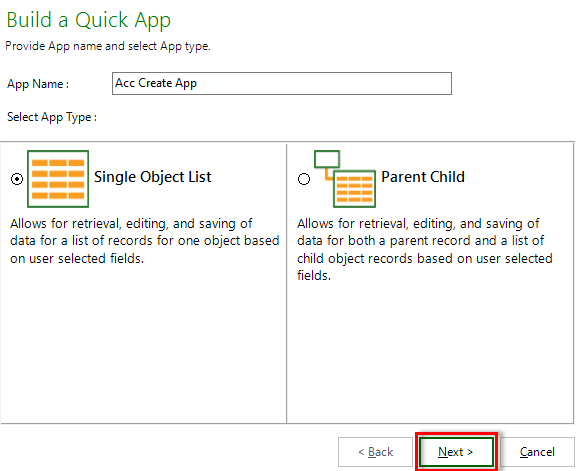
- Click Quick App and select New.

The Build a Quick App window opens. Type the application name in the App Name field. Use only English characters for the app name. Non English characters are not supported as they impact import/export operations, offline capability and more.

Give your app a name that is concise but also summarizes the basic purpose of the app.
- Click the Single Object List radio button and then click Next. The Build a Quick App page opens.
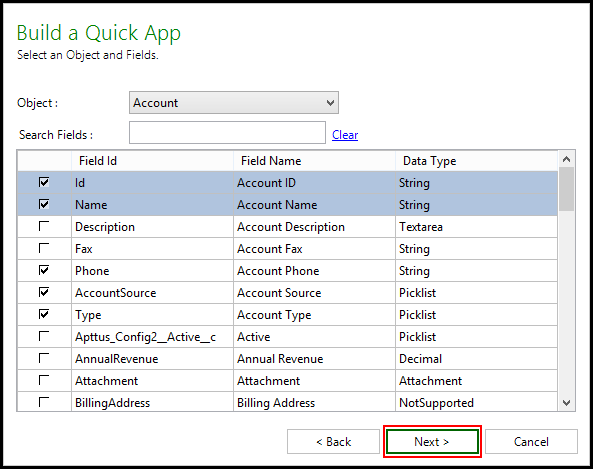
Click the Object drop-down menu and select an object. The Select Fields section will display the fields associated with the object.
- Click the check box next to the fields you want to include in your app. (Notice that the two primary fields of the object are selected by default.)
You can search for fields using the Search Fields search box. Click Clear to clear the search terms and view the full list.
- Click Next.
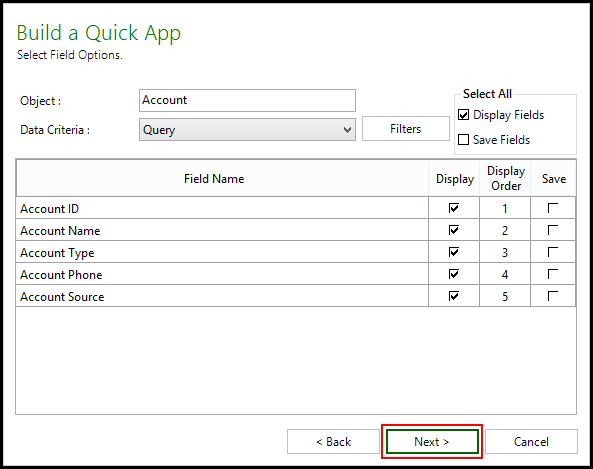
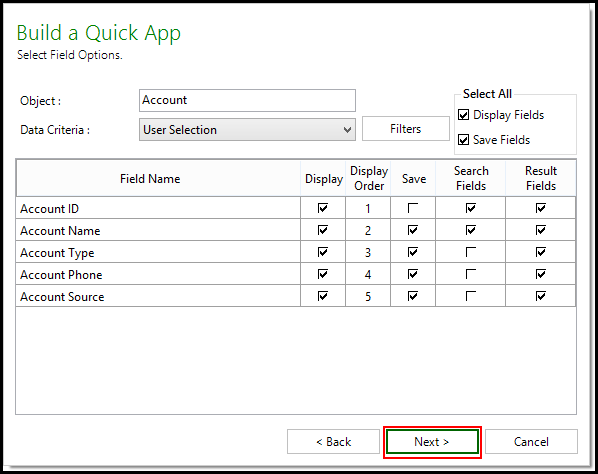
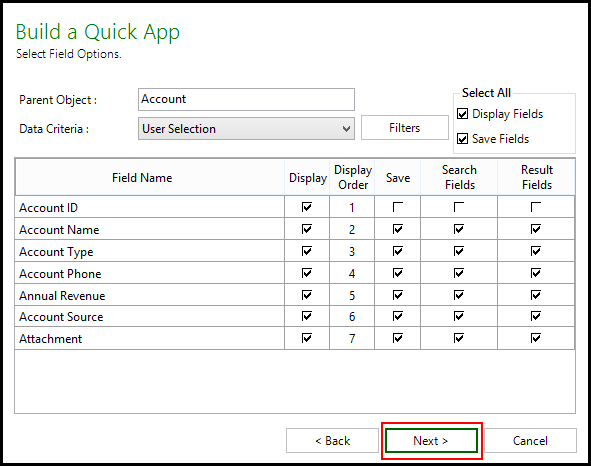
The Select Field Options window opens, displaying the fields that you selected in the previous step. - Select from the options in the following table.
| Column | Description |
|---|---|
| Data Criteria | Select the method you would like to use to retrieve data.
|
| Select All | |
| Display Fields | Click this check box to include all object fields in the Display Map. |
| Save Fields | Click this check box to include all object fields in the Save Map. This check box is inactive unless Display Fields is checked. |
| Grid Columns | |
| Display | Click this check box to include this field's data in the data retrieved from your environment and displayed in the Excel workbook. |
| Display Order | This represents the order, left to right, that fields will be displayed in. Click in the cell to edit the order. |
| Save | Click this check box to allow users to change the data in these cells in the Excel workbook and then save those changes to your environment. Note: Fields that are not Display fields cannot be Save fields. |
| Search Fields | This field appears only when the Data Criteria is set to User Selection. Click this check box to add a runtime search filter for this field. These filters will be used to limit the type of records returned when the runtime user retrieves data. For example, might make Billing Country a Search field so that you can retrieve data from only those accounts who have a billing address in Canada. You must select at least one field, and ID fields are not searchable. |
| Result Fields | Click this check box to display this field in the search results when retrieving and filtering data from your environment. This field appears only when the Data Criteria is set to User Selection. You must select at least one field and ID fields cannot be used. |
As shown in the following images, the displayed columns will vary based on the Data Criteria you select.
| Selecting Field Options with Query Data Criteria |
 |
| Selecting Field Options with User Selection Data Criteria |
 |
8. To add a filter to the data, click Filters. Complete the fields described in the following table to build your filter.
| Field | Description |
|---|---|
| Object and Field | Click the lookup icon You cannot type the field name in the text field. |
| Value Type | Select the value type from the drop-down menu. The value types change based on the field or object selected. • Input—Select this value to allow users to type in a value to search for. For example, if the field is Account ID, you might choose to let them type or paste the account ID in the filter at runtime. • Static—Select this value to prevent users from changing the Value field at runtime. • System Variable—Select this value to specify a system variable, such as CurrentUser or CurrentDate, as the filter value. • User Input—Select this value to allow users to change the Value field at runtime. |
| Operator | Select a relational operator from the drop-down menu. • Equals—The field value is equal to the specified value. • Not equal to—The field value is not equal to the specified value. • Starts with—The field value begins with the specified value. • Contains—The field value contains the specified value string. • Not contains—The field does not contain the specified value string. • In—The field value is in the specified list of hard-return-separated values. • Not In—The field value is in the specified list of hard-return-separated values. |
| Value | Type the comparison value in this field or select the value from the drop-down menu. Your options will vary depending on the type of field you are filtering on. |
| Click this button to delete a filter row. |
| Add Row | Click this button to add a new filter row. |
| Clear All | Click this button to remove all filter rows. |
| Add Filter Logic | Click this button to display the Filter Logic field and define the Boolean logic used to relate filters. For example, you might want display results only when all of your filter conditions are met or you might want to display results when any filter conditions are met. You can use filter logic to do this. Filter logic in X-Author for Excel works the same as it does in your environment. Important In Microsoft Dynamics, define filter logic within brackets. Example: (1 OR 2), ((1 AND 2) OR 3), ((1 OR 2) AND 3) |
9. Click Save.
10. Click Next.
11. On Provide App Settings page, provide requisite information as described in the table.
| Field | Description |
|---|---|
| Enable App Launch from Source CRM (Salesforce, Microsoft Dynamics, Apttus Omni) | Select this check box to allow users to open this X-Author app from within your environment (as well as from within Excel). |
| Worksheet Title | Type the title of the Excel worksheet. The title appears in the top row of the worksheet. |
| Max Column Width | Type the maximum width of an Excel column (in characters). |
| View Gridlines | Select this check box to display the gridlines in the Excel worksheet. |
| Display Filters | Clear this check box if you do not want the filters that you created to appear in the Excel worksheet. |
| Group Label | Type the ribbon menu group name. This value appears beneath the buttons in the X-Author for Excel ribbon tab. |
| Retrieve Data Button Label | Type the text you want to appear on the ribbon menu button used for data retrieval. |
| Save Data Button Label | Type the text you want to appear on the ribbon menu button used for saving data to the environment database. |
| Enable Add Row | Select this check box to allow users to add rows to the Excel worksheet. This option could be used to add records to the workbook so those records can be uploaded to your environment. |
| Enable Delete Row | Select this check box to allow users to delete rows from the Excel worksheet. |
12. Click Finish.
An App has been created with all design functions complete. You can now Preview the app, run the app, or use X-Author Designer to make additional modifications.
To create a Parent Child app
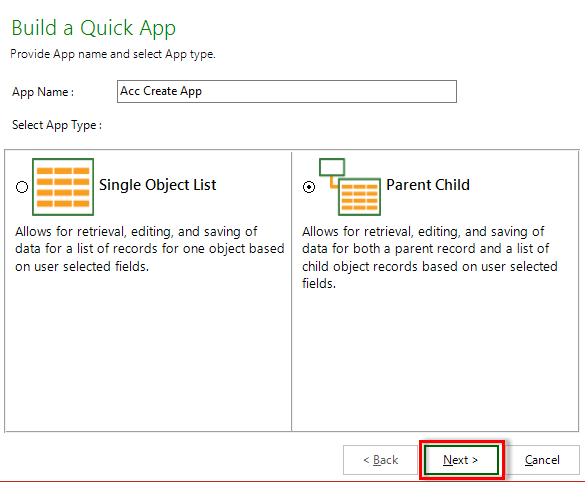
- Click Quick App and select New.
The Build a Quick App window opens. Type the application name in the App Name field. Use only English characters for the app name. Non English characters are not supported as they impact import/export operations, offline capability and more.
Give your app a name that is concise but also summarizes the basic purpose of the app.
- Click the Parent Child radio button and then click Next. The Build a Quick App page opens.
Click the Object drop-down menu and select an object. The Select Fields section will display the fields associated with the object.
- Click the check box next to the fields you want to include in your app. (Notice that the two primary fields of the object are selected by default)
You can search for fields using the Search Fields search box. Click Clear to clear search terms and view the full list.
- Click Next. The Select Field Options window opens, displaying the fields that you selected in the previous step.
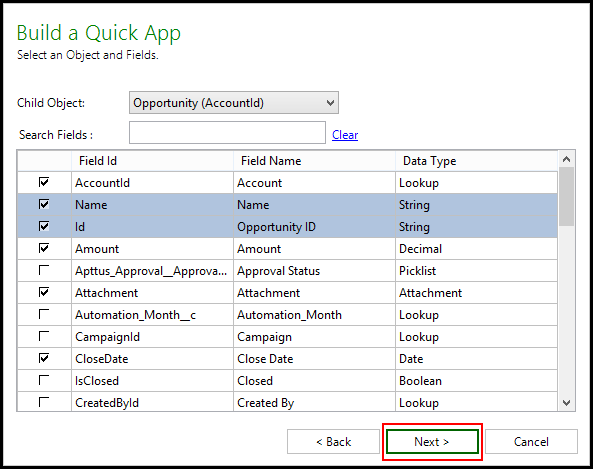
- Select the Child Object and the fields that you want to include in your app.
As shown in the following images, the displayed columns will vary based on the Data Criteria you select.
Selecting Field Options with Query Data Criteria 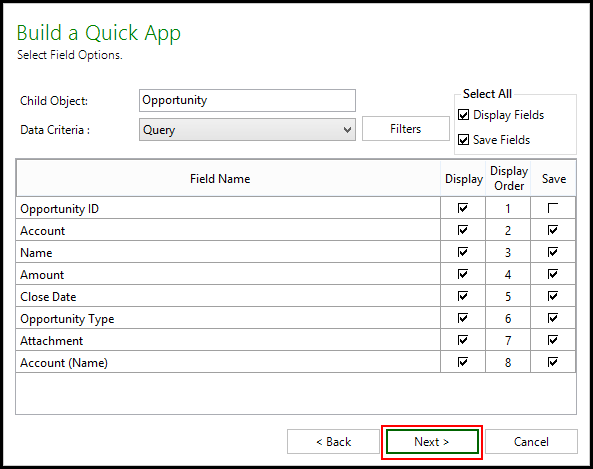
Selecting Field Options with User Selection Data Criteria - Select from the options in the following table.
Column Description Data Criteria Select the method you would like to use to retrieve data. Query—Select this method to have the query automatically run, based on your app's predetermined search filters, and retrieve the data without user intervention. User Selection—Select this method to allow users to apply search filter criteria before retrieving data. Select All Display Fields Click this check box to include all object fields in the Display Map. Save Fields Click this check box to include all object fields in the Save Map.
Note: This check box is inactive unless Display Fields is checked.Grid Columns Display Click this check box to include this field's data in the data retrieved from your environment and displayed in the Excel workbook. Display Order This represents the order, left to right, that fields will be displayed. Click in the cell to edit the order. Save Click this check box to allow users to change the data in these cells in the Excel workbook and then save those changes to your environment.

Fields that are not Display fields cannot be Save fields.
Search Fields This field appears only when the Data Criteria is set to User Selection. Click this check box to add a runtime search filter for this field. These filters will be used to limit the type of records returned when the runtime user retrieves data. For example, might make Billing Country a Search field so that you can retrieve data from only those accounts who have a billing address in Canada.
You must select at least one field, and ID fields are not searchable.
Result Fields This field appears only when the Data Criteria is set to User Selection. Click this check box to display this field in the search results when retrieving and filtering data from your environment.
You must select at least one field and ID fields cannot be used.
To add a filter to the data, click Filters.
Complete the fields described in the following table to build your filter.Field Description Object and Field Click the lookup icon
 to select the object and field that you want the filter to apply to.
You cannot type the field name in the text field.
Value Type Select the value type from the drop-down menu. The value types change based on the field or object selected.
• Input—Select this value to allow users to type in a value to search for. For example, if the field is Account ID, you might choose to let them type or paste the account ID in the filter at runtime.
• Static—Select this value to prevent users from changing the Value field at runtime.
• System Variable—Select this value to specify a system variable, such as CurrentUser or CurrentDate, as the filter value.
• User Input—Select this value to allow users to change the Value field at runtime.Operator Select a relational operator from the drop-down menu.
• Equals—The field value is equal to the specified value.
• Not equal to—The field value is not equal to the specified value.
• Starts with—The field value begins with the specified value.
• Contains—The field value contains the specified value string.
• Not contains—The field does not contain the specified value string.
• In—The field value is in the specified list of hard-return-separated values.
• Not In—The field value is in the specified list of hard-return-separated values.Value Type the comparison value in this field or select the value from the drop-down menu. Your options will vary depending on the type of field you are filtering on. 
Click this button to delete a filter row. Add Row Click this button to add a new filter row. Clear All Click this button to remove all filter rows.
Add Filter Logic Click this button to display the Filter Logic field and define the Boolean logic used to relate filters. For example, you might want display results only when all of your filter conditions are met or you might want to display results when any filter conditions are met. You can use filter logic to do this. Filter logic in X-Author for Excel works the same as it does in your environment.
Important
In Microsoft Dynamics, define filter logic within brackets. Example: (1 OR 2), ((1 AND 2) OR 3), ((1 OR 2) AND 3)
- Click Save.
- Click Next.
On Provide App Settings page, provide requisite information as described in the table.
Field Description Enable App Launch from Source CRM (Salesforce, Microsoft Dynamics, Apttus Omni)
Select this check box to allow users to open this X-Author app from within your environment (as well as from within Excel). Enable for Google Sheets Select this check box to allow users to open this X-Author app from within the Google Sheets application (as well as from within Excel). Worksheet Title Type the title of the Excel worksheet. The title appears in the top row of the worksheet. Max Column Width Type the maximum width of an Excel column (in characters). View Gridlines Select this check box to display the gridlines in the Excel worksheet. Display Filters Clear this check box if you do not want the filters that you created to appear in the Excel worksheet. Group Label Type the ribbon menu group name. This value appears beneath the buttons in the X-Author for Excel ribbon tab. Retrieve Data Button Label Type the text you want to appear on the ribbon menu button used for data retrieval. Save Data Button Label Type the text you want to appear on the ribbon menu button used for saving data to the database. Enable Add Row Select this check box to allow users to add rows to the Excel worksheet. This option could be used to add records to the workbook so those records can be uploaded to your environment. Enable Delete Row Select this check box to allow users to delete rows from the Excel worksheet. Click Finish.
An app has been created with all design functions complete. You can now Preview the app, run the app, or use X-Author Designer to make additional modifications.